Building a DSLR Camera Trap: Part 1 – Design Elements

A DSLR camera trap offers a number of advantages over typical consumer-grade trail cameras. These include higher quality photos, more lens options, flexibility in lighting options, flexibility in triggering mechanisms, and a slew of camera settings which enable the skilled to capture compelling photos. This post is a first in a series on building a DSLR camera trap. Specifically, this post will focus on: the reasons for and against building a DSLR camera trap; an overview of the key logical elements in a camera trap setup; and finally, an example of components we have used successfully in the field. Future posts will cover: building a highly ruggedized housing for the camera and external flash units; and customizing the firmware in a commercially available PIR detector.
Why Build a DSLR Camera Trap
Modern consumer trail cameras are very good, and are getting better with every generation. They are relatively inexpensive, rugged, small, light-weight, reliable, with easy to replace batteries and very good user interfaces. The biggest reason to venture from these into the DSLR space is to get even better photographs.
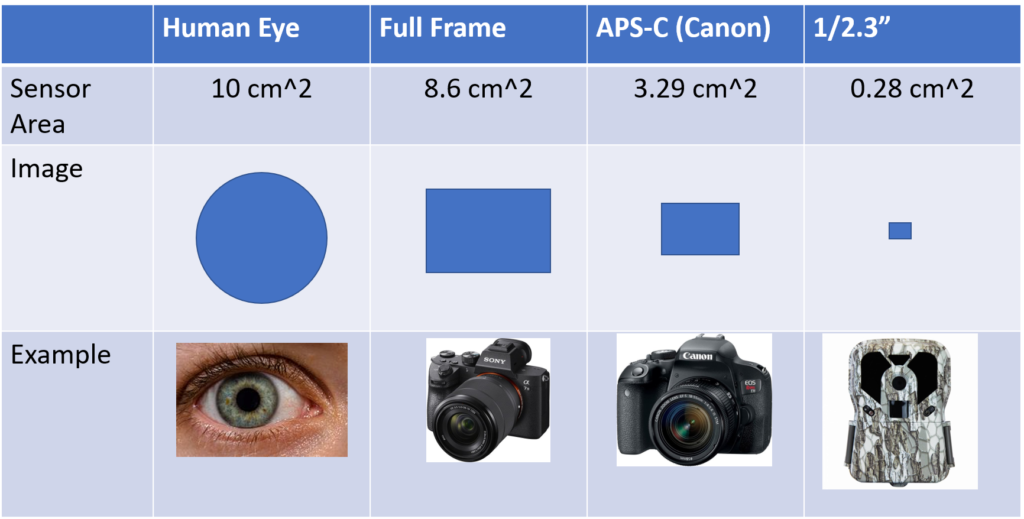
The foundation for getting better photos is getting more light. APC-C or the even larger “Full Frame” image sensors typically used in DSLR cameras are ~12-25x larger than sensors found in a typical trail camera. These larger sensors gather more light, and can thus take clearer, faster photos. Full frame cameras approach the light gathering area of the human eye.
Historically, high end digital cameras have followed the evolution of the “Single Lens Reflex” (SLR) camera design. Here, a movable mirror allows the photographer to look directly through the same optical path that will be captured on film. Early Digital Single Lens Reflex (DSLR) cameras replaced the film with a high quality electro-optic image sensors. As display technology has improved, high end cameras are now moving to “mirrorless” systems. This simplifies the optical path and reduces product size and weight. For camera trapping, the newer “mirrorless” designs remove the “click” created in a DSLR when an actuator flips the mirror out of the optical path. In this post, I will simply use the term DSLR camera to refer to “true” DSLRs as well as the newer “mirrorless” designs.
In addition to larger image sensors, DSLR cameras offer the creative photographer more control over camera settings. The most important of these are aperture (to control the depth of field), and shutter speed (to capture fast or slow animal motion). There are a host of other settings available, as well.
Finally, with access to the raw signal from a trigger (PIR) sensor, it is possible to control the scene lighting with remote flashes to create dramatic photographs. A visible xenon flash occurs quickly enough to freeze motion. With separate lighting, one can target the animal from the sides, thus eliminating red-eye and creating a 3D effect, as in the case of the racoon below. Flashes can be effective in highlighting detail even in the daylight, as illustrated by the photo of the great blue heron, below. The possibilities are limited only by the imagination and skill of the photographer. See References for other examples on the web.


Why Not to Build a DSLR Camera Trap
DSLR camera traps can take spectacular photos, but they are not without their shortcomings:
- Typical DSLR camera traps are larger and heavier than commercial trail cameras. Larger image sensors require larger optics, which require larger cameras, and larger and heavier cases to hold the cameras and other elements.
- DSLR cameras can quickly become very expensive. This makes leaving them in the woods more financially risky. Alternatively, one could place several standard trail cameras out for the cost of a single DSLR set, increasing the likelihood of finding something very good, vs. a lower chance of getting something spectacular with a DSLR.
- Separate lighting is great, but adds additional boxes to the setup. This takes more time, and increases the chance for error in the field. Also, without major surgery, typical DSLR cameras operate in the visual light spectrum only, so DSLR cameras require visible lighting. This can spook some animals, and will definitely make the camera more visible to people who might be in the area.
- DSLR camera traps usually contain a number of repurposed components, each with it’s own setup interface and it’s own set of batteries. It’s up to you to make sure all the batteries work, and all the settings are consistent with the setup you want.
- With great creative flexibility comes great responsibility to correctly predict where, and under what conditions the animal will appear in the scene, and to choose the camera settings necessary to get the perfect shot.
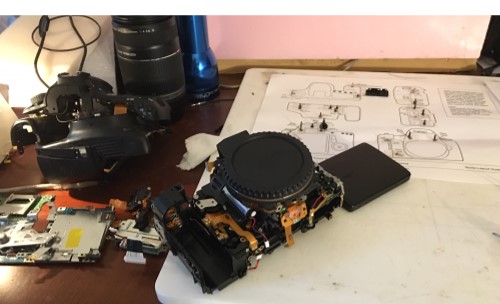
- And then there’s water. Or bears. Or ants. Or whatever else happens while the camera is in the field. Building robust enclosures that are able to protect the delicate and expensive camera from the elements is non-trivial. I have taken each of our two Canon60D cameras apart to repair several times after water or moisture has gotten into early versions of our DSLR camera trap. I’ve been lucky so far, and have not permanently damaged any cameras, but water incursion has ruined a couple of battery packs, an SB28 flash unit, and a PIR trigger sensor. Its’ a very bad day when you open your DSLR camera trap up expecting to find great pictures, but instead watch in horror as water pours out of the case.
If you don’t have have a hankering for DIY electronic and mechanical projects, don’t despair. There are several sources online for “off-the-shelf” DSLR camera trap “kits” and systems. I include a couple in the references.
In any case, one needs to approach a DSLR camera trap project as a learning experience. With the attitude that “mistakes will be made”, let us now explore the key design elements of a DSLR trail camera.
DSLR Camera Trap Design Elements
The diagram below shows the key elements of a DSLR camera trap. We’ll look at these in more detail, before providing concrete examples components I use in our setup in the next section.
Of course, a DSLR camera trap also requires enclosures for the camera and the flash units, but I’ll get to that in a later post. For now, let’s look focus on the active design elements in a DSLR setup.
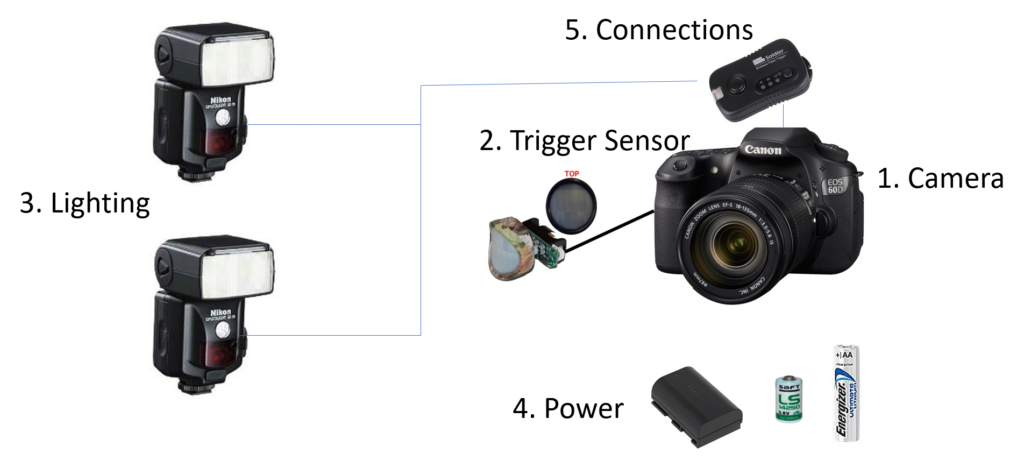
Camera
The critical design element. Ideally this is a camera with an APC-C or Full Frame sensor. For remote operations, the camera should have a very low-power “standby” mode which can be exited quickly (less than second) to take a picture. The easiest way to trigger the camera is with a remote shutter release — typically a three-contact 1/8″ plug. USB, WiFI, BlueTooth remotes are the trend, and can do more than just take a picture, but are less useful for camera traps. They are harder to connect to a PIR trigger, and may consume significant power, even while idle. Ideally, camera should be serviceable (see previous photo), in case something goes wrong.
The camera need not be “state of the art” or new. Especially for first systems, buying an older, used, or refurbished camera makes a lot of sense.
Trigger Sensor
Typically based on the same PIR (Passive InfraRed) technology used in consumer trail cameras. Coupled with a fresnel lens array, a two-element sensor detects changes in heat patterns in its field of view, creating an output signal. This signal is interpreted by a low power microcontroller which in turn generates the signals necessary for the remote shutter release. Writing your own firmware for this microcontroller can give additional control over the camera set — e.g. by allowing you to take bursts of photos. Other types of trigger sensors are an intriguing option for the DSLR camera trap. In an upcoming post, for example, I will describe my experience camera trapping bats using an acoustic trigger sensor.
Lighting
Lighting: If you want to use your camera in the dark, or want to enable dramatic daytime lighting, you will need some sort of external flash units. Like the camera, these flash units should have a very low power standby mode which can be exited very quickly. Standalone visible-light xenon flashes are typical solution here, but LEDs could be another option.
Connections
A DSLR camera trap needs some way for the camera to trigger the flash units. These connections can be via wires, or via wireless transmitter/receiver pairs. Using wires adds to the waterproofing challenge and gives you a set of wires to manage (bury or hide) in the field. On the other hand, wires don’t require batteries. Wireless systems offer easy and flexible setup in the field, but require energy, and therefore batteries to operate the radio units.
Power
Each of these elements (with exception of wires) must be supplied with electricity. Remote flash units require their own sources of power. Even within a camera enclosure, the camera and the trigger sensor are likely to require different voltage power supplies, and therefore different batteries.
DSLR Camera Trap Design Example
The diagram below is shows the specific “off the shelf” equipment we use in our current version of DSLR camera trap.
This setup hews closely to ones used by Denis Callet (see references). These are far from the only choices available. Extensions are limited by your imagination, technical talent, time, and (of course) budget. Typical variants range from adding larger and/or rechargeable battery packs, to using different manufacturers, to building alternate (or remote) trigger sensors.
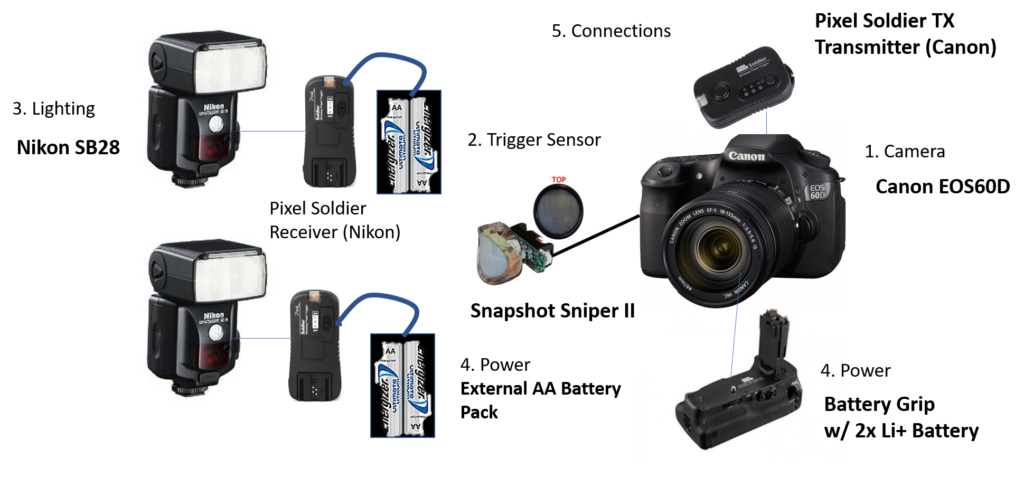
Camera
I use a Canon EOS60D DSLR camera with an 18 MPixel, APS-C (Canon) image sensor. This camera was new in 2010 and is no longer in production, having been replaced by newer models. However, used 60D’s are readily available at a fraction of a cost of current new models. Lens’s are also readily available. The 60D has very low power standby mode, allowing it to remain in the field, waiting, for weeks or months, while still waking immediately to take a photo. Though long out of warranty, this camera is very serviceable when using excellent on-line resources.
Trigger Sensor
I use the Snapshot Sniper II PIR sensor (see references). This unit fits in a 1″ hole in a case. It includes a fresnel lens array as well as a PIR detector, ultra low power PicAxe microcontroller, and 14250 3.4V Lithium battery. In several years of deployment, I have not yet had to replace one of these batteries. The unit ships with a factory version of camera-specific firmware. You can also customize the firmware using the (free) PicAxe software development toolkit. The SSII connects to the camera via a short cable and into the 1/8″ remote shutter release jack in the 60D.
Lighting
I use Nikon SB-28 flash units. As with the camera, these are no longer in production, but can be found readily online. These units can be manually programmed through a set of small buttons and an LCD screen. They have a standby mode which consumes very little power. The SB28 requires slightly longer to come out of standby vs. the camera, but once in active mode can produce a series of flashes in quick succession. It uses 4-AA batteries, works well with NiMH rechargeable cells, and at 1/4 intensity, can last for more than 1,000 flashes. Repair manual available online (see References).
Power
The Canon60D requires a nominal 8.1V power supply, typically provided by single BM-LPE6N Li Ion battery. I use an external “Grip” attachment for the 60D which holds two of the LPE6N batteries — thus doubling the energy capacity. I find that these two batteries last for months in the field on standby, and many hundreds of photos.
Connections
I use a wireless product, the PixelSoldier line, to trigger the flashes remotely. This greatly simplifies field setup, since there are no wires to hide or bury. The range of the wireless transmitter is in the 10’s of feet, allowing almost any practical lighting setup. The transmitter fits directly on the “shoe” of the camera, and is powered by a CR2032 coin cell, which lasts for many thousands of triggers.
The receivers attach directly to the flash units via the “shoe” connector. They come with slots for 2 AAA batteries, however, since the receiver draws power even while idle, I added an external AA battery pack. Two AA LiFeS2 batteries (see related post: Are My New Batteries Really New?) provides about 2-weeks of operation. Unfortunately, these units do no support NiMH rechargeable cells (voltage is too low). In our setup, since I use a Canon camera and Nikon flashes, and since Canon and Nikon have different “shoe” connectors, I ended up buying the Canon version of the transmitter, and the Nikon version of the receivers. It was necessary to buy complete sets of each. I use the extra parts for other wireless projects.
Up Next
Hopefully this first post servers as good introduction to the DSLR camera trap. In future posts in this series, I will cover: enclosures and water proofing techniques; the PIR trigger sensor and how to customize the firmware. Let me know in the comments which you’d like to see first, or if there are other topics you’d like to see in this series. Please share any feedback based on your own DSLR camera trap projects, as well.
References
- Tim Torrell’s page on Facebook: For examples of the power of DSLR camera traps to create dramatic photos in the hands of a professional photographer.
- Denis Callet: Professional photographer, user, and builder of DSLR camera traps.
- Canon60D Repair Videos: Bob Hosea’s video opus on the disassembly and re-assembly of the Canon60D is (IMO) the best of its kind on the internet. Maybe you won’t need these, but maybe you will.
- Cognisys Inc. : Commercial supplier of off-the-shelf enclosures, flash units, and trigger controllers for DSLR camera traps
- Camtraptions: Commercial supplier of off-the-shelf equipment for building DSLR camera traps
- Snapshot Sniper: Maker of components for homebrew and DSLR camera traps, including the SnapshotSniper II PIR Detector referenced in this post
- Nikon SB-25 and SB-28 Repair Manuals: Available for $6.99 USD each. Be warned, the SB-28 manual refers to the SB-25 manual for disassembly instructions. If you don’t need the SB28-specific parts list, just get the SB-25 manual.
Appendix A: Flash Enclosure Details
Here are some details on the waterproof flash enclosure I built to hold the SB28 flash, wireless receiver, and larger battery pack. There are still a few things I’m not happy with. For example, this flash enclosure requires a phillips head screw driver to open, which can be cumbersome in the field. You have been warned!
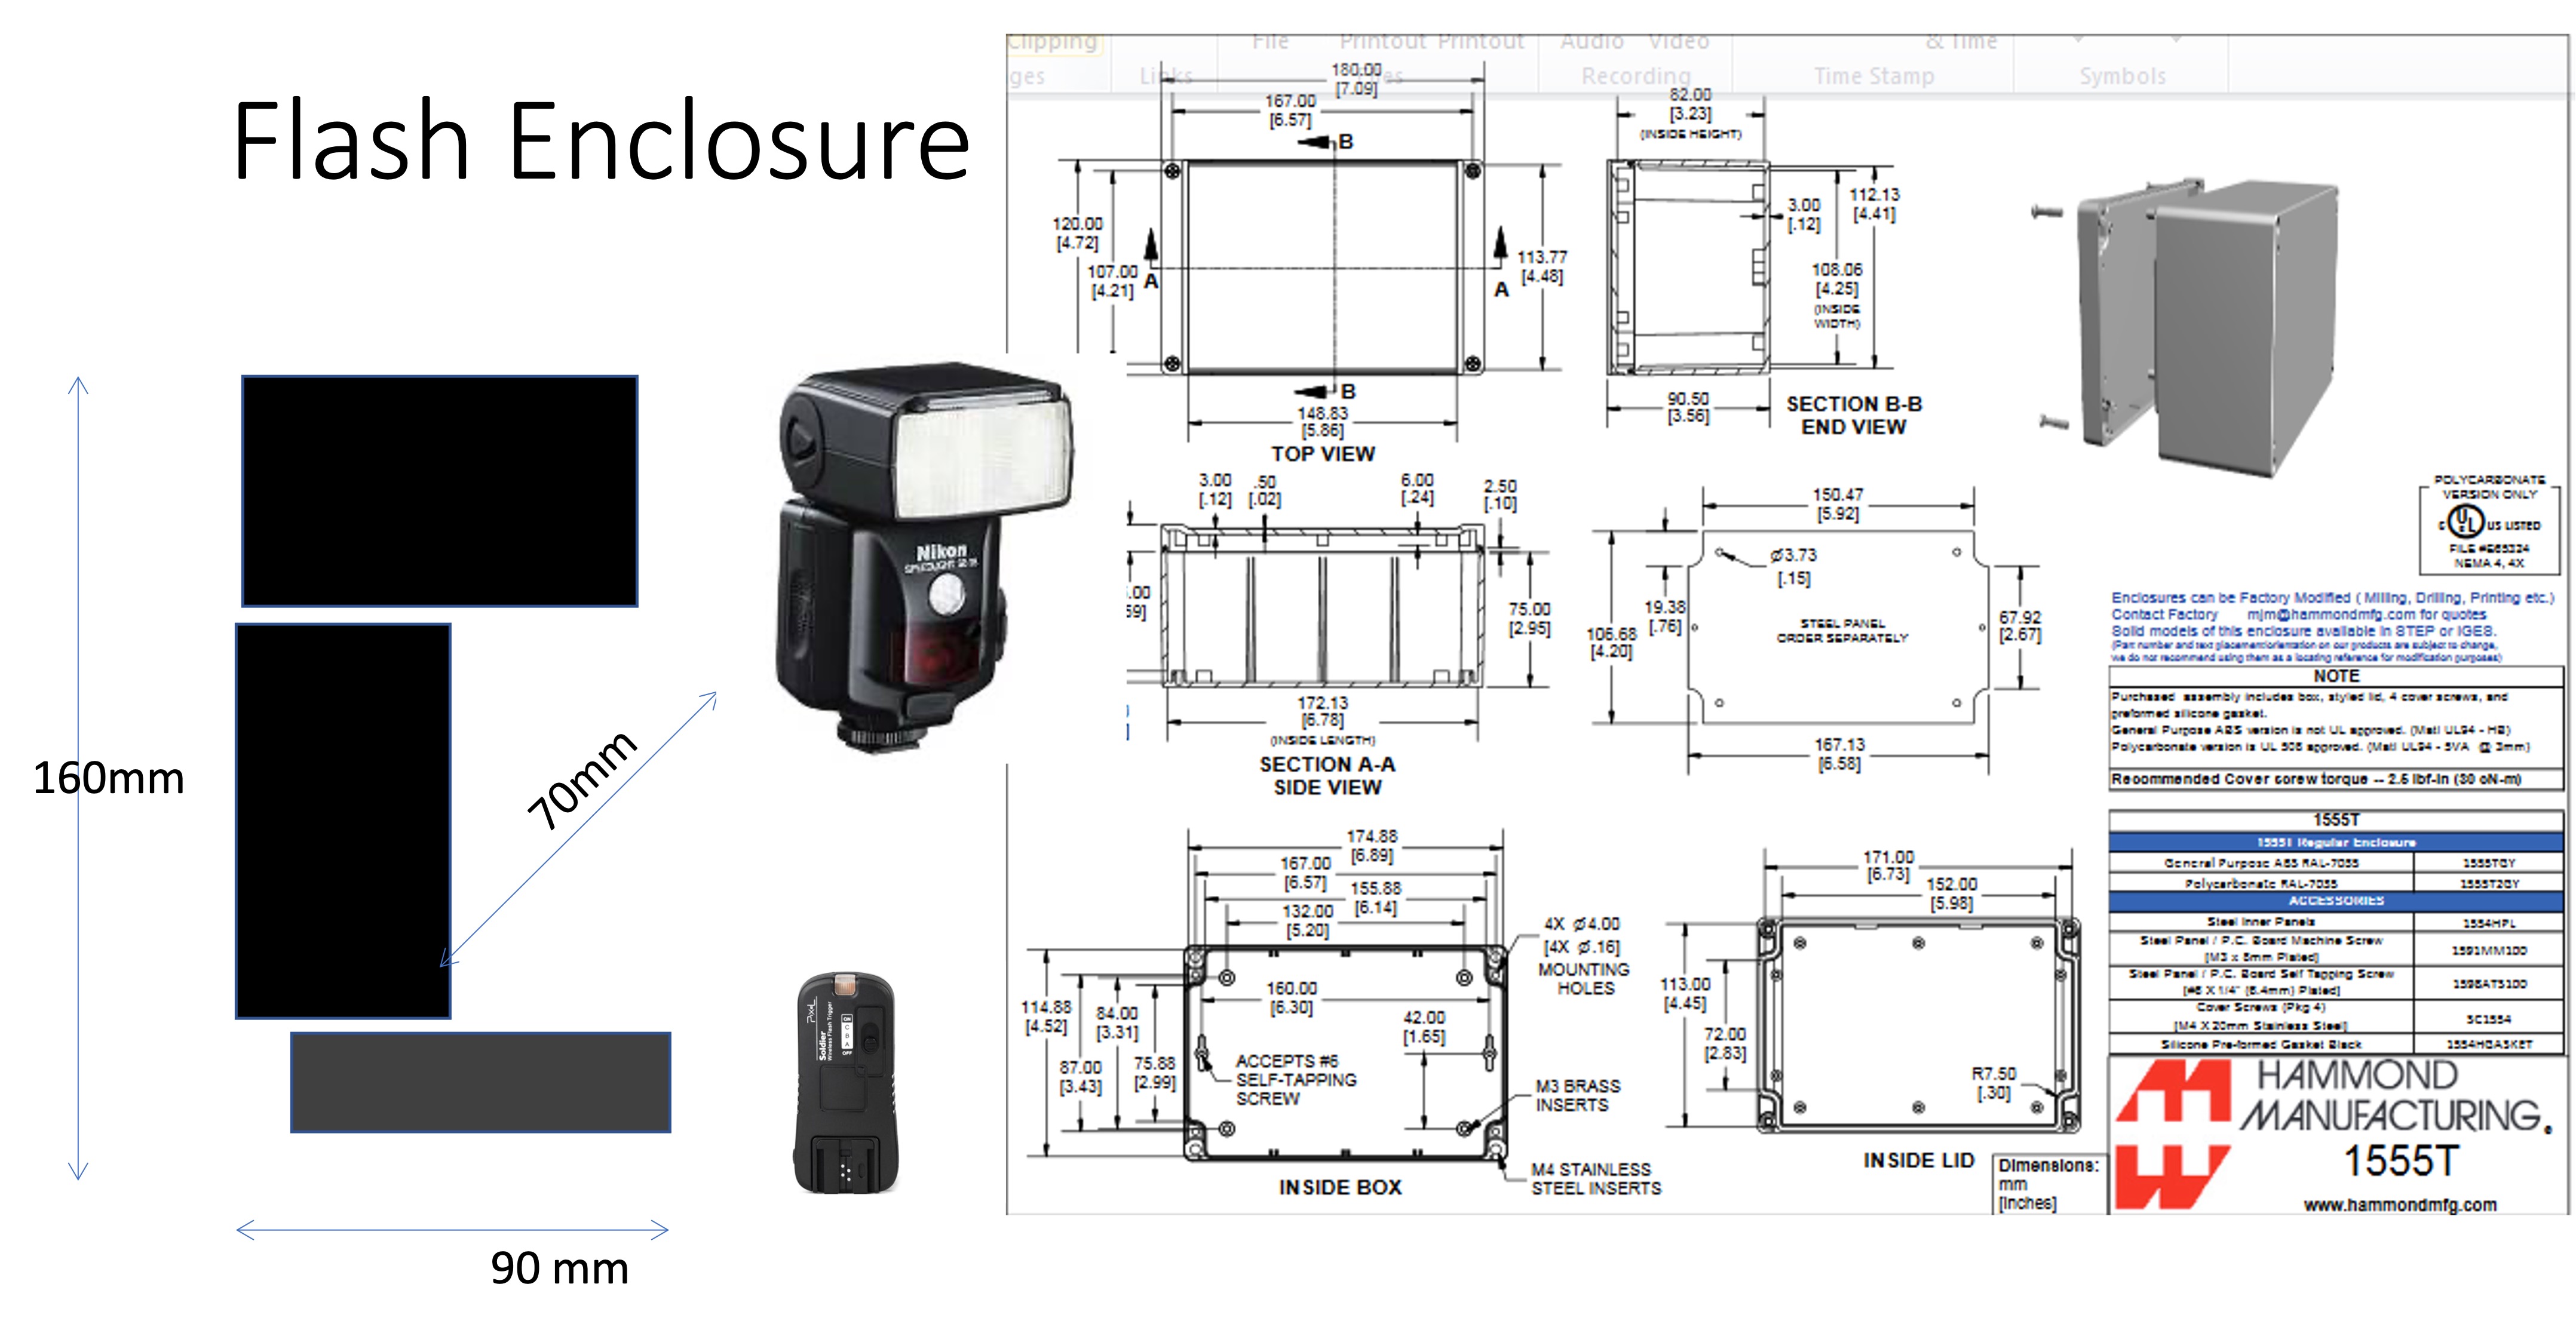
- the base box is a plastic waterproof electronic box from Hammond — Model 1555T
- the SB28 flash, attached to the wireless Pixel Soldier receiver, fits in this box if the flash unit is bent forward all the way.
- I drilled a hole for a 1/4″ screw (with washer) to hold down the flash unit in the box
- I cut a rectangular window in the side for the flash to get out 🙂 — I covered the hole with a thin piece of plexiglass that I epoxied into place (a couple of times before I finally got a waterproof fit)
- I drilled a pair of holes in the back side of the case (opposite the cover) for a sturdy U-bolt — with bolts on either side of both ends of the U to hold it securely to the box. In the field, we thread a cable lock through the U-bolt, and lash the unit to something sturdy
- I modified the Pixel Soldier receiver so that it uses an external 2-AA battery pack (vs. the 2-AAA internal battery compartment). The two AA’s keep the receiver on standby for 2-3 weeks (depending on temperature) — almost 2x of the AAA battery life.
- Janet made a nice camouflage cover for these units out of a double layer of camo-net, which wraps around the whole box and closes with velcro

Looks to be a bit more than I want to tackle! Having the electrical aptitude certainly is a plus. Article was very good in helping me understand the equipment requirements.
Building DSLR camera traps definitely favors the electro-mechanically inclined! Still, the results can be gratifying for all. Just as gratifying are the continual improvements in commercial camera traps. Thanks for reading, commenting.
Updated to include URLs for Nikon SB-28/SB-25 Flash repair manuals. See updated “References” section.
Hi Bob, why a DSLR as opposed to a mirrorless? I would expect a mirrorless would have weight and power advantages.
Yeah — I struggled a little here with terminology. In earlier versions of the post, I used a generic term, like “high end camera” (or maybe “large sensor camera”), vs. the more specific (and now technically dated) “DSLR”. Through the review process here are WBWL, we decided, though, that “DSLR” is a better known term, and therefore likely to attract more search traffic 🙂 Over time, the more modern “mirrorless” cameras are the way to go, for sure. When I chose the components for the pair of cameras we use (now a couple years back) the mirrorless cameras were all new, and quite expensive vs. the used 60D. I notice now that there are some very good used mirrorless cams out there in the same price range (a couple to few $ hundred) as the used DSLRs. Before using a particular camera (DSLR or mirrorless), you need to check for the availability of a low power standby mode, and an easily accessible remote shutter release interface. Thanks for commenting. Hope all well.
Pingback:Camera Trapping Bats with an Acoustic Trigger - Winterberry Wildlife
Hi, great article! I was wondering whether the wireless triggers for the flashes wake up the flashes before the first photo is taken. If you could clarify that it would be very helpful.
Thanks in advance!
Great question! The short answer is: I couldn’t figure out how to make this work at the time, though it should be possible. For now, I rely on the first photo “waking up” the flashes.
The longer answer goes like this: The wireless flash controllers I used (Pixel Soldier) are setup so that depressing the “focus” button on the camera (or activating the “focus” signal on the remote shutter release) “wakes up” the wireless channel, and pulls the flash out of sleep state. So adding a sufficient delay between the focus signal and the shutter release signal should wake up the remote flash to allow a flash on the first photo taken. Unfortunately, while I was experimenting with this in the lab, I found that the wireless receiver wouldn’t let the flash go back to sleep after a photo was taken. I spent some time on the web with various reverse engineering sites documenting both the camera (Canon) hot shoe interface, and the SB28 (Nikon) hot shoe interface, but was never able to figure out how to both allow the flash to go back to sleep; and to wake it up for a photo with the Pixel Soldier. Eager to get the camera in the field at the time, I gave up, and simply accepted a “sacrificial” first photo to wake the flash up. This works well enough, so I haven’t gotten back to the problem.
You may have more success — I think it should work. I would start with a logic analyzer (something I didn’t have at the time, but there are several inexpensive USB variants on the market) on the hot-shoe interface to better understand what’s going on as photos are taken.
Hope this helps.
Hello! I am enjoying so many of your articles. I would love to know/see how you made the boxes for the flash units (pictured in the bat article).
I’m glad these are useful. I just added an “appendix” to this post with more details on the SB28 flash enclosures. As I note, I’m not completely happy with these, but they work well enough that neither have I been motivated to come up with something better. Let me know what you think.
Pingback:IR to White Flash Trail Camera Conversion - Winterberry Wildlife