The Art of the Treeless Set
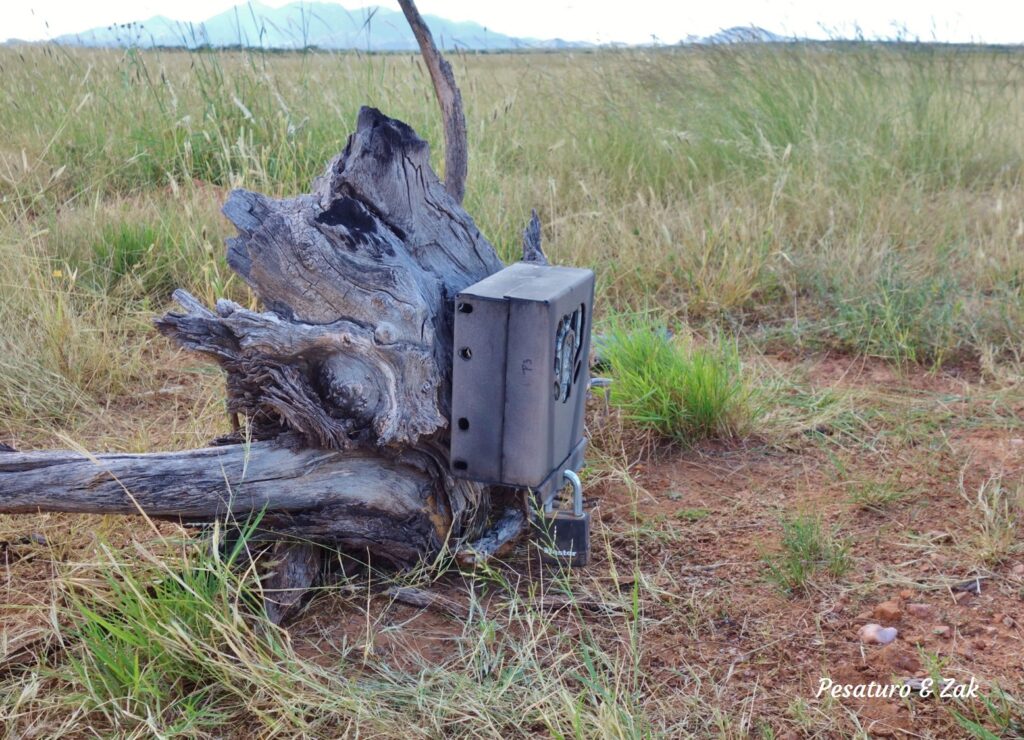
Most trail cameras are designed to be mounted to a nearby tree. However, many times there is no tree in the ideal spot. Even worse, many habitats, such as the desert, prairie and mud flats, have no trees at all. How does one set up camera trap when there are no trees? In this post we give examples of the treeless set, as well as a list of helpful tools for the backpack. As the title suggests, this is an art as much as a science. Hopefully this post will help inspire you to create your own alternatives to attaching camera traps to trees!
Start With the Animal
When creating a camera trap set, we are tempted to start by looking for somewhere to mount the camera. It’s better to start by asking the question: “Where is the perfect place to put the camera to capture the animal or behavior I’m interested in?” Of course, once you’ve done this, you still have to find a way to mount the camera. In you end, you may even decide that a nearby camera-friendly feature, such as a tree, is “close enough”. But we have found that starting with the ideal spot for the camera can lead to creative solutions. These may take a little work, but often capture the animal at it’s best.
Examples of Treeless Sets
Over several years of camera trapping in many habitats, from deserts, to rocky outcrops, to marshy wetlands, we’ve come up with many treeless sets using materials available on site so that we do not have to tote tripods and posts everywhere we go. To discourage theft, we try to attach the camera securely to something that would be awkward or difficult to carry out. Here are some of our favorites.
Lashed to a Rock
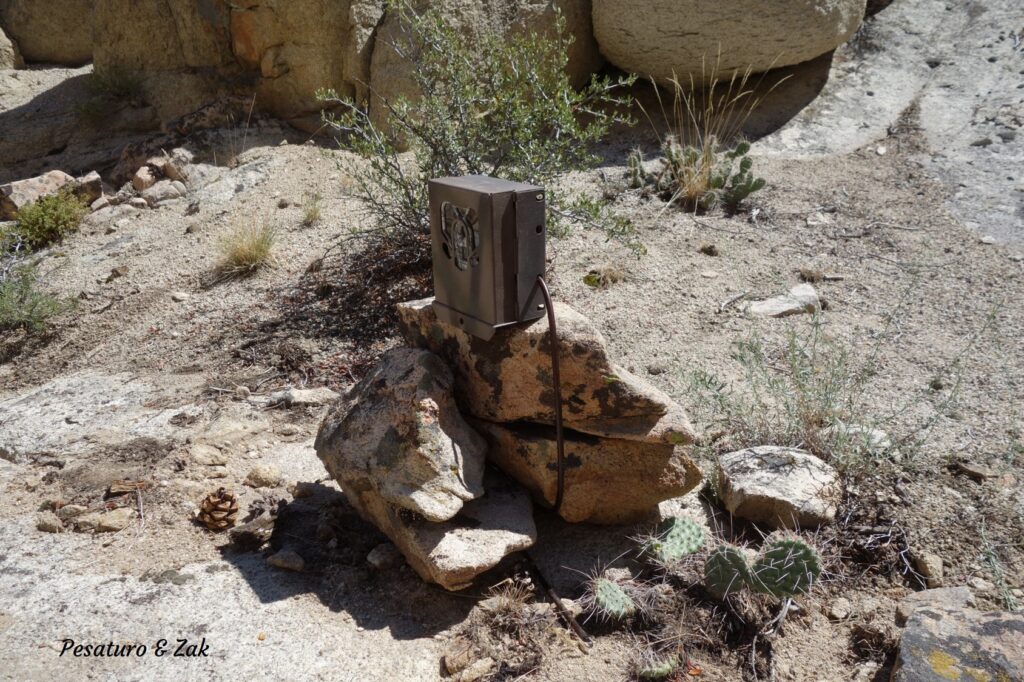
We have made successful treeless sets by using a cable lock (or nylon strap) to lash a camera directly to a rock. The best rocks are heavy enough to anchor the camera securely, but light enough to shove into position. Ideally, they are “hour-glass” shaped, allowing a cable lock to be cinched around the narrow center. A rock which is close to the ideal shape can be modified in the field (by pounding it with another rock!) to help it’s figure. We often pile smaller rocks around to hide the camera and cable.
Atop a Tripod
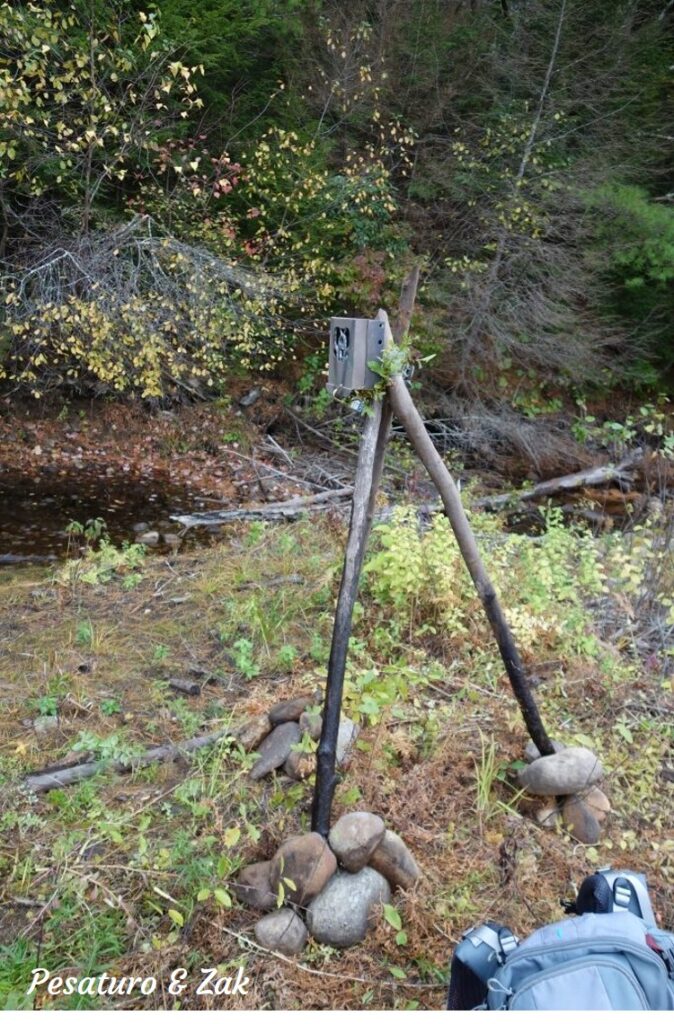
A treeless set based on a tripod works well for a wetland habitat. If you can find materials on site, you don’t have to carry in a tripod. In this example, we cut 3 branches of diameter at least 1″ to the right length and lashed the tops together with many wraps of a nylon strap. The camera lock box can be secured by screwing it into one of the three supports, or with a cable lock, or with some combination. Press the legs of the tripod into the ground as much as possible and/or shore up the legs with piles of small rocks. Adding another leg or two can also help to firm up the set.
On a Homemade Post
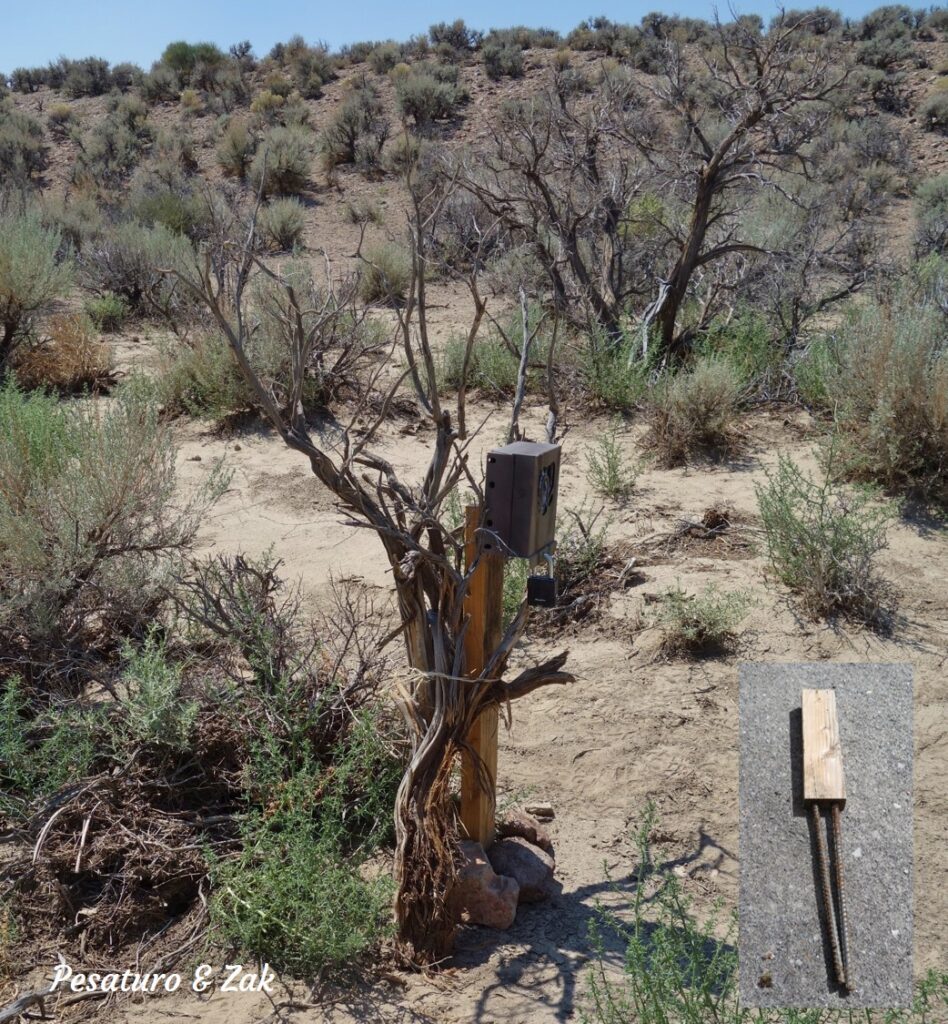
When camera trapping in the American Southwest, we faced the problem of getting a camera in a position several feet off the ground, in a sagebrush habitats, devoid of trees, large branches and often even of large rocks. Commercially available “camera trap posts” seemed less sturdy than we wanted, and unsuitable for sandy soils.
We came up with a post as shown below, consisting of a piece of 2×4 (cut to length on site with a small handsaw), and one or two 18-24″ sections of 3/8″ or 1/2″ straight steel rebar. The rebar is pressed 2-3″ into slightly undersized holes drilled into the bottom of the 2×4. For relatively dense substrate, and/or shorter sets, one piece of rebar is plenty. For sandy substrate, even for a post several feet tall, two pieces of rebar provide a very good anchor. Rocks on the base also help to hold the post tight.
Wall Nuts on a Boulder
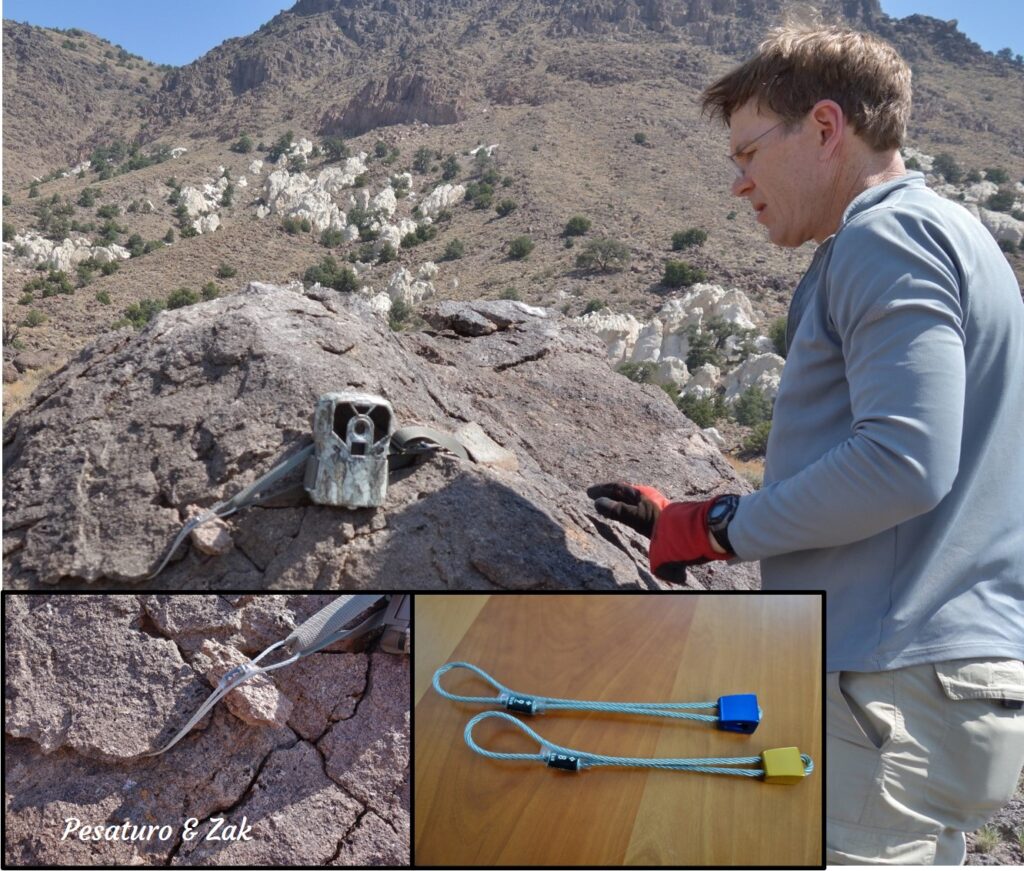
“Wall nuts” are rock climbing equipment consisting of small but sturdy metal wedges with firmly attached stainless steel cable loops. They slip easily into rock cracks, wedge themselves inside when pulled, and provide protection against falling for climbers. In this treeless set, we slotted a pair of wall nuts into cracks on the face of a boulder overlooking wild horse habitat. We threaded a nylon strap through the mount points on the camera, and then through the loops of both wall nuts. When we pulled the cable lock tight, it engaged the wall nuts, which held everything firmly.
Lashed to a Slab
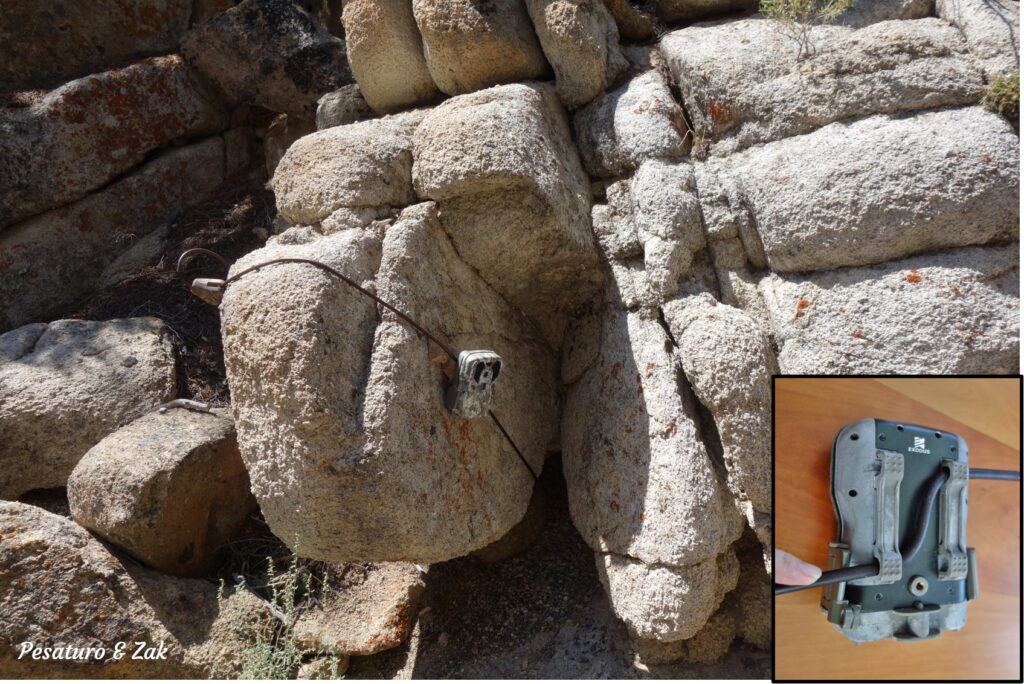
While following a small stream in an area of rocky crags and boulders, we found a crisp mountain lion track in the wet sand. Although there was not a tree in sight, there was a slab of rock angling out from the side of stream. We wrapped two cable locks, strung together end-to-end, around the whole slab. The cable was threaded diagonally through lugs on the back to the camera to hold it in place. We tightened the cables around some small jagged features in the slab to give them a secure purchase. Some small nearby small rocks served as wedges to cinch the cable up tightly and to adjust the final position of the camera.
Using a Rock to Support a Post
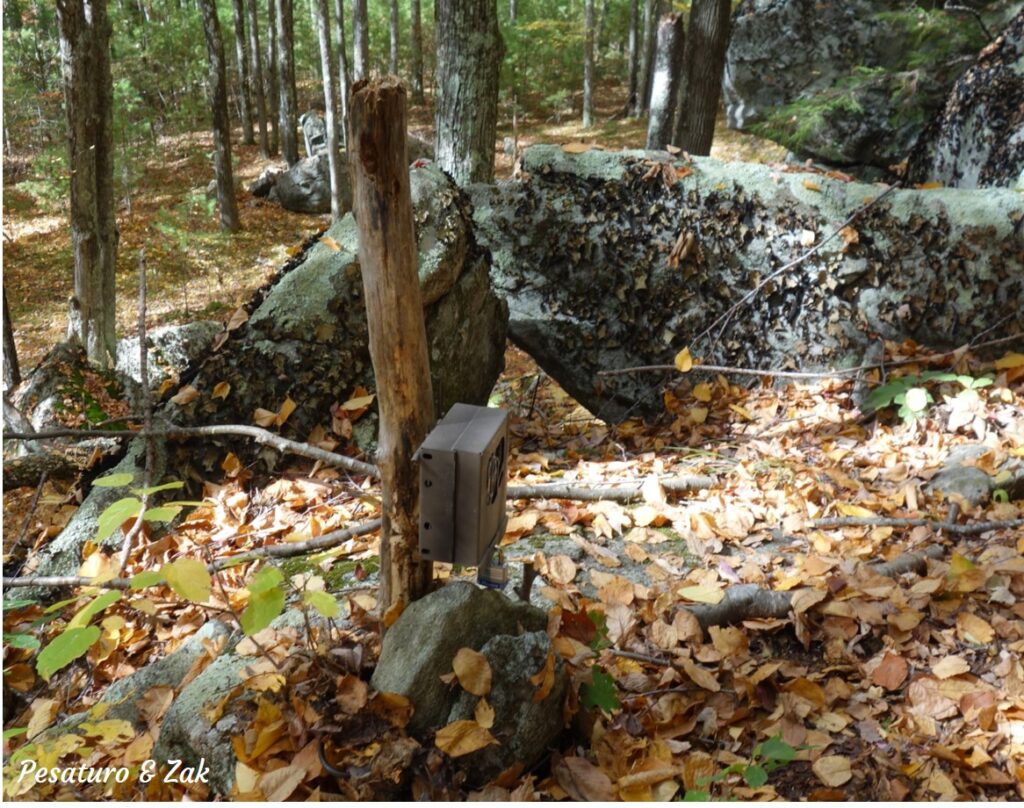
In rocky outcrops, such as the one below, strewn with granite slabs, it may be possible to create a “pseudo tree” by anchoring a found post to a large rock or slab with a cable lock or nylon strap. In other cases, to get a sturdy set, we have lain a post sideways, between supports, and lashed it to both sides.
Think Long Term
Unlike a tree which has already proven itself in its habitat over years, any treeless set you create is new to the local environment. It’s up to you to consider their futures.
If you are making a set (e.g. a tripod) in a wetland environment, make sure to consider potential changes in the water level. We once set a camera on a tripod in a drained beaver pond in Maine. When Janet returned, months later, beavers had again dammed the stream. Much of our tripod was now underwater! (Fortunately, the camera was a few inches above the waterline — this time).
In placing a tripod near a stream or in a stream bed, consider signs that tell you what “flood stage” is like. A debris-line a couple of feet above your tripod base, on a patch of sandy land surrounded by river stones the size of candle-pin balls is workable. Use the rocks to shore up your tripod. On the other hand, a channel cut by a flash flood in the desert with smooth rocks the size of a microwave strewn about is probably not a good place to leave your tripod/camera through the rainy season.
Supporting Equipment
Here is a short list of “weight efficient” things we carry to help creating treeless sets:
- Nylon Straps: We use cable locks and padlocks for almost all of our sets, these days, as opposed to just the nylon straps included with most cameras. However, we always carry several of these nylon straps with us, just in case. They can be used to lash together a tripod, or pull a branch out of the way.
- Cable locks: In addition to providing security, cable locks are a versatile tool for holding things securely together. We carry an extra cable lock to lash an on-sight post to a rock, or tree, or to extend the length of another cable lock.
- Small Cross-Cut Saw: while out west, we purchased a small cross-cut saw at the building supply store. It was perfect for cutting 2×4’s to length for the rebar posts described above. The saw has now become a regular in our back packs. We use it to cut available “forest floor” branches to purpose. It’s also great for medium-scale “landscaping” of brushy sets.
- Wall Nuts: technical climbing gear repurposed for camera trapping. A few well placed wall nuts and a cable lock can anchor a camera to a rock face.
- Screws, washers, and screwdriver: We carry a sturdy plastic box full of wood screws of varying lengths — from 1″ to 3″ — and a collection of fender washers with us to attach lock boxes to wood surfaces. Shorter screws are adequate for anchoring into solid hardwood. Longer screws may be necessary for punky, or softer substrate.
- Light Work Gloves: I always bring a set of gloves along. They save my hands when wrestling with ragged rocks, or grabbing a bunch of wet rough branches, or getting a really good grip on a cable lock.
Enough about Us
What are some of your most creative treeless sets? We’d love to hear about them in comments below.

Great videos as always!
I finally got a browning recon force advantage cam!!! 🙌
Haven’t set it up yet, but getting there.
Glad you enjoyed them! The recon force advantage is a fine camera. Looking forward to see what you come up with — in photos and sets 🙂
Very interesting and well done. I had not thought of using 2 cable locks together. How secure are the wall nuts at preventing theft, and how hard are they to remove when you want to?
This is Bob’s post but I’ll contribute my $.02. The wall nuts themselves do not prevent theft. They merely provide a method for affixing a camera to rock crevices. As shown in the photo, we fastened the camera to the wall nuts with fabric straps which can easily be cut or undone. For a more theft resistant set, you could instead use cable locks where we used fabric straps.
Thanks, Hal. Regarding resilience of wall nuts to theft — I think if you hold a pair of them together tightly with a cable lock, they’re just as secure as a cable lock :/ The steel cable for the wall nuts may be slightly smaller diameter than the cable lock, depending on their intended load, but they’re pretty rugged. Of course their strength is only as good as the cracks where you seat them. We fiddled around with the set shown in the photo a fair amount before it felt like the wall nuts were in solidly. The good news was that once they were in, you could hang on them! Also, the little blocks were deep in the rock and therefore hard to tamper with. As you know, though, homo sapiens is a clever animal, and the best bet is to put the whole set where its unlikely to draw attention.
Oops — to part 2 of your wall nut question — we didn’t have any trouble getting these out. Once the tension is gone, and you can push them in the other direction, they pop right out.
Good ideas. I’ve often used what are called “concrete stakes”, a solid steel round bar from 18-36″ long that has a series of holes drilled at intervals. Normally used to hold concrete forms in place, they’re easily pushed or driven into the soil. A camera trap steel security box can be bolted to the concrete stake at a desired height. These stakes aren’t light, but work very well.
Thanks, Woody. “Concrete stakes” sound like another good example of repurposed building supplies.
Pingback:Avoiding False Triggers in Trail Cameras - Winterberry Wildlife