Deep Tech: Will Long Night Videos Damage the Browning Elite HP5 Trail Cameras?
I recently released firmware for Browning Elite HP5 cameras that bypasses a limit of 20 seconds on the length of night time videos. Several folks have asked: “Is this a safe thing to do, isn’t the limit there for a reason?”
In this post, I answer that question with some data. I find that taking longer night time video will consume battery power at up to 4x the daytime rate, but the LEDs and camera should hold out fine.
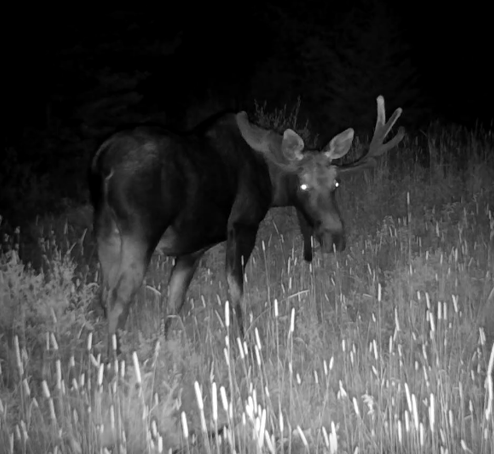
What Could Possibly go Wrong?
I’ve heard two different explanations for the 20 second night time video limit. This limit has been in place for at least the last three generations of Recon Force and Spec Ops Browning models. This even though the LED technology has changed drastically. One is that the manufacturer is “protecting” it’s customers from running the batteries out too quickly. Depending on the flash setting, night time video does indeed, consume 2-4x the power of daytime videos. The other reason I’ve heard is that Browning is trying to protect the IR LEDs from overheating and thereby failing prematurely.
If Browning is merely trying to help us conserve battery power, then extending the duration of night time video has, at worst, the effect of decreasing battery life. This is often a good tradeoff if a longer video results in more compelling captures. If you’re looking for interesting behavior in an animal as elusive as a jaguar, two minute video clips may be just what you want!
On the other hand, if extending the night time video duration has the potential to damage the LEDs, this is more serious. It could cause premature failure of the camera itself.
In the rest of this post, I will take a closer look at the engineering of the thermal design of the LED module itself to better understand its limitations.
LEDs
Brief History
Light Emitting Diodes (LEDS) were invented in 1961. The first one emitted faint IR light and was about the size of a pin head. LEDs moved into the realm of ubiquity as low power, long-life display technology for early computers. In the last 5-10 years, engineers have focused on increasing light output and efficiency. As a result, LEDs have quietly become the dominant technology for everything from streetlamps to indoor lighting, to camera flashes.
How LEDs Work
LEDs produce light as current flows through the “junction” formed at the intersection of two types of semi-conductors. Electrons cross a “bandgap”, characteristic of the semi-conductor materials. For each electron that passes through this gap, a photon with the energy of the band gap is produced. By carefully engineering the mechanical and optical properties of the junction, these photons can be directed out into the world as usable light. Semi-conductors with a bandgap corresponding to near infrared light are used to make LEDs for trail typical trail cameras.
Heat-Induced Failure
Unfortunately, not all the electric current results in usable light. Inevitably, some of the electric power is converted to heat. In today’s LEDs, for example, less than half of the electrical power in converted to light. In addition to reducing the efficiency and brightness of the LED, this heat can cause the junction to overheat. A high temperature junction operates even less efficiently. Worse, the high temperatures can damage the semi-conductor, and cause the LED to fail sooner than a typical lifetime of tens of thousands of hours.
Note that the junction stability also depends on the amount of current passing through the LED. The more current — the brighter the LED — the lower the safe operating temperature.
Because of this sensitivity to heat, modern, high power LED systems include a highly engineered thermal management solution. This system carries heat away from the LED semi-conductor junction to keep it’s temperature below ~100 C.
Browing Elite HP5 LED System
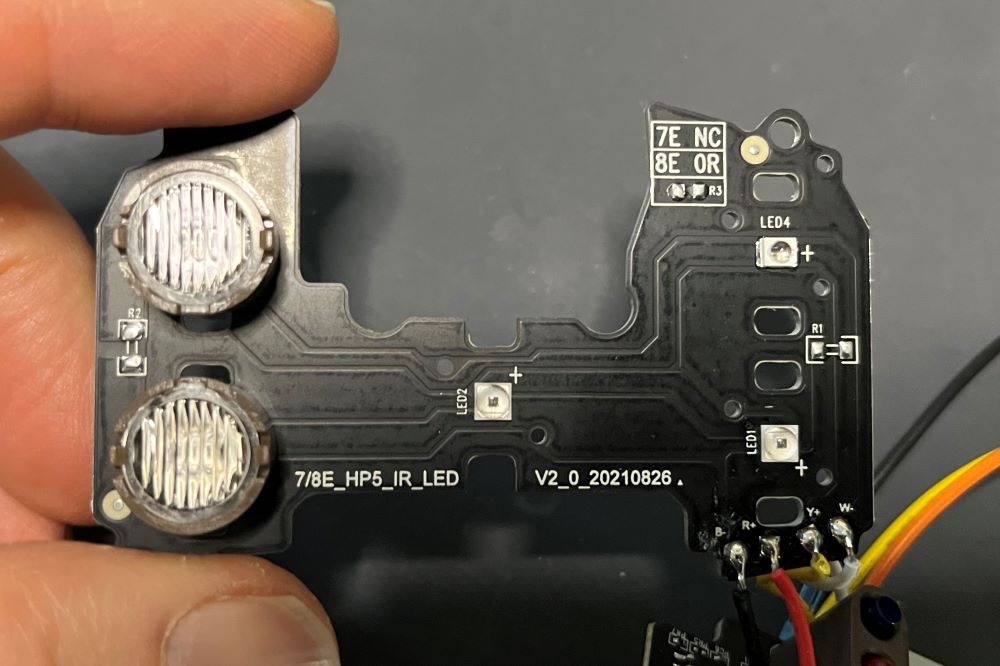
Per it’s branding, the HP5 features 5, High Power IR LEDs. These LEDs mount to a small circuit board. Critically, this circuit board features a 1.5 mm thick aluminum layer bonded directly to the electrically isolated circuit traces. Aluminum is a very good thermal conductor. Since it is integral to the circuit board itself, it is in close thermal contact with the LEDs. The result is that the intense local heat from the LEDs is spread over a large area. This diffuse heat dissipates to the environment at a low temperature. This, in turn allows the semiconductor junction to remain below the manufacturer temperature specification for lifetime operation.
LED Specs
How Long Should a High Power LED Last?
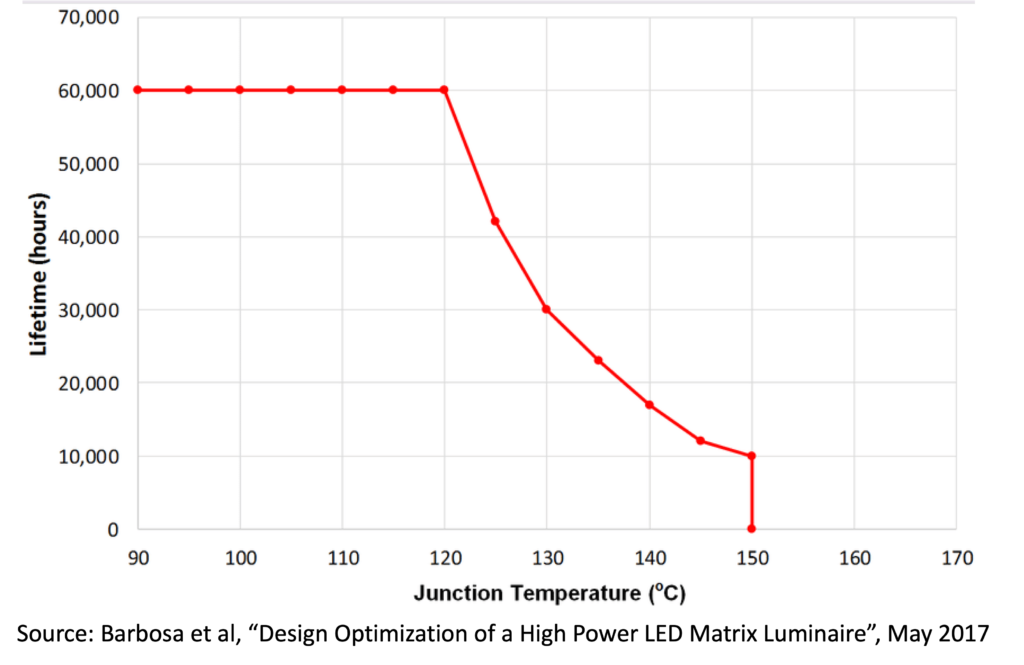
See the graph above for the relationship between junction temperature and LED lifetime in a typical high power LED. I would point out two things:
- A well designed system should keep the junction temperature of the LED below 120C (250F). At this temperature, we can expect the LED to last many 10’s of thousands of hours at full illumination. 60,000 hour LEDs in a trail camera operating continuously for 12 hours per day would last more than 10 years!
- Even for a poorly designed thermal system that allows the junction temperature to reach ~150 C (300 F) — the temperature you might bake cookies at — the LEDs will still last 10,000 hours. Or two years of continuous operation. Or decades of more typical trail camera operation.
For all practical purposes this data alone is enough to answer our question. A competently designed LED system that includes a heat spreader will keep the LEDs cool enough to last a very long time.
High Intensity LED Operating Envelope
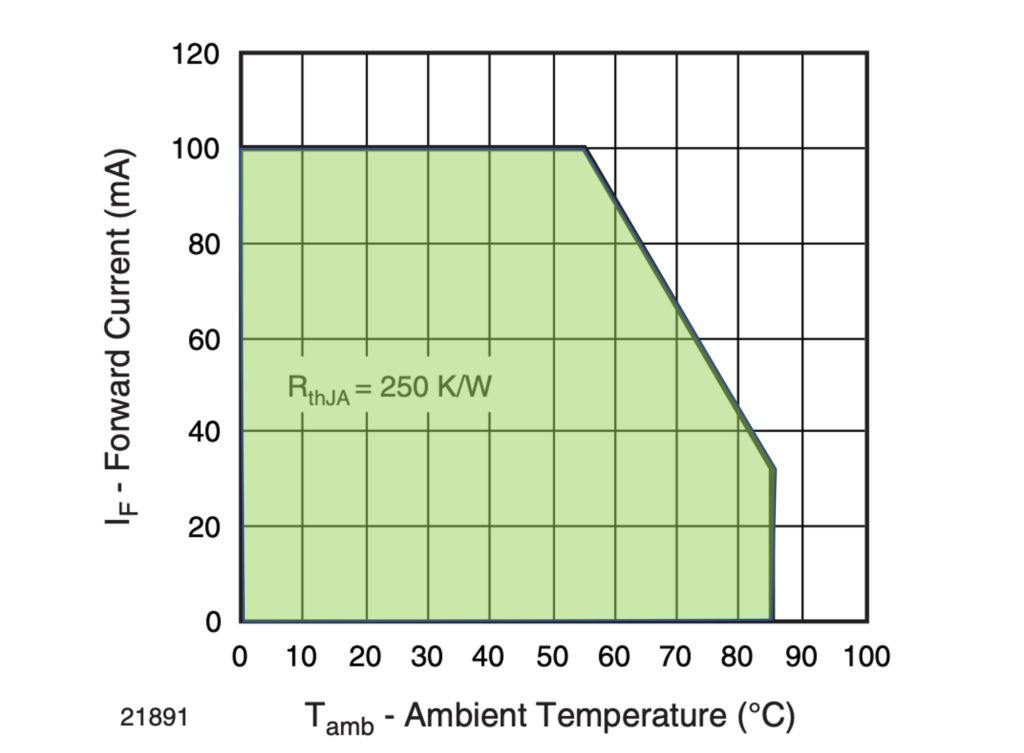
The operating conditions for LEDs is often summarized in a graph with forward current on the Y-axis and case temperature on the X-axis. As shown in the example below, taken from a Vishay specification, a line on the this graph represents “safe” operating points of the LED. Any operating point within the line is safe, any outside is not.
Instrumenting the Browning HP5 Flash Module
I attached a thermocouple to the aluminum heat spreader to measure it’s temperature. This I measured as a function of time at the different “flash intensity” settings, and for two minutes at a time. I also used a thermal camera to measure the temperature of the LED junctions themselves. The thermal camera was not at all confused by the NIR emitted by the LEDs. I present that data from these measurements below.
Temperature of Heat Spreader
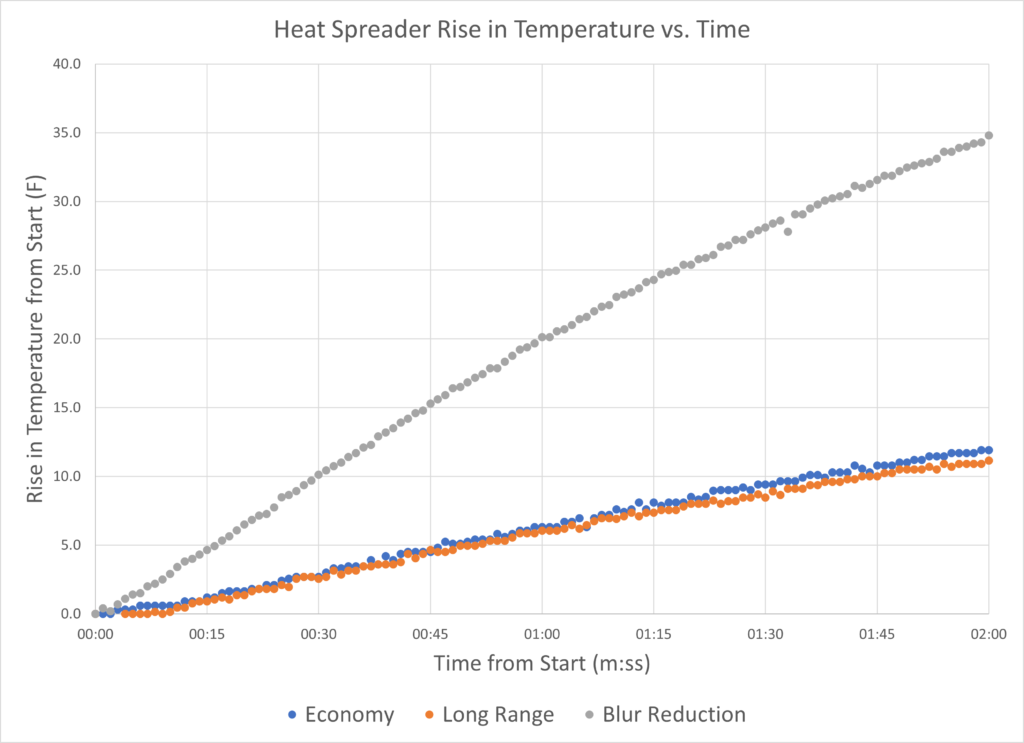
As you an see, the temperature of the LED module starts rising as soon as the LEDs come on. Depending on the flash setting, this is between 10 and 35 degrees Fahrenheit (between 5 and 20 degrees Celsius) above ambient over the two minute video duration. Note that “Economy” and “Long Range” flash settings are practically identical. This leads me to believe that they are different names for the same setting internally. Perhaps an opportunity for another firmware feature?
Thermal Image and Junction Temperature
From the thermal image below, the temperature is quite uniform over the entire circuit board due to the effectiveness of the aluminum heat spreader. The darker, cooler rectangles in the photo are holes in the board for the lens holders.
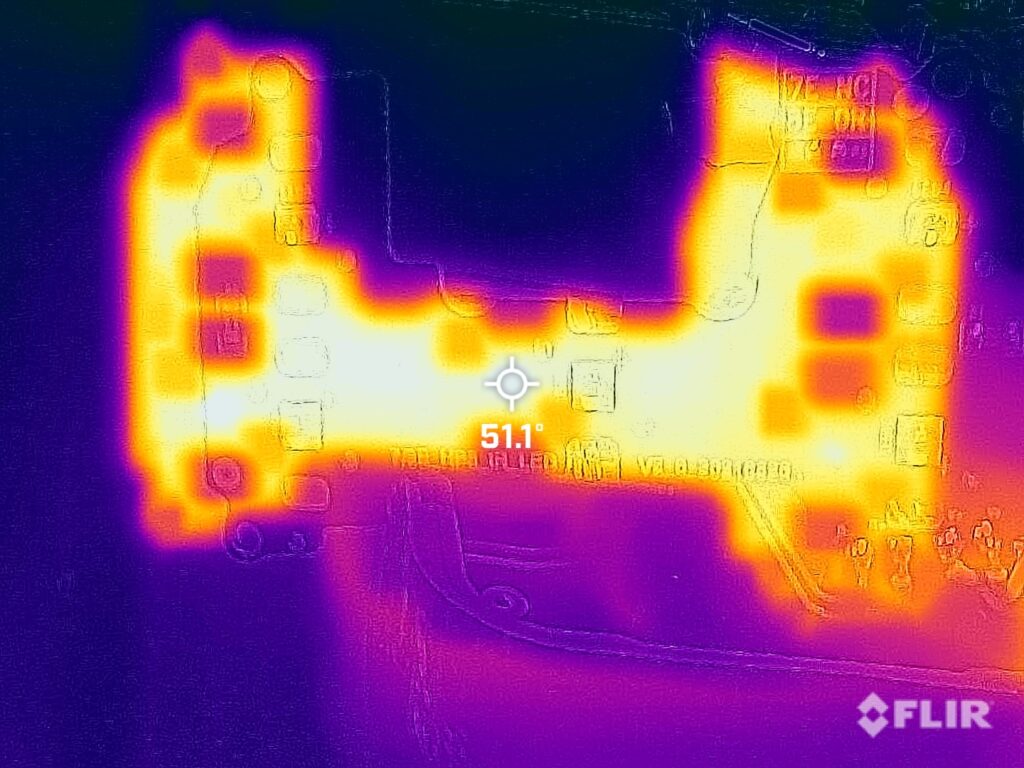
The 5 LEDs show as even whiter (hotter) elements. I have placed the measurement cross at the center of the center LED, and found that it reaches a maximum temperature, over a 2 minute video, of ~51 C (122 F).
At the end of a 2 minute video, the junction temperature is approximately 30C (54 F) above the ambient room temperature. This, in turn is only 10 C (18 F) above the temperature of the head spreader measured above.
This speaks to a robust thermal design, as we expected by the inclusion of the aluminum heat spreader.
Camera Environment
So far I have focused on the rise in temperature of the LED module over ambient. Since the lifetime of the LEDs depends on their absolute temperature, we must also consider the typical ambient temperature at which these cameras operate.
Fortunately, we are concerned with LEDs that are in use. For trail cameras, this is at night, when ambient temperatures are lowest and there is no sun to directly heat the camera. Also, we have found that the rates of false triggers drops drastically in night time conditions.
Per the lifetime graph, above, if we choose a conservative target of 100C for our junction temperature, this means that the outside, ambient temperature can be as high as 70C (~160 F).
Note, in any case, these cameras have a separate thermal shutdown function. If the internal temperature exceeds 70 C (159 F), the camera will stop taking video and shut itself down. This will cover the case of consecutive, or continuous 2-minute triggers as well. It protects not only the LEDs, but all the other electronics in the camera from overheating.
Bottom Line
Based on this data, I have every reason to believe that the HP5 LED design can easily handle two minute operation as long as the ambient temperature of the camera is below 70C (160F) . This covers all of the conditions an animal would be out at night. A separate automatic thermal shutoff provides additional protection. If you are still feeling squeamish, set the flash power to “Economy” or “Long Range” and worry no more.
References
Vishay High Power Surface Mount IR LED Emitters
Barbosa et al, “Design Optimization of a High Power LED Matrix Luminaire,” 2017.

Pingback:Adding Features to Browning Elite HP5 Firmware - Winterberry Wildlife
Another extraordinarily helpful/educational (now I know a bit more about LEDs!) and well-written post. And more proof that Bob should be a paid consultant for Browning 😉
Thanks! Although, to be fair to Browning, why would they pay a “consultant” who keeps posting this information for free? 🙂 Now, if I started working on another type of camera…
Great to hear that overheating is unlikely, but I’ve noticed a different problem: My HP5s have started burning through lithium batteries at a tremendous clip now that ambient temps have dropped below freezing. I’ve never experienced anything like this with the previous Browning models. Wondering if the LED aspect is somehow resulting in use of way more juice at cold temps?
I have not seen this behavior on our HP5s (several have which have been out in the winter). Can you provide more details:
1. Verify that batteries were new (or of some known state) when installed
2. Number of Photos and/or videos duration taken on a single charge; number and/or duration of night time photos/videos
3. IR flash intensity settings
4. What happens when you pick the camera up? I assume batteries are dead on pickup?
5. Have you had any issues reading photos/videos from the SD cards on these cameras?
Hi Bob,
opening recently a chinese trail cam I’ve found a thermal resistor on the led pcb. I guess to stop flash in case of self-heating of the pcb due to the led.
I wonder if Browning uses that kind of circuitry that allow to have longer night video without dammage thanks to this thermal protection.
I guess no & I expect they will use it in a future generation (as it is done on all smartphone on the several daughter board such as illuminator)
Hmmm. I’m not aware of any Browning cameras which actively monitor the temperature of the IR LED PCB. These cameras do monitor the temperature of the main PCB, but I think this is aimed at preventing overheating (and damage) of the SoC processor. Based on my extensive testing of the HP5 models, the thermal design (which features an aluminum-clad PCB and surface mount high power LEDs) supports continuous use of the IR LEDs under all practical environmental conditions. I explore this in excruciating detail in Deep Tech: Will Long Night Videos Damage the Browning Elite HP5 Trail Cameras?. I suspect that as long as a good thermal design is less expensive than adding a thermistor and additional connections, Browning will keep doing so.
PS: This is not the reason that Browning factory firmware limits night time video length to 20 seconds. It could be to save battery power, or it could be because some earlier version of the IR LED driver required such limiting? When I created new firmware that bypassed this limit, I spent a lot of time with the IR LED driver on the Edge, HP4, and HP5 to make sure I wouldn’t damage the camera. Which was genesis for post above.
Hi ! Firstly, Thanks a lot for your Firmware and all techinical informations about the HP5 Browning. I must warn here about a issue due to quite low temperatures. Actually I placed around 5 HP5 in the forest in the moutains around to observe wolves. 3 Hp5 are working properly in winter and 2 have big problems as soon as temperatures are going below maybe -5° Celcius. Batteries goes down very quickly and the camera stopped working after few videos. After a while in cold it doesn’t’t start again or after serveral minutes.
Interesting! This is the second time this week I’ve heard about HP5’s not triggering in cold weather. In the other case, the camera owner was able get his cameras to work by setting the temperature units to “Fahrenheit” instead of “Celsius”.
Based on a quick inspection of the firmware, my hypothesis is that an “over temperature” check done in the firmware is getting confused by negative values for temperature due to some binary representation bug. The C scale goes negative at higher temperature than the F scale, so that’s where the bug is showing up when in Celius mode, and not when using Fahrenheit mode.
Here’s an experiment you can do at home to test my hypotheis and help debug this problem:
1. Configure one of your failing HP5s to use Fahrenheit, and the other to use Celsius units. Put a piece of opaque tape over the light sensor to the right of the PIR detector (this to ensure the camera will take flash-assisted videos – a necessary condition for the over-temp check). Set both cameras to take 5 second videos with a 5 second delay. After you’ve done all this, turn the cameras off and remove the batteries.
2. Put both cameras in the freezer (nominal temperature 0 F, -18C) overnight (without batteries.)
3. Remove both cameras from the freezer, install some new batteries, and trigger them simultaneously as they warm up – maybe once every 2-5 minutes until they are much above freezing (maybe 60 minutes?). If these are 7E-HP5s you should be able to see the red glow from the IR flash to confirm they are triggering. If you are using the no-glow 8E-HP5s, you may need to view the flashes with your iPhone camera viewfinder.
4. Check the SD cards.
a. Did both cameras trigger the right number of times?
b. Does the camera set to “Celsius” (or F) trigger whe the temperature value is below 0? [as shown on info strip of recorded video]
Alternatively, if you’d rather, you can just try changing the temperature units to F in your cameras and deploying them in the field. The experiment above will give us a controlled result sooner, but just trying a different camera setting in the field may get you to wolf captures sooner.
-bob
PS: When they failed, were your cameras set for “Photo” or “Video”?