Inside the Browning Recon Force Elite HP4 (BTC-7E-HP4)
In this post, I do a “tear-down” to see what’s inside the Browning Recon Force Elite HP4 — BTC-7E-HP4. Specifically, I look at differences relative to earlier Browning models, especially our favorite: the Recon Force Advantage (BTC-7A).
There are several changes which I consider improvements over the BTC-7A, but there is one that seems like a step backward, and another which is merely annoying. Fortunately, I’ve found easy fixes to remedy these shortcomings, which I also describe below.
What’s inside the BTC-7E-HP4
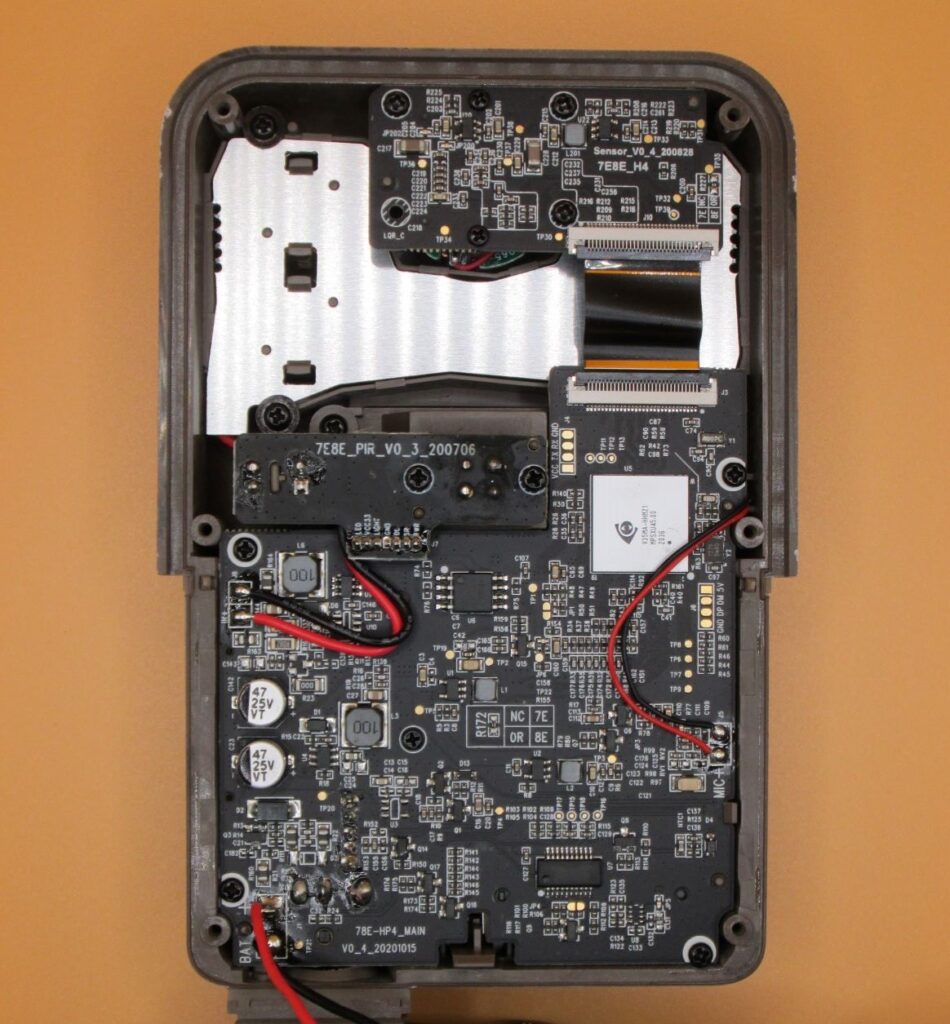
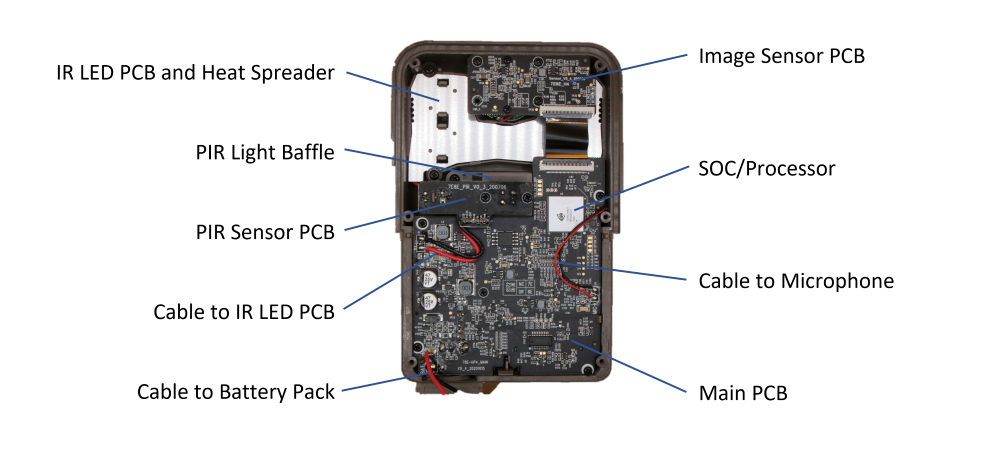
The photograph below shows the major parts of the BTC-7E-HP4. To support the smaller size of the BTC-7E vs. the BTC-7A, the total circuit board area is smaller, with fewer overall components.
Changes Relative to the BTC-7A
In this author’s opinion, here are the “Good”, “Bad”, and “Too Early to Tell” changes based on my initial investigations.
Good
Lower Power
I’ve measured about a 10% lower power consumption while taking daytime videos in the BTC-7E-HP4 vs. BTC-7A. This should improve battery life by about 10%. Less power means less heat, which could reduce the chances that heat from the processor unintentionally triggering the PIR sensor (see: “Run On Triggering” in How (some) Trail Cameras Fail). However,
PIR sensor on Separate PCB
In the BTC-7A and 8A, the PIR sensor is mounted on the same PCB as the heat-generating SOC processor. This could allow heat form the SOC to confuse the very sensitive PIR sensor into triggering repeatedly (see: How (some) Trail Cameras Fail). In the BTC-7E-HP4, the PIR sensor is mounted on its own PCB, thermally far away from the SOC. I consider this a definite improvement that should reduce the flow of heat from the processor to the PIR sensor.
But for both of these positives, Browning has also removed the heat sink from the SOC, which could increase the amount of heat flowing through the PCB. See “Too Early to Tell” below.
Bad
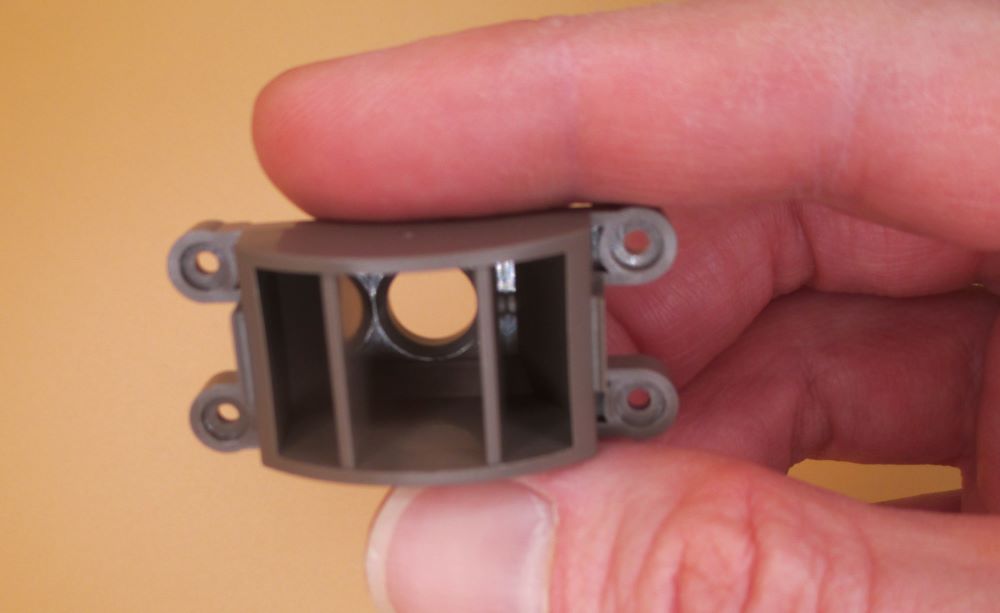
Light Baffle Blinders
The “light baffle” for the PIR sensor on the BTC-7E-HP4 has two “blinders” on either side which seriously limit the field of view of the sensor. These blinders are not present on the BTC-7A. Their presence has the effect of narrowing the field of view for camera triggers, which means fewer triggers overall, but a greater percentage of triggers where the animal is already in the center of the frame.
It’s possible Browning made this modification along with the faster trigger speed in the Elite to increase the likelihood that animals are in the center of the frame for singleton photos. Unfortunately, this is a disappointing development for those using trail cameras primarily for video. In this case, we really want to start the action as soon as the animal enters the field of view of the camera.
[Updated 2022-08-27] Newer versions of the HP4 apparently have a slightly different baffle piece. Thanks to blog subscriber GD who apprised me of this, and provided an updated photo, below, comparing the original and new HP4 baffles.
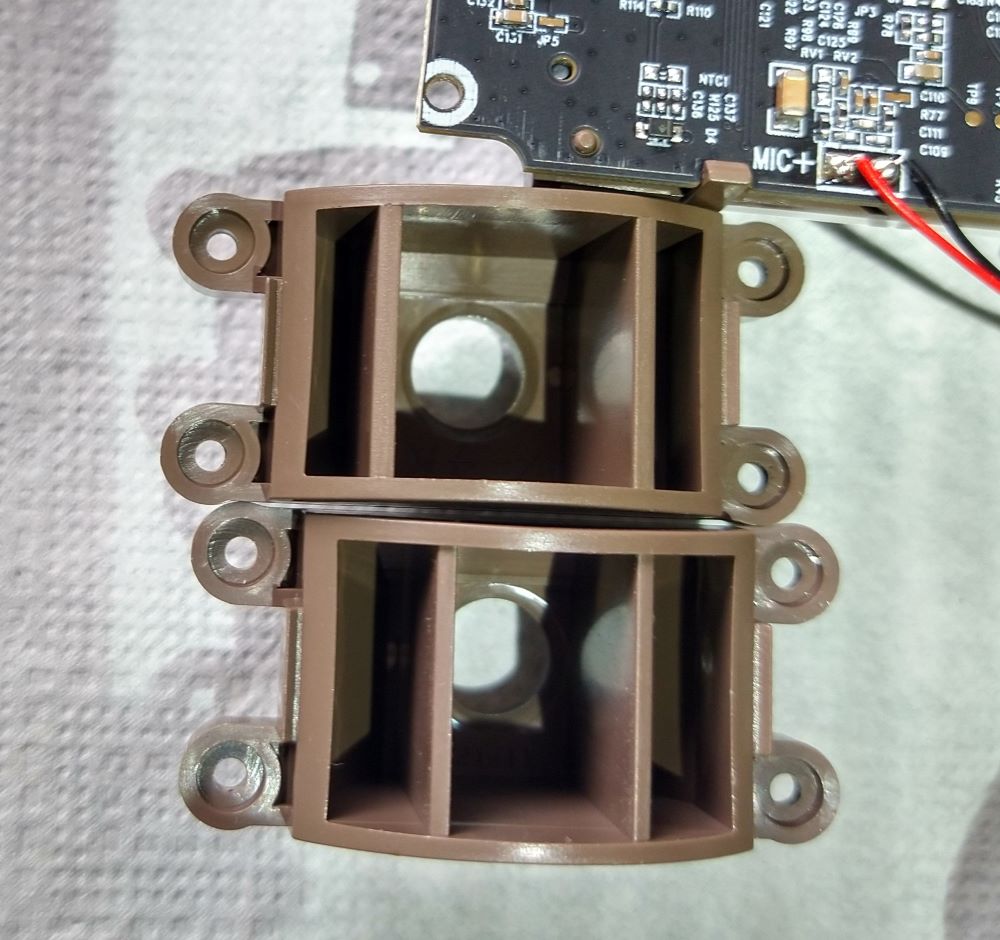
These new baffles let in more light — which is a good thing. They may still limit the two side detection zones found in the BTC Advantage series. See Deep Tech: Trail Camera Detection Zones
Too Early to Tell
Missing Hole Plugs
The screw holes on the main case don’t have the rubber sealing plugs featured in the BTC-7A and 8A. At first I feared that this might allow moisture to leak in through the screw holes. On closer inspection, though, I found that the gasket on the BTC-7E-HP4 has been extended to include sections which seal the screw holes This should keep water out.
I have found (with other cameras) that the rubber plugs used in the earlier Browning BTC-7A and 8A cameras also keep insects from colonizing or pupating in these attractive dark holes. Insect frass in these holes doesn’t effect the camera operation, but it makes taking them apart a bit of mess.
No heat sink on the S(ystem)O(on)C(hip) Processor
Per “Good”, the power consumption of the Elite is about 10% less than the Advantage. Less power means less heat overall which could reduce the chances that heat from the processor unintentionally triggers the PIR sensor (see: “Run On Triggering” in How (some) Trail Cameras Fail). However, even at lower power, without a heat sink, the SOC processor will get hotter than in the BTC-7A.
I found that mounting the PIR sensor on a different PCB does do a pretty good job of isolating it from the heat on the main PCB. The thermal video below shows that although the PCB around the SOC quickly heats up to ~33C (91F) in a 21C (70F) ambient while taking video, the temperature rise on the PIR PCB is much smaller.
I have seen some reports online of “run-on triggering” in the Elite. I will need a camera that fails in this way and more investigation to understand why this might be happening.
Since the temperature sensor used to provide the “ambient temperature” reading on the info strip is close to SOC processor (perhaps in the SOC?), it will likely be even less accurate (read too high) than in the BTC-7A. This is a little annoying.
Less Robust Enclosure Gasket
Like the BTC-7A, the BTC-7E-HP4 has a rubber gasket which seals around the outside rim of the front and back cases. In the BTC-7A, this gasket is several mm wide and a mm or so thick. The gasket in the BTC-7E-HP4 is much less substantial — being less than 1 mm thick. More of a “rubber film” on the bottom case piece than a free-floating gasket. Of course, this gasket doesn’t need to take much abuse. It should generally not be accessed once the camera is assembled. As long as it’s thick enough to keep moisture out, all’s good. It’s that latter point I’m a little worried about.
New LED Board
LED board has 4 high-power SMT LEDs backed by an aluminum heat spreader. Plastic, snap-in lenses narrow the output beam. Too early to tell whether this is a good thing, or not. The earlier Edge models with a similar LED design seemed to us to be less well lit at night vs. the BTC-7A. The “low blur” setting on the Elite pushes significantly more power into the LED array than on the BTC-7A. No doubt this makes the LEDs brighter, but at the cost of decreased battery life. We will need more experience on this camera to make a call.
Image Sensor on a Separate PCB
In the BTC-7A, the image sensor is mounted directly to the main PCB. Inside the BTC-7E-HP4, the image sensor is mounted to a separate “daughter card” which attaches to the main PCB by a short flex cable. This change is mostly invisible to the user, but it may allow Browning to offer different image sensors and/or deal more easily with supply chain issues. I’m not sure (yet) what image sensor is used in the BTC-7E-HP4, but I hope it’s the next generation of the excellent low-light Sony IMX291 sensor used in the BTC-7A.
Lack of a USB port
This is mostly a disappointment to camera hackers such as myself. In general use, we don’t use the USB port to download photos in the field — we just swap the SD card, like most everyone else. Likely Browning noticed this, and when miniaturing the Elite, dropped the USB port to save space.
I confess, the USB port comes in handy for some of my firmware hacking exercises (to avoid swapping SD cards back and forth). I also have plans to attach an external device to the camera in the field to analyze, and maybe even download photos and videos wirelessly. For this application, I guess I’ll have to keep using the BTC-7A.
Fixing the “Bad” and merely “Annoying”
Here are a couple of fixes that address some of the quirks I found inside the BTC-7E-HP4. The good news is that they are both easily remedied.
Removing the Blinders
If you find animals “appearing from nowhere” at the start of your videos of photo sequences, you may want to try removing he blinders on the PIR sensor. I created a drop-in replacement PIR light baffle without the blinders that can be 3D printed. Here is a link to the .STL Design File which you can send to your favorite 3D printing service. The TinkerCAD link is here, if you want to modify it (perhaps add back in some wider blinders?). It is also possible to remove the blinders mechanically — maybe aided by a rotary cutting tool. Using a 3D-printed replacement allows you to change back, or possibly even modify the “blinder” configuration to match your needs.
Note that I have a few extra of these 3-d printed parts that were part of a minimum order. I am happy to send any I have left anywhere in the US (international shipping is more than cost to just get a new one). If you are interested, let me know in comments, below.
Filling the Screw Holes
If you’re worried about bugs making homes inside the unplugged screw holes in the case, there is easy fix. I found some “rubber hole plugs” — e.g. 6 mm Rubber Stoppers at Widgetco.com. These are not identical replacements to the plugs Browning uses in other models, but they work well enough. If someone finds better replacements, let us know in comments, below.
I started by snipping ~4 mm off the tapered end, then jamming the shorter plug into the holes. I then snipped off whatever was standing proud of the hole. Finally, I used a small screw driver to press remaining rubber plug flush to the surface of the case.
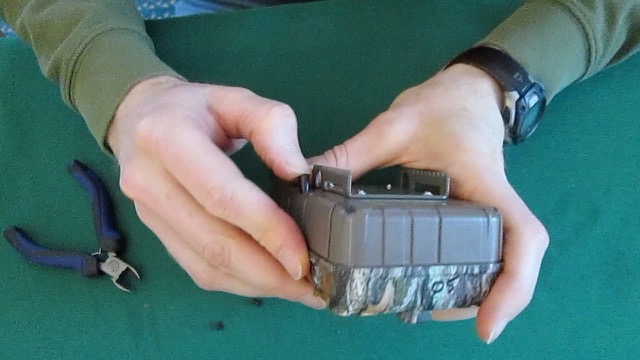
The last section of the video in the appendix below shows the process of installing these plugs in detail.
Summary
The Browning Elite Advantage HP4 (BTC-7E-HP4) has some good things going for it, IMO, vs. the venerable BTC-7A: it’s certainly smaller, more battery-efficient, and has a shorter trigger delay. Browning also seems to have at least partially addressed issues with heat flow between the SOC processor and the PIR sensor which could lead to “run-on triggering” in the BTC-8A (and less often the BTC-7A — See: How (some) Trail Cameras Fail).
But this new version has some quirks of it’s own, including a PIR sensor with a narrower field of view, and screw holes which make good homes for insects. Fortunately, these problems are easily remedied, as I’ve described in this post.
Let me know if you try any of the fixes I covered here in comments below.
Have you had issues with moisture incursion or poor trigger field of view with your BTC-7E or 8E Elite cameras? Are you still seeing run-on triggering in this model?
Appendix: Taking Apart the BTC-7E-HP4
Below are the highlights of disassembling the BTC-7E. I have also posted a sped-up video showing the whole process, including replacement of PIR baffle, and insertion of hole plugs.
- If you installed the rubber hole plugs, the first step is to remove them. I use a hooked dental tool, but a hand-made hooked pin will also do the trick. See. DIY: Converting BTC-7A from IR to White Flash.
- Remove the back case by removing the 6 Philips-head screws that hold it in place.
- Disconnect the short flex cable from the image sensor daughter PCB. Put you fingernail, or small flat head screw driver under the dark-colored “flip paddle” and gently pull up. It should flip up, releasing the flex cable, which will slide out. To reinstall, just slide the flex cable back into the connector, and press down on the “flip paddle” to lock it in place.
For Access to the PIR Sensor Light Baffle
- Remove the 4 screws that hold the main PCB in. Note, when you do so, you will “free” the “on/off” slider, a small piece of plastic, sandwiched between a switch on the PCB and the front cover. Carefully set it aside until you’re ready to put the main PCB back in.
- Remove the 2 screws that hold the PIR Sensor daughter-card in to the light baffle.
- Remove the 4 screws that hold the PIR sensor baffle in. Note that there is a beveled side to this baffle which gives some clearance for the very nearby main PCB. When re-installing, or replacing the baffle, make sure to put it back in with the bevel towards the bottom of the camera.
For access to the LED Board
- Remove the image sensor PCB by removing the 3 Philips-head screws that hold it to the chassis.
- Remove the 4 screws that hold the LED board in place. Note that these have a built-in “pan” head which different than the other internal screws.
Wondering if Browning is using the same IR Filter Motor and image lens assembly? And how does the solder connection look for the filter motor?
It looks like the IR filter assembly is the same as in earlier models. Also, the wires for the motors appear to be hand-soldered in place, as in the BTC-7A. The image sensor (including the IR filter assembly) is now on a separate PCB. This could allow a “factory repair” of problems with the image sensor (e.g. loss of focus, flaky IR filter motor) by simply swapping in a new sensor board from an inventory of spares. I.e. without scrapping the main PCB (and without having to adjust the focus, or res-older the wire leads to the IR filter).
The audio of my spec ops elite hp4 is horrible.
Is there a way to fix this at home without sending it to browning?
https://youtu.be/UR_l73U7GcA
Yikes. It sounds like the microphone on your Elite isn’t connected at all.
I think there’s a good chance you can fix this!
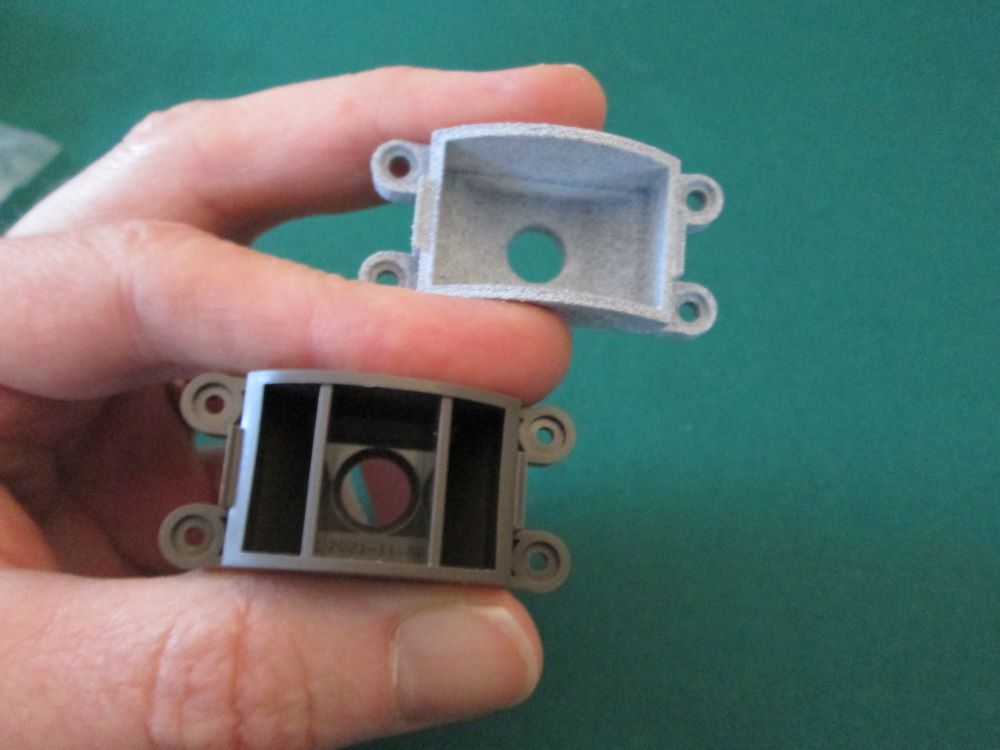
See the 2nd photo in post above.
There is a small microphone that is glued into the case with two fine wires, red and black, coming out of it. These wires are soldered to the main PCB at “J5” on the right side of the main PCB.
Assuming you have access to a soldering iron made for small eletronics, here’s what I would do:
0. Open the camera case per disassembly video.
1. Check to make sure the microphone is wired correctly — the red wire should be soldered to the pad marked “+” and the black wire to the other. If they’re backwards, unsolder them both and solder them back with the proper polarity.
2. Check that the wires are securely soldered to the pads. If one or both of the wires isn’t soldered to the correct pad, use a soldering iron to attach it.
3. There could yet be a “cold solder joint” at one or both microphone pads. You may be able to see this, or you may not. Use a soldering iron to “reflow” the microphone wires solder joints. Hold the wire in place with one hand (so it doesn’t come off when solder melts), and heat the pad up with the iron until solder melts completely and wicks up the wire. Then, remove the iron and let the joint cool *without moving the wires*
I’m pretty confident that one of these steps will fix your problem.
If they don’t, it’s possible that microphone itself is faulty. Fixing would mean removing it from is glued-in housing, and finding a replacement. This would be painful, but this is much less likely than one of failures above.
Let us know how you make out.
This is an excellent discussion! Thanks. Does anyone know why Browning does not include a way to lock the door? I’ve had cards removed. Seems like an obvious shortcoming.
Glad you like it!
I’m actually with Browning on this design choice. The “locking tabs” I’ve seen on other trail cameras are not very robust. Certainly the little plastic doors are not very rugged. Putting a lock there just encourages people (animals?) to twist it off and break the plastic. Better to let them have the SD card.
Before we used metal lock boxes on all of our sets, we had someone do this very thing to an Exodus Lift, taking the SD card to boot 🙁 Short of a rugged metal case for the trail camera itself, I think the best solution is to place camera in a well-secured steel lock box. And, of course, placing sets away from human travel if possible.
Pingback:How (some) Trail Cameras Fail - Winterberry Wildlife
Thank you for this post! My husband got me a couple of these cameras for Christmas, and I’ve been quite frustrated by the animal-appearing-out-of-nowhere-in-the-middle-of-the-frame issue, as well as the complete inability or unwillingness of Browning’s customer service staff to address or explain it. Thank you for clearing it up for me.
On a separate note, I’ve also been really unimpressed with the picture resolution. My husband chose this model because reviews said it had super fast trigger speed and great picture quality, and neither of those is really panning out.
I’m glad you found this post useful. I’ve always found Browning tech support to be responsive, if not always helpful.
I’m a little surprised about the resolution issue you’re having — this tends to be a strong point for these cameras.
Hey, I just stumbled upon your site, very interesting and helpful.
Those blinders certainly explain a lot, I´ve been using the BTC-7E-HP4 for a couple months now and was wondering if mine was perhaps faulty. I use it for videos only and get a lot of videos with animals already in the center of the frame when the capture starts, or already leaving the field of view when they´re moving a bit faster. This really defeats the supposedly fast trigger speed.
I`m also a bit worried about moisture in the camera, I´ve seen some inside the light sensor/aim led before and there seems to be a small amount of dried water on the inside of the camera lens glass, can´t quite tell.
Another issue I´ve been having is the color adjustment happening during recordings. At first there always was a bright flash at the start of every video, which has since been fixed by a firmware update Browning released. However, instead of that short overexposure period, now there´s this very noticeable change from a more neutral color scheme to a warm color scheme in the first second, or sometimes during the recording.
Apparently that is some kind of color enhancement. I´d be okay with either color scheme, I just don`t like the fact it abruptly changes during the recording. I think it might be possible to disable that enhancement in software, have you had a look at the BTC-7E-HP4 firmware yet?
Also, on their website they state that it is not recommended to use their trail cameras with a wall sourced power supply as it could cause damage. Is there really anything to worry about if the power outlet has decent surge protection?
On a different note, do you have any experience with the Bolyguard SG2060-K or their 2060 series in general? I´ve been thinking about getting one of those. They aren´t as convenient to use as the Browning models of course, but the daylight video I`ve seen so far seems to have about the same quality as my Recon Force Elite HP4 videos and they`re significantly cheaper.
Maybe I will wait for the new Browning HP5 models to arrive instead, they seem a bit expensive though, especially here in Europe. Are you planning on reviewing those models too?
Glad you found us!
You’re right to be worried about moisture, as it certainly has the potential to damage the camera. I’ve heard this reported for other HP4s, but I do not yet know where it’s coming from. I have an idea for debugging the problem based on (slightly) pressurizing the inside of the camera case. Let me know if you’re interested in more detail. Unfortunately, there is not a lot of room in these cameras for something easy like a silica gel pack.
We’ve also seen the “automatic” color adjustment that these cameras do, even as the video is being recorded. This effect is especially prominent if the lighting in the scene changes dramatically, such as when a big animal is moving through the frame. Or, in the case of my white flash conversion, when an animal moves in and out of the LED-lit area. I agree that it’s almost certainly under software control, although I have not looked at this so far. These cameras have of a general-purpose processor and a specialized video/image processing pipeline. The general purpose processor runs user interface, and the file system on the SD card, and it configures the image processing pipeline. Unfortunately, without knowing how the image processing pipeline is built, it’s hard to figure out what the (unnamed) configuration commands and options do. You’d have to change things one at a time and see if you can tell what it’s doing. I’ve avoided this so far.
On power supplies: A wall adapter rated at 12V with a “positive” center barrel connector looks the same to the camera as Browning’s 12V battery pack. I’ve used a wall adapter extensively when reversing the BTC-7A.
I do not have any experience with Bolyguard cameras. I have seen some nice images from these cameras.
And finally, regarding the HP5 — I’m working on a post even was we speak. Spoiler alert — the “blinders” are gone!
Hey, thanks for your reply.
I’m a bit reluctant to make any changes to the camera that could void warranty, given it lasts 2 years. If the moisture problems take over hand or even damage the camera, I’d probably get a replacement unit. Still happy to hear your solution, it might come in handy in the future in case the camera outlasts the warranty.
I should have clarified, Browning support confirmed to me a while ago that this issue I’ve been experiencing is a color adjustment of some sorts, meant to “enhance” images or videos with a more vibrant color.
There’s been a new firmware update for the BTC-7E-HP4 on March 22.
I don’t know what exactly this update is for, since there’s no changelog on this version, but I really hope this finally fixes the color changing throughout recordings, I will install it as soon as possible.
As for the Bolyguard, I ordered a SG-2060K and got somewhat disappointed. The video quality is as good as plenty videos online show, it can really keep up with the Browning models. However, this newest batch runs on a slightly different software version. Apparently there was demand for a timestamp on videos, not just photos. They now use the same yellow timestamp you’d see on very cheap, older trail cameras. Unfortunately, the option to disable it got removed, for whatever reason.
I’m leaning towards the Browning HP5 now, waiting to see some videos first.
The pricing here in Europe is interesting though to say the least. Browning sells them for 179.99$, cheaper than the HP4. Retailers here in Europe are now selling the HP5 versions for no less than 235$ for Recon Force and 260$ for Spec Ops. Maybe the prices will drop after a while.
Yeah — warranties are good things. Another friend went through a couple of exchanges of his HP4 under warranty with Trail Cam Pro (I think I’m getting this story right) due to water incursion. After that, they agreed that he would try to put them into drier sets. If your HP4 has moisture issues, you should ask for an HP5 to replace. Not mentioned in may HP5 teardown (I forgot) is IMO a better gasket around the case vs. the HP4. I’m hoping this addresses HP4 moisture problem.
Sorry to hear about the SG-2060K banner issue.
And good luck getting an HP5 at the right price.
Just posted my teardown of the The Browning Spec Ops Elite HP5. See full post, including the ever-popular disassembly video at: https://winterberrywildlife.ouroneacrefarm.com/2022/04/10/browning-spec-ops-elite-hp5-teardown/
Pingback:Browning Spec Ops Elite HP5 Teardown - Winterberry Wildlife
Hello and thank you for this post (and your teardown video)! These gave me the confidence to go in and replace the PIR baffle on several of my BCT-7Es–I really appreciate it!
I have an unrelated issue I’d like your thoughts on. Here are two night videos from one of my BTC-7Es (not the HP4, just the non-Elite Recon Force Edge):
https://www.youtube.com/watch?v=v3zK3_-NBj0
https://www.youtube.com/watch?v=6DJAgK_qojg
Note that the 2nd video is not that long after the first. This is the 2nd BTC-7E now that I’ve had these “dark” videos show up on: eyeshine from an animal triggering the camera, but no illumination. On the first BTC-7E the problem became serious enough that most of the night videos were useless. On this second BTC-7E, the problem is still rare; most of the night videos appear perfectly normal.
I’ve run both of these on an external battery (12.8v LiFeP04), the same as several other BTC-7Es I’ve never had a problem with. I had just switched out the battery the day before these videos were taken.
I’ve had the IR Flash Power setting to Long Range.
Any idea what might be going on here?
I *so* wanted to say “battery” — but I’m not, because you’ve thought of that, and you’ve used charged batteries that behave well for other cameras. Also, the camera is triggering correctly on the heat signature of the animal and taking the whole video — which means there’s enough power to keep the processor going even while the camera is trying to power the flash.
The eyeshine is a clue — it means that the IR flash is coming on a little — not enough to fully illuminate the scene, but enough to generate a little eyeshine. I’m going to go out on a limb and suggest one of the 4 ends of the two wires connecting the IR LED circuit board to the main circuit board has a cold solder joint. Sometimes it works, and sometimes it doesn’t. Over time, it would tend to get worse. Heat (caused by the high current from the power supply) may be enough to “fix” the flaky connection for the next video.
Open the camera that’s failing *most often* up (see the teardown video of the Advantage in https://winterberrywildlife.ouroneacrefarm.com/diy-converting-btc-7a-from-ir-to-white-flash/ ). Inspect the solder joints at both ends of the red and black wires that go from the main circuit board to the LED circuit board. I’m betting one looks different from the others. Reflow the solder on that one. If they all look the same, reflow them all 🙂
Let me know how you make out.
I thought of one other thing 🙂 See my post on “Hidden Test Mode” in recent Browning trail cameras . There is a menu option which allows you to toggle the IR flash on an off from the keypad. You can use that (and maybe your slightly IR-sensitive iPhone camera, depending on your eyes) to see whether flash reliably comes on and off without having to trigger, wait, take video, etc. See: https://winterberrywildlife.ouroneacrefarm.com/2021/08/31/hidden-test-mode-in-browning-trail-cameras/
Thanks so much for your quick and detailed reply/advice! I’ll pull this cam later this week and check out those IR LED wires. I’ll report back on what I find! Colin
Well keeping fingers crossed but your diagnosis appears to be right on target! I couldn’t see any differences in the 4 solder joints, so I resoldered/reflowed all 4 like you said. I ran it last night on the porch with a clumsy two-legged animal (me) as a test, and the night illumination looked wonderful. In fact better than I remember from this camera even before it started having the visibly dark images that caught my attention. It will go back into the field today, so I’ll post back after some time there. Thanks again for this great advice!
Colin
Those are all good signs! This is fortunate, too, as I am having trouble coming with an alternative diagnosis 🙂 . Good luck with your new sets!
Well I’ve had a chance to do a bit more testing, and the result is a mix of mostly good and a little bad news. I’m still getting one or two “dark” videos per week, but this is far fewer than I was getting before. I also ran a cycle where I used AAs rather than my 12v LiFeP04 just to make sure it wasn’t the LiFeP04 (although as I said initially I’ve run these with several other BTC-7Es without issues). These were rechargeable 1.2v NiMH–the same I’m using in several other BTC-7Es that have never had this problem. I ended up with same 1-2 “dark” videos as I had with the LiFeP04.
So I think I’ll likely open it up one more time and re-solder those leads. Maybe I “fixed” one but not one of the others? It’s still a very usable camera and thankfully I’m not having this issue with any others…hopefully this won’t develop in any others!
Colin
Hmmm. This is somewhat mysterious. The fact that it started (mostly) working after you reflowed the solder on the 4 connections to PCB is consistent with at least one cold solder joint. Cold solder joints are usually visible on inspection, but not always. Once fixed, by reflowing the solder, it is *very* unlikely they would fail again. I suppose you could have not quite fixed it, but I’m suspicious. Have you tried using the test mode (see my earlier response on this thread) to verify that it’s working (or, alternatively, to reproduce the problem at home)?
Hi Bob,
Very interesting article. And indeed, I suffer from the sudden appearance of animals in the middle of the image (video).
I have therefore decided to change the baffles of all my BTC-7E-HP4 cameras. First of all, I tried to modify an original baffle with a rotary cutting tool (a Dremel we call such a thing in Europe). The cutting discs cannot reach everywhere and the material tended to melt because of the friction.
So the cutting tool was no success.
So I thought, I’ll order 8 of them from a 3D printing shop. I have never had anything printed in 3D before and was very curious. What I received in the mail was a lump of plastic. I really can’t do anything with that. They are SLA prints. I had asked for maximum quality….
Did I make a mistake when ordering? Should it be a different printing technique such as FDM? Which technique should we choose here?
I don’t know if it is possible to upload a picture of the failed prints.
Kind regards,
Gerard from Holland
Sorry I just made a mistake in my previous comment. I had the baffle printed in FDM instead of SLA. So the question should be as follows:
Hi Bob,
Very interesting article. And indeed, I suffer from the sudden appearance of animals in the middle of the image (video).
I have therefore decided to change the baffles of the HP4. First of all, I tried to modify an original baffle with a rotary cutting tool (a Dremel we call such a thing in Europe). . The cutting discs cannot reach everywhere and the material tended to melt because of the friction.
So the cutting tool was no success.
So I thought, I’ll order 8 of them from a 3D printing shop. I have never had anything printed in #D before and was very curious. What I received in the mail was a lump of plastic. I really can’t do anything with that. They are FDM prints. I had asked for maximum quality….
Did I make a mistake when ordering? Should it be another printing technique such as SLA? Which technique should we choose here?
I don’t know if it is possible to upload a picture of the failed prints.
Kind regards,
Gerard from Holland
A lump of plastic is not what we’re looking for 🙁 Sorry to hear of this experience.
First, let’s double check the link to the .STL file. Should be:
https://github.com/robertzak133/DIY-3D-Parts/blob/main/BTC-7E%20PIR%20Sensor%20Baffle-v1.stl
Second, when you open the link to the STL file, on github, you should see a rendered 3D model. Do you?
I’m not sure which 3d printing house you’re using. I use Sculpteo.com, which provides a 3d rendering of any part you download. Does your vendor provide a rendering (that’s not a blob of plastic)?
In terms of material, I use Nylon PA12. But I can’t imagine a different material choice would result in a blob…
If the design file is right, and you’ve already spent the money, I’d try contacting the 3d printing service and let them tell you why it didn’t work, and get you a proper part.
If this doesn’t work, you can try the following link on Sculpteo. Part is ~$6USD (subject to minimum order)
https://www.sculpteo.com/en/print/btc-7e-pir-sensor-baffle-v1/DiAzxcpm?basket=1&noclickredirect=1&uuid=kVsBUEXUM1HZ7OiGPz7WOd
(at the time of the original post, sculpteo was not supporting public models. They seem to be doing so now…)
Hope this helps.
Hi Gerard!
I just wanted to share that I manually modified mine with a Dremel/rotary tool. While the result was not “pretty” like the 3D printed versions, it definitely worked. You are right that the cutting discs will not “reach everywhere.” I started with the disks, and cut down as far as they would go. Then I use some narrow pliers to wiggle the plastic pieces back and forth to break them off. Then I use those pliers to wiggle/break off small additional pieces as much as I can to get near the “edge” of the baffle piece. Finally, I used a different rotary tool attachment (an egg-shaped attachment with rough ‘sanding’ material on it I believe?) to “carve” down the edges and get closer to the “edge” of the baffle piece.
You are right that the plastic material did “melt” a bit in spots, but I would just run the tool in short bursts, then scrape the melted material away with a knife blade, small file, etc. as I went.
My only concern was that for two of them, I worked too close to the baffle “edge” and actually made a small hole in the side. I covered that up with a thick piece of tape (you could make a better repair with a small piece of plastic and expoxy/glue). From what I can tell from my photos/images, this did not affect how the camera has worked.
I think making/ordering baffles is probably the better approach, if for no other reason than that you can easily revert back to the original baffle if you decide the modification isn’t producing the results you want.
Bob, it is not the .STL file. That is all in order. I can also just see the rendered 3D model.
I have contacted another 3D printing service. Their answer: “They are good 3D printable and I don’t expect any problems with them. Please note that the quality of the file is quite low, and in round planes the facets are visible,
an .stp or high-quality stl would make this a bit rounder”.
This is a translation from Dutch.
So I am going to have them printed by these people (in the Netherlands) As soon as I have them, I will let you know. If they are usable I will mount them in the cameras.
By the way, do you have the idea that when you change the baffle, the lens is still watertight in the housing?
I plead guilty to the “less round” facets on circular structures, but what’s there is good enough, in my experience. (If you want to add more facets to smooth it out, you’re welcome to modify the TinkerCad file linked in the post).
The rounded feature on the top (opposite the hole for the PIR sensor) is what presses the Fresnel lens up against the gasket that keeps water out. This part should work at least as well as the original (and has on the camera we have it installed in).
Good luck.
Yes, I also think that your design is round enough. I only showed the reaction of the printing service.
Did you notice any difference in trigger speed or the appearance of the animals on the image with your camera Bob?
Are there already more people who have changed the baffles?
(no offense taken re: “roundness” — just wanted to confirm that the vendor gave you accurate feedback 🙂 )
It’s non-trivial to test the PIR sensor and Fresnel lens on these cameras. I would not expect a camera with the “blinderless” baffle to have a faster trigger speed. I would expect it to widen the field of view of the detector. This should enable it to detect an animal crossing the frame (left to right, or right to left) when it is closer to the left or right of the frame. Especially for videos, this should extend the time in which the animal is in the frame — a generally desirable feature. This follows from the physics, though I have not done a controlled experiment.
I know of someone else who was going to 3d print the part, but not the outcome. There may be more. Ours has been out working in the field for a while now.
Of course you are right, trigger speed will definitely not change. And that is absolutely not necessary with these cameras, they are already lightning fast.
If the baffles are good enough, I will mount them. I will certainly post the results here.
But since the cameras are going into wolfterritory, it will be a while before I check them. I will stay away until the pups are already roaming freely and relocated to the next “Rendezvous” site. I don’t want to disturb the packs.
Bob, if you are interested in photos of the 3D prints, and the ie badge disaster. Just send me an email, I can’t upload images here.
Wolf project sounds super interesting. And you’re absolutely right to leave the camera (and wolves) alone for a good long time. We can wait 🙂
Also, thanks for volunteering photos of your build — I will send you an email shortly
I did the PIR modification a couple of months ago on several of my Browning cams, and I wanted to share one caveat/limitation I’ve discovered. I review my camera footage by opening the folder with the videos in Windows explorer, then selecting “preview” pane. This allows you to scroll through the vids and see a “preview” of the video, which in the past always included a view of the critter (or shadow, grass, etc.) triggering the video capture. Now, after the PIR mod, this technique is not as effective. This appears to be because the “preview” image does not include the full image—it “crops” a bit off each side. Since the PIR modification facilitates triggering at those “edges,” I have now “action” at the edges that I’m unable to see via the “preview” technique.
So just something to consider. A solution would be to use another technique to review videos than the Windows explorer view/preview, so I’d sure like to know what techniques other may be using. When I recover cards from several cams that have been out in the field for 4-5 weeks, I’m usually looking at hundreds of images (many false triggers certainly), the folder view/preview method has been very effective in culling my vids efficiently.
Thanks for posting your experience with this fix. I can see where giving the PIR sensor a wider field of view might reduce the number of thumbnails with animals in them. A solution would be to use AI techniques to find the “best” frame to serve as thumbnail (vs. the first frame, typically used). I’m sure this will come.
So I searched around a bit and found an option that isn’t a total solution to this problem, but is a big improvement over manually opening and closing each video. It’s a Microsoft Store App called “QuickLook”–free and something that should come with the regular Microsoft OS I think (https://apps.microsoft.com/store/detail/quicklook/9NV4BS3L1H4S?hl=en-us&gl=US). Once installed, you review your videos in the folder as you normally would; I use “Extra Large Icons” view along with “Preview Pane.” As you move through each file, just hit/hold the space bar and a window pops up playing the video. When you’ve reviewed as far as you’d like, release the space bar and move to the next video. ‘Much faster than manually opening, waiting for your video playing software to load, watching the video, manually closing, etc. This isn’t as fast as just eyeballing the “previews,” but since the “previews” are cropping those edge-of-frame movements, this may be the next best option. I think Mac users may have more/better options than Windows so this may not be an issue for them, but for PC users this is something to consider.
Thanks for the pointer to this tool — I tried it and it does a pretty good job! We also use an old Microsoft tool — Photo Gallery. Though no longer supported by Microsoft, it is still available for download, see: https://answers.microsoft.com/en-us/windows/forum/all/install-windows-10-photo-gallery/6f424e9f-283d-44ba-9a1b-50a25b05c7e6 . The newer microsoft photo apps aren’t really suited for quickly reviewing a lot of small videos 🙁
Hey thanks for the ‘heads up’ on Photo Gallery–I’ll give that a look too 🙂
I’ve been playing around a little more with QuickLook, and it’s handy for reviewing photos too. I do a fair amount of “nature” photography, at at the end of the day I have a folder with several hundred shots. So out of 20-30 shots of a bumblebee, I’m looking for 2 maybe 3 that are decent enough to ID the species. The “preview pane” in Windows is pretty good for this, but QuickLook is even more useful since you can use the scroll wheel on your mouse to quickly zoom in on your photo and decide whether or not it is a “keeper” or not. All of this without having to actually *open* the photo in any kind of separate software. I think this will speed up my workflow when I’m trying to plow through lots of shots at the end of the day…
Pingback:Inside the Bushnell Core DS 4K Trail Camera - Winterberry Wildlife
Hello
do you know what PIR Baffle is in the browning recon force edge, if yes can it be replace without the blinder
Yes and Yes. I just checked, and a recent Edge does indeed have baffles built into the PIR sensor flange. You could remove the baffles by hand (maybe with a grinding tool? — I haven’t actually done this) of make a 3D-printed replacement based on the STL file in the post.
thank you so much for the info
I’ve just binned my 27 month old BTC-7E-HP4 due to its draining batteries even when it’s turned off. A new set of 8 would last less than 48 hours. Had been working OK up to when the issue became apparent. I tried Brownings help line for suggestions via email but they didn’t acknowledge or reply. I will not be replacing it with another from Browning nor purchasing any other of their products.
Bummer about your HP4. 2+ years in the field is not terrible, but Browning should do a better job at least answering email. Perhaps they’ll see this post. In any case, well after the warranty period, they are most likely to offer you a new camera at a discount as a replacement. Calling on the phone usually works for contact.
In terms of the likely failure, my first guess would be a failed internal battery/ultracapacitor responsible for keeping the clock going during battery changes. I have found that a little moisture in the camera often corrodes the contacts on this battery, allowing current to pass where it shouldn’t. The recharging circuit then drains the primary batteries trying to keep the internal battery charged. See: https://winterberrywildlife.ouroneacrefarm.com/2021/06/30/how-some-trail-cameras-fail/#early-battery-drain
Keeping moisture our a camera is a hard problem. Keeping standing water off the housing helps. We use metal security boxes primarily for security, but they also serve to divert rain and/or water flowing down the tree trunk, off the housing. Hope this helps.
Hi I have woodpecker damage to my pir lens on my BTC-7e-hp4 and it looks like browning website out of stock. Anyone know where else I could pick one up please. Thanks in advance. Rhonda
I just looked at the Browning “extra part” website — the cupboard certainly looks bare. I notice that they do have PIR sensor lenses in stock for the BTC-{7,8}FHD cameras. I just measured the opening in the camera case of the HP4s and the 7A (which is the same as the 7FHD), and they are the same size. The detection zones may not be the same, but they were good enough for these earlier cameras 🙂 I would give these a try. I don’t know of any other source for Browning PIR lenses.
Hi Bob, I have a Browning BTC-8A with Magpie damage to the PIR lense. The lense is not in stock on their website.Would the BTC-EXP be compatible? Grateful for any help.
Thanks
Lou
A pir lens for a btc-7fhd should work fine in your btc-8a. I’m not sure about the btc-exp.