
How (some) Trail Cameras Fail

Most trail cameras work most of the time. However, the outdoor environment is hard on electronics and some fail. In this post, I review the record of cameras we have used over the years to give an account of symptoms, failure modes, and in most cases, fixes. Perhaps this will help you figure out what’s wrong with an out-of-warranty camera. Even better, if trail camera manufacturers could take this information to heart, perhaps they could eliminate these failure modes from future models!
[Updated 2021-07-19] Added “Disassembly Notes” section at the end of this post with tips on taking some cameras apart.
[Updated 2022-09-19] Added some new failures. Last notice of update on this post, although I will continue to add to it as I become aware of more failure modes.
Overview of Failures
The table below gives a summary of failures and fixes discussed in detail in the rest of this post. Follow hyperlinks in the “Name” column to get to each.
| Name | Symptoms | Failure | Fix |
| Stuck IR Filter | Pink day photos; dark night photos | Cold solder joint on leads for IR filter motor | Reflow solder on IR filter motor leads |
| Digital Image Artifacts | Portion, or all of vidoe or photo frame has “digital” artifacts. E.g. very wrong color, or vertical lines, or “split screen” | (Likely) Main processor failure | Repair not practically possible. |
| Run-On Triggering | Multiple videos with no animal after legitimate trigger | Thermal path between CPU and PIR detector causes self-triggering | Increase delay between triggers; push PIR detector 1 mm up off surface of PCB; tighten CPU heat sink screws |
| Loss of Focus | Over time, photos and videos become blurry and out of focus | Failure of lens, which sometime seem to develop an “astigmatism” (areas that our out of focus) over time | Replace the image sensor lens |
| Early Battery Draining | New batteries fail after a few weeks in the field | Corrosion of small internal battery leads to higher than normal current drain while camera is in “sleep” mode | Remove corroded battery, clean PCB, replace with a new cell. |
| Reset Date/Time | Date/Time reset to some default (e.g. 12:00, Jan-1, 2017) despite being recently set. Other camera settings are preserved | Wearout of the small internal battery prevents real time clock from working | Remove discharged battery, replace with a new cell. |
| Reset Date/Time and Lost Settings | Date/Time and other settings (e.g. “mode”, “video length”) reset to some default value when camera is turned off, then back on (or when triggered) | Corruption of internal configuration file | Hard reset by removing/reinstalling batteries. If that doesn’t work, reload firmware |
| Lost Settings | Menu settings (e.g. “mode” , “video length”, etc.) reset to some default value when camera is turned off, then back on (or when triggered) | Failure of EEPROM | Replace EEPROM with one programmed with factory image |
| Lost Time | Time is off by an hour or more, despite being recently set | Unknown | Unknown |
| Punctured PIR Lens | PIR sensor stops working; water incursion; visible damage to PIR lens | Thin Fresnel lens over PIR sensor is punctured or broken, often by a bird pecking at it; sometimes by a large tooth | Replace Fresnel Lens with replacement from manufacturer |
| Flash Failure | Dark night shots; IR Flash does not come on | Drive transistor for high current IR LED array overheats, melting plastic, opening circuit | Replace drive transistor if possible. If plastic is damaged, time to retire camera |
| No Photos Taken | Despite new batteries, working SD card, correct settings, correct arming, camera takes no photos/videos | Unknown | Unknown |
| Water Incursion | Moisture or condensation visible on the inside of the camera, often in front of camera lens, or LED flash window | Design limitation; failure of gasket systems; crack in Fresnel lens for PIR sensor. | Design problems may not be repairable. Check all gaskets for integrity and proper seals. Check Fresnel lens and replace if cracked. Place camera in security box; or cover with a “roof” to limit water from the top. In very wet (e.g. tropical) environments, consider putting desiccant material inside the camera enclosure |
| SD Card Failure | Camera will not turn on, or freezes, or does not take photos or videos, or runs down batteries in <48hours | SD card is unreadable, unwritable, or returns errors to firmware which cannot be handled | Discard SD card and replace with one that works |
| SD Card Corrupted and Battery Dead | Same as above | Most likely SD card spontaneously fails in camera | Discard SD card. Full format new SD cards in PC before deploying in camera. Quick format, take test photo in camera. |
| Sound Failure | Audio associated with video is missing sound, or is crackly and noisy | Microphone is damaged, or wires have become disconnected | Replace microphone |
| LCD Failure | Loss of one or more colors on LCD screen, or loss of contrast, or lack of backlight | Failure of LCD module in time. Less likely, water contamination of flex cable connector | Remove and clean flex cable connector for LCD screen. Retest. If this does not work, replace LCD module. |
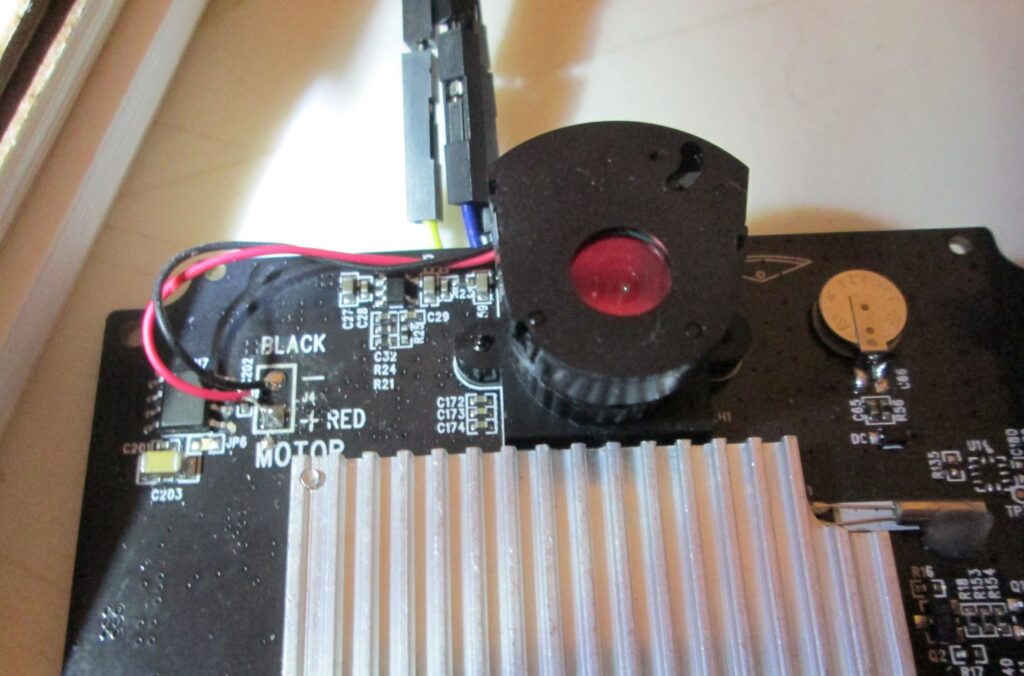
Stuck IR Filter
Many cameras use a motor-driven IR filter to block out IR during daytime photos, while allowing IR to get to the sensor for night time photos. If the IR filter is working, you can hear a faint “click” as a tiny, simplified, electric motor moves the IR filter from one stable position to another, and back.
Symptoms of Stuck IR Filter
Failures of the IR filter result in two kinds of “wrong” photos/videos:
- If the IR filter becomes stuck while disengaged (not covering the lens and image sensor), nighttime photos will be fine, but daytime photos will be pink. This is because the image sensor is interprets the IR from the sun as “extra” red. This is the problem with the pink panther in the intro photo.
- If the IR filter gets stuck while it is engaged (over the lens and image sensor), daytime photos will be fine, but nighttime photos will be very dark, because the stuck IR filter is preventing IR light from the flash from getting in. This is sometimes misinterpreted as a failed flash unit. It can be differentiated from this case if the flash itself is actually coming on during night shots.
The IR filter is often the only moving part in a trail camera, and therefore subject, in principle, to mechanical failure. Some manufacturers even go so far as to offer models with two image sensors — one with an IR filter, and one without — in part to avoid the possibility of IR filter failure.
Debugging Stuck IR Filter
False Lead: It’s not the mechanical part!
In debugging these cameras, my initial hypothesis was some sort of mechanical failure of the motor system. On investigation, I found that the motor mechanism is refreshingly simple and robust. In all cases of “stuck filters” I investigated, the IR filter mechanism showed every sign of working correctly, as shown in video below.
The Real Culprit: A Cold Solder Joint
Instead, the problem has been a cold solder joint between the wires from the main PCB to the IR filter motor. Cold solder joints occur when the solder doesn’t quite get hot enough to melt completely. The connection can look good, and even work well for a while. Over time, however, the connection fails, eventually leading to a sometimes intermittent open circuit. Cold solder joints have a notorious history, but have largely been eliminated by automation from modern, mass-produced electronics. I believe they occur in some trail cameras because of manual soldering of the IR filter motor wires to the PCB, and because at least one of the PCB pads dissipates a lot of heat, and is therefore more difficult and time-consuming to solder correctly.
Fixing Stuck IR Filter
One can sometimes “fix” a cold solder joint by mechanical agitation. Yes. By “banging it.” Unfortunately, the problem is likely to recur as thermal changes and oxidation work their undesired magic. The permanent solution is to open the camera and to use a soldering iron to reflow the solder on the offending joints. Nowadays, I need a magnifying glass (or better, a binocular dissecting microscope) to watch the satisfying point at which the solder melts into a uniformly shimmering mass and wicks completely around the pad on the circuit board and the wire to the IR filter motor.
Digital Image Artifacts
Symptoms of Digital Image Artifacts
In this failure mode, reported to me by followers of this web page, the image files written to the SD card have “digital image artificats”. These artifacts may include bizarre coloring, visually noisey or solid horizontal stripes, or multiple “images” or pieces of an image in the same file. These artifacts are “digital” in the sense they don’t reflect the “analog” artificacts that might actually occur in an image. E.g. poorly lit, washed out, blurry “blobs” or eyeshine reflections.

Digital image artifacts may affect all of the photos and videos taken by the camera, or may only affect a subset of images. They may appear consistently through a whole video, or may change, flashing in and out, between portions of a video.
Debugging Digital Image Artifacts
Sometimes digital artifacts will result in images with pink color, also seen in “Stuck IR Filter.” We can rule out “stuck IR filter” if only a portion of the image is pink, or if the pink coloration occurs in night time video.
I have not debugged one of these failures to a root cause, but I believe these digital image artifacts are caused by a failure of the video memory used by the main processor in the camera to process the image on its way to becoming the .jpg or .mp4 files that are written to the SD card. The consistent failure of even a single bit can lead to incorrect color, and address decoding errors can lead to portions of the memory (and therefore the image) not being updated at all, and thus having only uninitialized data.
Fixing Digital Artifacts
Unfortunately, there is not a practical way to repair cameras with this problem. In principle, one could replace the main processor itself, but his part is not available on the consumer market, and would require lab equipment and expert time to remove and replace. One could also replace the entire main circuit board, but this circuit board is the bulk of the cost of the camera, so you’re better off with a new camera.
Run-on Triggering
Symptoms of Run-on Triggering
This is a problem I have seen in several cameras. I even featured one of these failure modes, in which a camera suddenly “photos itself to (battery) death” in an earlier post. See: Runaway Trail Camera. I have recently seen a variant of this problem in Browning models BTC-7A and 8A. The camera takes a video on a legitimate trigger, but then continues to take videos constantly for up to several minutes. This even though the animal has long left. We have seen this failure develop in cameras over time. That is, initially the camera operates correctly, but over time, it begins to get more and more of these “run-on” trigger events.
Debugging Run-on Triggering
After some investigation, I believe this problem is caused by unwanted coupling of heat between the microprocessor (used to process the video and compress it into MPEG files) and the PIR sensor. As cameras get smaller, designers are more likely to put the heat-generating processor closer to the highly heat sensitive PIR sensor. This at the same time they are using increasingly sensitive PIR sensors (to capture all those animals!) , and processing higher resolution videos (generating more heat from the microprocessor). The PIR sensor is sensitive to changes in its local temperature, which can cause it to trigger falsely.
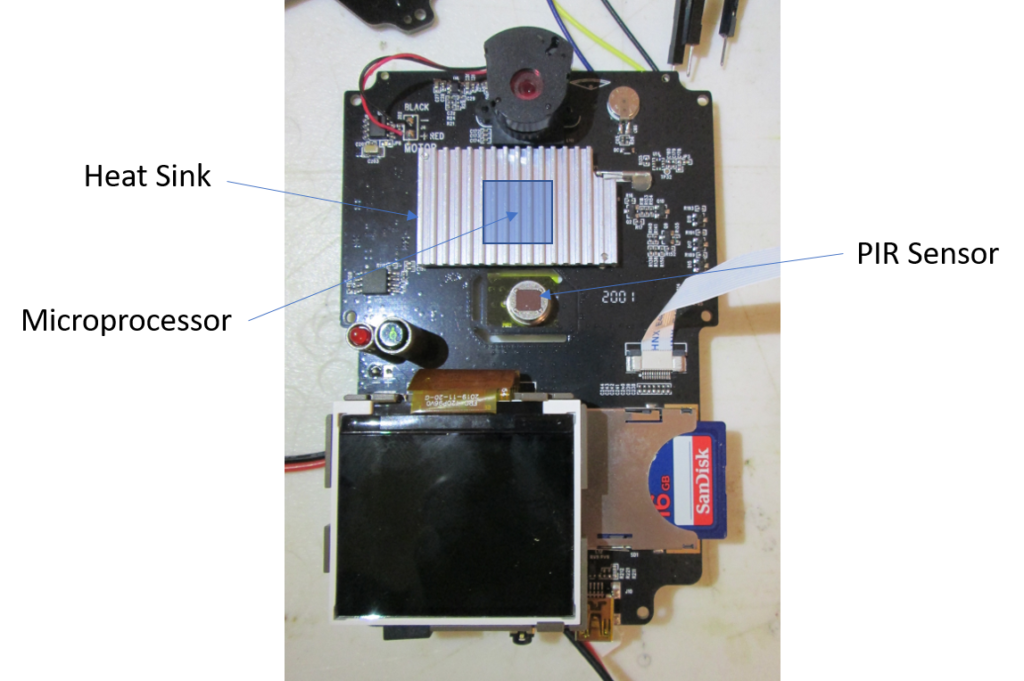
In the scenario I have documented in the lab, the processor heats up while processing the first video. Then the heat from the processor travels through the PCB to the PIR sensor. The PIR sensor starts becoming warmer at a rate that exceeds 2 degrees Celsius per minute (the rated maximum spec on the PIR sensor). This causes the PIR sensor to immediately trigger, which causes the processor to get even hotter, and so it goes. Fortunately, the PIR sensor is only sensitive the the rate of change of its ambient temperature. Once the the sensor reaches an equilibrium temperature, it stops triggering, and the run-on stops.
I think the root causes of the problem are some combination of:
- insufficient margin in the thermal design of the camera
- a possible design or manufacturing error in which the PIR sensor is placed flush with (and therefore in tight thermal contact with) the PCB
- failure of the the thermal bond between the processor an the heat sink, causing PCB, and with it the nearby PIR sensor, to get hotter
Update 2021-11-10: We noticed that this problem seems more common in Browning Spec Ops Advantage (BTC-8A) vs. Recon Force Advantage. Turns out that the BTC-7A has a series of cutouts in the PCB around the PIR sensor which limit heat flow (see photo above). The (earlier?) BTC-8A PCB does not have these cutouts. Increased heat flow through the PCB in these cameras explains the increased prevalence of this problem.
Update 2024-02-03: After a long hiatus in Browning trail cameras, this problem has made a comeback in certain instances of the Elite HP5 SpecOps and ReconForce cameras. These cameras have a substantially different internal design vs. the Advantage series cameras I focused on in the original post. Gone is the CPU heat sink, and the PIR sensor is now on a separate “daughter” PCB. It is possible that pushing the PIR sensor a mm or of above the daughter card may help in these cameras as well, though I have not yet tried this.
Fixing the Problem
One can work-around this problem by setting the “Photo Delay” parameter (the minimum amount of time the camera will wait before re-arming) to be larger. This allows the camera to cool down a little before waiting on the PIR sensor. Unfortunately, this also means that the camera won’t retrigger quickly if the animal is still there.
I have had some success in reducing (if not completely eliminating) the problem by:
- tightening the screws which help hold the heat sink in contact with the processor. This allows more of the heat generated by the processor to be dissipated by the heat sink, reducing the heat flow through the PCB, and ultimately to the PIR sensor.
- unsoldering the PIR sensor; pushing it up off the PCB by a millimeter or so, and resoldering. This increases the thermal resistance between the PCB and the PIR sensor, thus reducing heat transfer.
Loss of Focus/Photo/Video Clarity
Symptoms of Loss of Focus
I have seen this problem now in several Browning models (e.g. the Recon Force Extreme BTC-7FHD-PX, and the newer Recon Force Edge BTC-8E), but I expect it to be endemic to exist in other types of cameras as well. Initially, the camera takes great, crisp and clear color and night time photos and video. However, over time, the quality of the images deteriorates as both the photos and videos become blurry and out of focus. On careful inspection. one can sometime see that only a portion of the image is blurry and out of focus.
Debugging Loss of Focus
After much head scratching, I came up with a simple experiment that at least isolated the problem. I took a series of photos of myself at varying distances from the camera, with and without a “corrective” magnifying lens from a pair of reading glasses taped in front of the camera’s own lens. I found that in all the photos without the corrective optics, the photos were blurry and out of focus. However, for some of the photos taken with the corrective lens, the photos were in perfect focus.
The fact that the corrective lens fixed some of the photos ruled out any problem with firmware or processing hardware. More subtly, it ruled out the possibility of lens becoming scratched, cloudy, or perhaps covered with condensate.
This problem remained mysterious to me because the “fixed focus” plastic lens mount and lens seemed so solid. Not so.
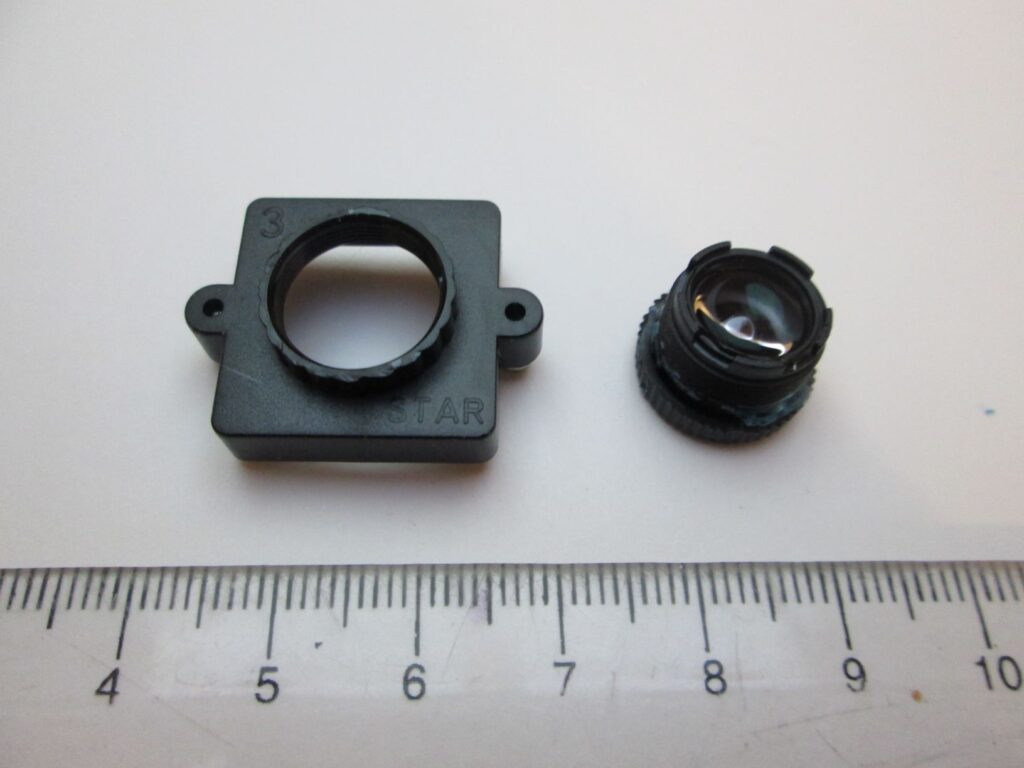
Details on the Lens Assembly
As shown in the photo below, the “fixed” lens assembly is actually two pieces. The first piece is a Type-S, or “M12” lens mount, which attaches to the PCB with a pair of screws. The lens mount has a 12 mm hole, tapped with a 0.5 mm pitch set of threads. A small lens screws into these threads. The amount that the lens is screwed-in determines its distance to the sensor, and therefore the optical focus.
A Theory Revised
My original theory was that the lens was somehow rotating in the mount (possibly due to improperly installed glue), causing the camera to lose focus.
Subscribers to the blog (thanks Ulli and Dan!) had this problem and agreed to test out my early theory. They found that the glue was solid. Moreover, that since the IR Filter motor is stuck to front of the lens, and it had not rotated, neither could the lens. Finally, when they turned the lens (a good half turn) they found that it fixed the focus in one part of the image, but made it worse in other parts of the image.
This new data required a new theory, and here it is: the lens itself is deteriorates over time. This is not surprising, given the number of thermal cycles these cameras often experience, and the low-cost, plastic housing for the lens components. I’m imagining that the lens assembly somehow goes a little out of alignment, causing the image to become defocused. I have verified, in any case, that replacing the lens fixes the problem.
Fixing Loss of Focus
This repair requires replacing the image sensor lens. In the repair I did, I used a lens from a “parts camera” as a replacment. I am currently working on a post that includes sources for replacement lenses. Until then, I would not recommend simply buying an S-type, M12 “compatible” lens as a replacement. Trail cameras seem to rely on a unusually compact lenses, and most of the lenses I’ve found on line are too long, and won’t fit in the camera. Stay tuned.
The repair involves getting into the camera, removing the main circuit board, removing the IR filter motor assembly from the top of the lens (it’s held on by double sticky tape). I replaced the whole lens mount/lens assembly, but it’s possible to just change the lens. The latter requires removing the glue along the threads. Dan advises the use of small screw driver heated with a flame to soften the glue. Future post will include details on setting the focus correctly.
Early Battery Drain
Symptoms of Early Battery Drain
Occasionally, cameras seem to drain batteries very quickly. This whether they are taking photos and videos or not. A modern trail camera should take tens of thousands of photos and several hours of video, even at nighttime with the flash, on a new set of AA Energizer Ultimate Lithium batteries. It should last in the field without taking videos or photos (just waiting, with the PIR sensor active) for years.
We recently ran across this problem after a long hiatus when retrieving a “pandemic” camera that had been in the field for over a year. Unfortunately, this Browning Strike Force HD Pro (BTC-5HDP), with a new set of 6 Energizer Ultimate Lithium batteries exhausted its batteries, somehow, after less than a month. This was particularly frustrating, since it was in a really good spot! During the month it worked, it got some great photos, and would have undoubtedly gotten many more had it not failed. The silver lining is that I got to investigate this failure mode in detail.
Debugging Early Battery Drain: Typical Trail Camera Operating Current
Trail cameras consume power in two ways: while taking video or photos; and while waiting to take video or photo. Actually taking the the photos/videos consumes much more power than simply waiting. In this camera — the active power is about 650 mW, whereas the “sleeping” power is close to 650 uW — or 1000 times less.
The camera in question used the batteries at greater than 60 times the expected rate. This is very difficult to do in the active state — since consuming ~60 times the power is hard to do with the available components, even in failure. This caused me to suspect the “sleeping” power. Since this power is very low to start with, there are several possible failure modes which could consume little absolute power, but still much more than the intended idle power. Since idle power is consumed all the time, even a small amount can drain the batteries over a series of days or weeks.
I used my digital multimeter to measured the current (which is proportional to power) consumed by the problem camera. I happened to have (from the same trip) a camera of the same model that had not failed, which I was able to use as a reference. I confirmed that the current (power) consumed by both cameras in “active” modes — that is taking photos and videos, or displaying the user interface — was very close.
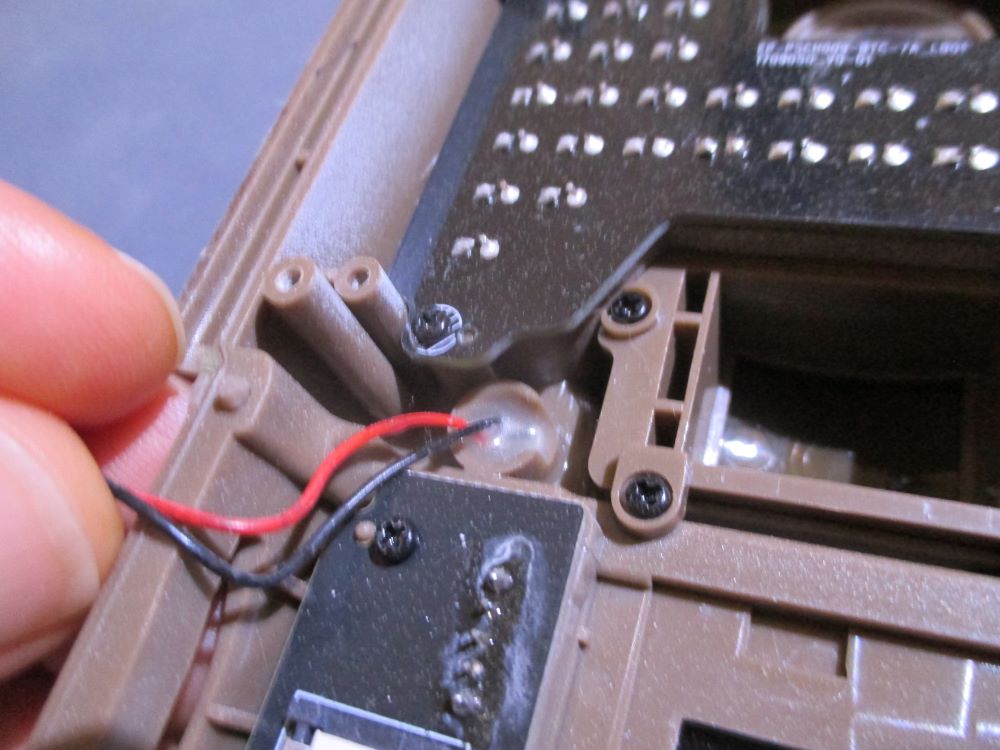
Then I moved on to the “sleep” mode and found some strange behavior in the problem camera. Unlike the good camera, which consumed a constant ~50 uA, the problem camera started out consuming 3 times this amount. Over time, it seemed to approach the lower figure, but the long time constant (10’s of minutes) suggested some energy storage element — a capacitor or perhaps battery — was not working properly.
On visual inspection, I found a small battery on the PCB with some corrosion between the positive and negative leads. This battery is used to power the real-time-clock (RTC) (date and time) device while the user is changing the main battery pack. This battery is designed to be “trickle charged” at a very low current (< 10 uA), and can power the RTC for several hours.
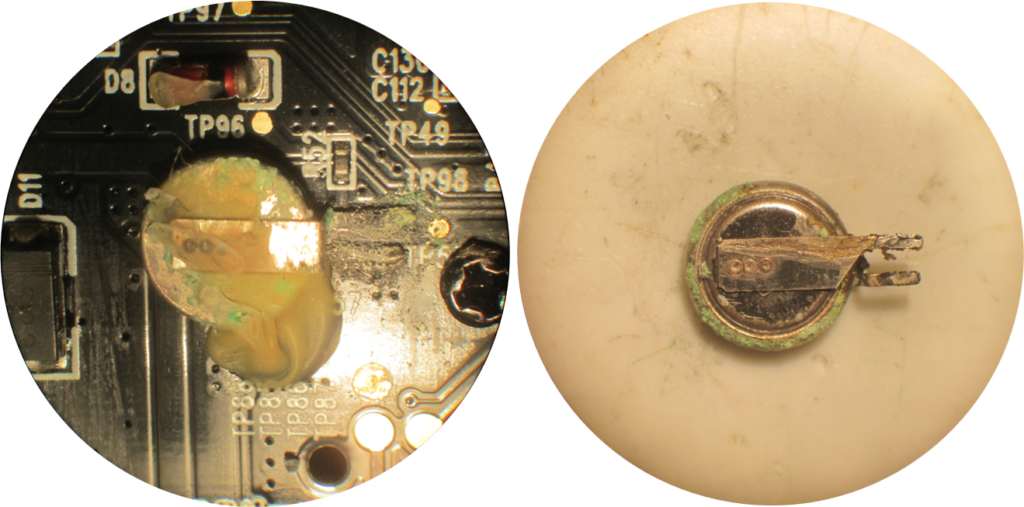
In the case of the failed camera, some bit of moisture lead to corrosion between the positive and negative battery pins. Alternatively, the battery itself failed due to thermal cycling, and started to leak. Whatever its source, the corrosive mixture created a parasitic circuit between the battery pins. This “short” drained the battery and caused the charging circuit to try to draw more current as it tried to charge the small battery from the main battery pack. After 30 days of doing this, the main battery pack was completely drained. Diabolically, in the intervening year, the corrosive mixture dried out and became less conductive, masking the original failure mode.
Fixing Early Battery Drain
I was able to find a similar, 3V, rechargeable, surface mount battery online (see references) — the Seiko MS920T-FL27E for a couple dollars. It is slightly larger than the original cell, but none-the-less fits on the PCB, and has a compatible set of pads. I removed the old battery using some solder wick, cleaned up the board, and then installed the new battery. The current draw in “sleep” is now back around ~50 uA, and the new battery maintains the RTC while I’m swapping the main battery pack.
Reset of Date/Time
Symptoms of Reset of Date/Time:
Date and time on camera are incorrect, appearing as the pre-set default (e.g. 12:00 am, Jan-1, 2017) , even after being properly set. Depending on the type of camera, the data and time may go awry only during changes of the primary battery pack, or even with the primary battery pack installed (and charged). This problem usually develops after cameras have been used for several years.
Debugging Reset of Date/Time:
Verifying this problem is done by opening the camera and measuring the voltage across the two terminals of the internal battery. See photos in “Early Battery Drain” section, above, for an example of what these batteries can look like. Assuming a 3 Volt battery, a measurement below ~2.7 Volts indicates battery is discharged.
Cause of Reset of Date/Time
In addition to the main battery pack, most trail cameras have a small internal battery permanently mounted on the PCB. This battery or ultracapacitor provides continuous power to an ultra low power “real time clock chip.” In some cameras, this battery or ultracapacitor is rechargeable, taking a trickle charge from the main battery pack. In other cameras, the battery is not rechargeable. In either case, failure of the internal battery (either due to charge/discharge cycles, or just running out of power), removes power from the real time clock chip, causing the camera firmware to revert to the default, preset value.
It is possible that extreme temperature fluctuations, hot or cold, may lead to early failure of the small internal battery.
Fixing Reset of Date/Time
This problem can be resolved by replacing the battery on the PCB. This procedure is the same as described in, “high battery consumption.” The first, and most important step is to find a proper replacement battery. A non-rechargeable battery should never be used as a replacement for a rechargeable battery. I do not have samples from very many cameras, but the table below summarizes what I know. If you find other replacements for other cameras, led me know in comments below. Ideally, the battery will be marked with a manufacturer part number.
| Camera | Markings | Type | Replacement(s) |
| Browning BTC-{7,8}A | ELNA 3.3V 0.2F | Ultracapacitor | ELNA DCK-3R3E224U-E, KORCHIP DMS3R3224 |
If the battery is not labeled, there are other ways to determine whether the battery is chargeable, or not, and the nominal voltage.
The failure mode can provide insight into the battery type. If the camera loses track of date/time even when primary batteries are installed and charged, there is good chance that the RTC battery is not rechargeable.
Alternatively, if it only loses date/time when primary batteries are removed, it is likely rechargeable. To be sure, use a mulitmeter to measure the battery voltage with and without the main batteries installed. If the voltage goes up when the primary batteries are installed, the internal battery is likely rechargeable type.
I have only found 3 Volt batteries in the trail cameras I’ve looked at, but this is no guarantee (and may change over time – this post written in 2021). For cameras which recharge the internal battery, measuring voltage across battery terminals with the primary batteries installed will show slightly above the nominal voltage. Unfortunately, measuring a dead battery won’t tell you what the charged voltage should be.
Reset Date/Time and Lost Settings
Symptoms of Reset Date/Time and Lost Settings
When the camera is turned on, or when it triggers, the Date/Time and internal settings reset to some default value.
Note that this symptom is different than the “Reset Date/Time” failure in that both the clock and the camera settings are affected.
The camera parameters are settings are stored on an internal file-system based on an EEPROM (Electrically Erasable Programmable Read Only Memory). This memory holds data even with power is off. When you change the camera parameters and turn the power off, the updated parameters are supposed to be stored in a file on EEPROM. When the camera is turned back on (or triggered) the parameters are read from the file.
Thanks to blog subscriber ShannonW for her help in debugging and testing the fix for this problem on her BTC-7A camera.
Debugging Reset Date/Time and Lost Settings
To verify this problem, it’s easiest to: turn the camera on; change one or more of the settings from their default value; turn the camera off; turn the camera back on again; check settings. If your changes have been replaced by default values, then your camera has this problem.
With this failure, for some reason, the settings are not being correctly stored or retrieved by the camera. We know that the EEPROM device itself hasn’t failed completely because it also contains the program that allows the camera to turn on and respond to the menu. These EEPROM devices do have a limited number of write cycles — but the limit is very large (100,000), and the device is only written if parameters change. It seems very unlikely to me that anyone would exceed this limit even with heavy, long term use of a camera.
Instead, the underlying problem could be a corrupted initialization file which is confusing the firmware. In response to this confusion, the firmware reverts to the default settings (and date/time).
Fixing Lost Settings
- Reset the camera by removing the battery back; waiting for 30 seconds; turning switch on and off; replacing battery back.
- Reload the firmware, which should reset the EEPROM contents.
Find the firmware at the manufacturer website and install per manufacturer instructions. This will definitely reset all the camera parameters. But, with luck, rewriting the firmware will over-write whatever got corrupted in the current EEPROM, and the camera will start working again.
Reloading Firmware for Browning Recon Force Advantage (BTC-7A) and Elite HP5 Cameras
If you have a Browning Recon Force Advantage (BTC-7A), or Elite HP5 with this problem, you may find that there are no firmware images for this camera on the Browning website. However, I did recreate the factory firmware images for these cameras other projects (IR to White Flash Trail Camera Conversion and Adding Features to Browning Elite HP5 Firmware. You can find it at my BTC-7A-Firmware-Images repository and Elite HP5 repository on github.com
Follow directions for downloading and installing firmware in this document. You are looking for the “Baseline” firmware.
Lost Settings
Symptoms of Lost Settings
Very similar to Reset Date/Time and Lost Settings. In fact, a good way to figure this out is to try updating the firmware. If it fixes the problem, you are in luck. But if your camera persistently fails to remember new settings, then you have a problem.
Debugging Lost Settings
The easiest way to do this is to simply change one or more of the camera settings; verify that you have made the change; turn the camera off; then turn it back on. If this happens, the next step is to try installing new firmware. If this doesn’t fix the problem, then it is very likely that the EEPROM (Electrically Erasable Programmable Read Only Memory) — the device that stores the camera firmware, as well as files with settings value, has failed in a way that makes it “read only”. The firmware tries to write new settings (or new firmware), but the EEPROM device won’t take them.
Fixing Lost Settings
See my post: Deep Tech: Repairing EEPROM in Browning Trail Cameras and video below.
Lost Time
Symptoms of Lost Time
This failure is similar to “Reset of Date/Time” failure in the date and time are incorrect. However, in this failure mode, the date and time are merely “off” by a number of hours, vs. resetting to a factory default value. So far, we have only observed cameras losing several hours, never gaining hours. Note that the time being off by a small number of minutes over the same period is a “feature” of the battery-powered RTC design, which accrues some drift in its internal time base.
Debugging Failed Flash
I am still in in the process of collecting data on this failure mode, which happens in our sets relatively rarely. Here are some questions I’m trying to answer:
- Does the loss of time occur in discrete events or as continuous, gradual slowing of the rate of incrementing?
- Assuming errors occur in discrete events, is there any correlation in the “time” at which these events occur in a population of failures?
- Assuming errors occur in discrete events, are they associated with any environmental anomalies (e.g. much higher or lower temperature)
- Having lost time once, does the camera ever spontaneously get the correct time back again (without being reset)?
- Having lost time once, is a particular camera prone to losing time in the future?
If you have answers to any of these, please respond in comments, below!
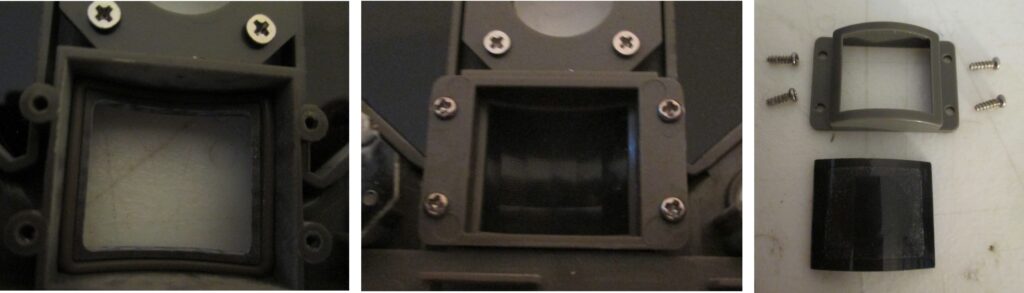
Broken PIR Sensor Lens
Symptoms of Broken PIR Sensor Lens
Usually damage to the PIR sensor lens is obvious on inspection, and may involve other cosmetic damage to the camera. These thin pieces of plastic can be punctured by birds, or by the teeth of animals. They may also become brittle and crack on extended exposure to direct sunlight due to UV damage.
If damage is more subtle, you may first notice poor PIR sensor performance and/or moisture in the camera.
If lens is damaged, it’s important to take your camera out of service ASAP, as water can easily leak in and cause more (possibly irreparable) damage. Hopefully, you catch this problem before that!
Fixing Broken PIR Sensor Lens
Fortunately, several manufacturers, including Browning (see References) offer replacments for broken PIR sensor lenses. Find and order a replacement and follow manufacturers instructions for replacing. You will need to disassemble the camera to get at internal fasteners and gasket. Photo below shows a typical seating mechanism for the PIR lens.
Note that the PIR lens is highly engineered. It features an array of Fresnel lenses in a very particular orientation and a camera-specific focal length. Your best bet is a manufacturer replacement for your camera. A part from another manufacturer may “work” on your camera, but may not be as good as the original part. A piece of black plastic is right out 🙂
Readers of this blog have had some success making replacement PIR sensor lenses by cutting a readily available Fresnel lens to fit their camera. If you do this, use what’s left of the old lens as a template, placed in the middle of the new lens, and carefully cut around the center. See, for example: PIR FRESNEL LENS_PF16-12012-WHITE available from DigiKey. Note that the lens pattern, will be different on this part than on the OEM part, so the detection behavior may be different.
Preventing PIR Sensor Lens Damage
- Bird Attacks: Some bird species seem more interested in pecking at trail cameras than others. Chances are if your camera is damaged by one of these types of birds, and you put it out again, it will be attacked again. To avoid this, you can try attaching “spikes” around the PIR lens (but obviously out of the field of view of the image sensor).
- UV Damage: The plastic material used for PIR sensor lenses will become brittle and crack due to UV damage from prolonged sun exposure. This is another good reason to avoid setting your camera up so that at faces directly into the sun.
Failed Flash
Symptoms of a Failed Flash
I’ve only seen this problem in older Moultrie model. The flash stopped working, and the nighttime photos were very dark or completely black. I determined that the IR LEDs were not working by testing the camera in a dark room, and looking for a faint red glow from the IR LEDs. Alternatively, you can take advantage of the IR sensitivity of most digital cameras to test for IR light by looking at the camera under test through the camera viewfinder screen. It also helps to have a working trail camera to compare to.
Debugging Failed Flash
When I opened up the camera, I could see that the power transistor driving the LED array had gotten so hot that it had melted the plastic housing for LED PCB, and then failed at some point.
Fixing Failed Flash
I might have solved the problem by replacing the flash PCB. Unfortunately, the melted plastic kept a new PCB from fitting into place, so I ended up turning this unit into a “parts camera”.
Water Incursion
Symptoms “Water Incursion”
Water, or more typically moisture, can sometimes find its way inside the camera. Symptoms include visible condensation on *inside* surfaces. The can include the inside of the camera window, or inside surface of the Flash LED window. Moisture can also damage sensitive electronics, as well as cause corrosion of connections. Suspect water damage if the operation of the camera seems flaky; menu cuts out; camera spontaneously resets itself; and especially some combination of apparently unrelated symptoms.
Debugging “Water Incursion”
“All” you have to do is figure out where the moisture is getting in, and fix it. Here are things I would check. The details vary by camera type. I’ve used a Browning Recon Force Advantage (BTC-7A) as a specific example
- Fresnel Lens for PIR Sensor: can become cracked over time.
- Look for signs of corrosion or oxide buildup on the circuit cards in the camera
Here is a recent example of a camera that stopped triggering. The problem turned out to be a circuit board trace that had corroded away, disconnecting the processor from the PIR sensor.
There are 5 sets of “gaskets” on the BTC-7A that I’m aware of:
- The rubber plugs that seal each of the 6 recessed holes for the screws which hold the front and back case pieces together
- The gasket that seals the battery compartment. This is on the case, around the slot where the battery carrier snaps in
- The gasket that seals the the fold-out door.
- The gasket between the front and back housing pieces. This ~1mm piece of rubber get sandwiched between the housing pieces.
- The gasket around the Fresnel lens/window for the PIR sensor. Getting at this requires taking the main circuit board out, as well as the Flash LED board, to expose a plastic piece held in by 4 screws. While this out, take the opportunity to double check the integrity of the Fresnel lens. See photos in “Broken PIR Sensor Lens”
Check that all of these are clean, undamaged, and properly fitted.
If a careful visual inspection doesn’t turn up any source of leak, you may have to resort to some variant of the “dunk” test. For example, on one of my homebrew DSLR enclosures, I “floated” (just) the front plate (including the barrel and window for the main camera) in a pot of water. Sure enough, after a couple of minutes, I found sources of leaks. I haven’t done this with one of the commercial cameras, but, in principle, I can imagine removing enough of the camera innards to be able to “float” the bottom and top cases. If you do this, make sure that there are no electronics to batteries to get wet if water gets through.
Fixing “Water Incursion”
With luck, a problem with a gasket can be fixed by cleaning and/or resetting the problem gasket. Missing hole plugs for the BTC-7A can be replaced as in my post Inside the Browning Recon Force Elite HP4 (BTC-7E-HP4). Note that not all cameras require these. If a gasket has been permanently damaged, replacement is the only option. I have used the online O-Ring Store as a source for O-rings of the type found sealing the Fresnel lens. You’ll have to measure the size yourself. If you take this path, I recommend “bracketing” the size with slightly smaller and slightly larger replacements to increase the chance you have something that works.
In the absence of a replacment, you may be able to make do with a small, continuous bead of silicone caulk. Done caerefully, this is as good as a gasket in sealing the front and back enclosure halves. It does make future disassembly more difficult, and will require replacement on reassembly.
Another easy solution is to keep water off of the camera. We always put our cameras in steel security boxes, which do a good job of deflecting water from above or below. Others have fashioned little “roofs”, placed above the camera, to deflect rain.
Finally, if all else fails, for “mild” moisture incursion, you can use silica gel packs to soak up moisture that does get in. This solution is relatively easy to apply to a typical homebrew cameras. Unfortunately, there’s typically not a lot of space inside a commercial trail cameras for “extra stuff.” Putting them inside the case is problematic because it requires opening the case to replace them (and they do need to be replaced and re-dessicated to remain effective). I have found that Reconyx sells “Desiccant Sheets“. These will work for cameras other than Reconyx, as long as they can be placed inside the “water proof” volume of the camera. For example, I found that these sheets will (barely) fit under the battery tray for our Browning cameras.
If your camera is malfunctioning after a water “incident” you may be able to repair. Start by visually inspecting the circuit boards for signs of corrosion and water damage. If you find these, use a cotton-tipped swab and some isopropyl alcohol to gently clean the corrosion from the board. Pay special attention to the internal coin cell battery used to maintain the real-time-clock (see “Early Battery Drain” section in this post).
Unfortunately, some water damage may to irreparable harm to the circuit board and/or components.
No Photos Taken
Symptoms of “No Photos Taken”
A problem (so far) for the mystery bin. In these cases, we set up the camera, following a checkoff list which includes verifying that:
- the camera has good batteries,
- the camera powers on
- the LCD comes on
- the camera has initiated its “countdown” to automatic triggering.
- the SD card is relatively new, and has been formatted in the camera — typically right before arming it in the field
None-the-less, when we return, weeks later, full of expectation, we find that the camera has taken zero photos. None. Not even of us finishing the setup. And, yes, the batteries are still good.
Debugging “No Photos Taken” (a work in progress)
We have experienced this most frustrating type of failure several times, primarily on Exodus trail camera models. The problem is intermittent and not reproducible. The SD card is empty, with no files, as it was after being formatted in the camera before the final arming operation. I have used several disk recovery tools and never found any indication that the camera had written anything new. The SD card itself is fine. Indeed, after being turned off and back on, the same camera (with the same batteries) can record to the same SD card.
The good news is that this problem happens very rarely. The bad news is that without being able to reproduce it, I have been unable to get to a reliable root cause. Possibly an obscure firmware bug or error case in the camera startup sequence? I’m all ears, internet!
SD Card Failure
Despite their small size, SD cards are, themselves, a complex computer system with memory, processing, and a great many internal error cases. The firmware inside the SD card allows the billions of fundamentally unreliable, “storage cells” to appear to the trail camera as a reliable data storage device. Sometimes the errors win.
Symptoms of “SD Card Failure”
- Camera will not turn on: Turning a modern trail camera “on” results in a whole pile of firmware being run before you see the “splash” screen. This code incudes internal checks of the hardware, including the SD card, to make sure they’re working. A failed SD card can return a fatal error during one of these checks. Such errors happen so early in the software “boot” process that the screen isn’t ready to report the error (as it does if the SD card is missing completely). The only recourse the firmware has is to turn the camera off and hope that things get better the next time the switch is flipped.
- Camera Freezes: Something similar can happen while camera is reading SD card contents. In this case, if it gets a fatal error it can’t (or isn’t programmed to) fix, it may just “freeze” the camera, requiring a reset of the on-off switch, or even removing and replacing the battery pack.
- Early Battery Draining: If the camera freezes in the middle of trying to write a video or take a photo, it will not go back to sleep, and will consume as much power as it would if it were taking a video or photo. At this rate, it will draw down a new set of batteries in less than 24 hours. Note this is a much faster rate than is caused by a failed internal RTC battery (above).
Debugging “SD Card Failure”
Because SD card failure can be intermittent, good debugging hygiene is required to track down their failure. By this I mean keeping good records of what you changed, and what happened. Certainly, symptoms above suggest potential SD card failure. In general, the best practice is to put known-good batteries (or an external power supply) to eliminate low battery as a possible problem.
Remove the SD card from the camera and try another SD card which you know works. If this fixes the problem, put the old SD card back and see if problem comes back. If it does, you have your culprit.
You can try putting the SD card from the camera with symptoms above into a different camera to see whether the symptoms follow the SD card. Unfortunatley, I’ve seen cases where an SD card would (at least appear to) work fine in one camera, but not in another, so this may not be a reliable test.
Fixing “SD Card Failure”
It is possible that reformatting a failed SD card in a PC (long or short format type) will “repair” a failed SD card. However, given the opportunity lost in an SD card that fails in the field, and their relatively low cost, we have taken to a “1-strike” policy. Any time, including the first time, an SD card fails we discard immediately. If you do try to recover an SD card by reformatting it, make sure to mark it in some way so that you will know (definitely!) to discard it if it fails twice.
Corrupted SD Card and Dead Battery
I’ve updated this section based on more evidence and a lot more work to debug and fix. See full post at: Fixing Browning Edge, Elite HP4 and HP5 SD Card Corruption. I’ve included a synopsis of the post here.
Symptoms of Corrupted SD Card and Dead Battery
- A Browning Edge, Elite HP4, or Elite HP5 Trail Camera is given new batteries, and a recently formatted SD card, and set in the field
- When the camera is retrieved the batteries are dead. The the camera will not turn on unless the battery pack is removed and re-inserted
- The SD card cannot be read by the camera. Indeed, the camera often will not get past the “splash screen” while the SD card is installed
- When placed in a PC, the SD Card is unreadable by the file system. The PC asks whether you want to format the SD card
- Forensic analysis of the SD card with disk recovery tools (e.g. Stellar Photo Recovery) show a small number of intact images/videos. Invariably, these start with IMG_0001.mp4 . There are certainly not the number of files one would expect from a full set of batteries.
- We have never seen this problem in the earlier Browning Advantage camera models.
- This problem occurs with cards as small as 32 GBytes, but also on 64, 128, and 256 GByte Cards
Debugging Corrupted SD Card and Dead Battery
These intermittent, rarely occurring problems are invariably difficult to debug. Starting with the symptoms, I was able to conclude:
- At some point during the cameras deployment, often after taking only a single video, camera corrupts the SD card. This makes the card unreadable by the camera.
- The camera firmware, on encountering the corrupted SD card, crashes. One result of this crash is that the camera firmware stops functioning. Critically, it does not run the timer which turns the camera off between triggers. Left in the crashed state, the camera consumes the battery charge in about a day.
- The problem is not related to the difference in file system formats between cards of 32GBytes and smaller, which use a FAT32 format, and cards 64 GByte and larger (which use the ExFAT file system format). This points to a problem “further down” to software storage stack.
Reproducing the Failure
To get any further, I needed to reproduce the problem in the lab under conditions and with tools that would help me figure out what was going wrong.
I found that I was able to elicit infrequent behavior from the camera that hinted at read/write errors to the SD card by:
- Erasing the SD card using the Delete All menu
- Arming the camera
- Triggering the Camera
- Taking one 5 second video
I performed this sequence many times while examining the diagnostic print messages. Most of the time, the print messages showed everything fine. But on every 10th attempt, or so, detected some “early signs” of errors from the print message. These occurred in cases where the camera reduced the clock speed to the SD card in the face of detected errors.
Fixing Corrupted SD Card and Dead Battery
Instead of allowing the camera to (optimistically) try to run the SD card at it’s maximum speed, and getting occasional data corruption as a result, I simply limit the SD card speed right from the start. This works because the SD card can easily keep up with the incoming video data even at the lower speed. There is probably a way to fix the firmware so that it could reliably work at higher SD card frequencies. such a fix may be necessary in the future for higher resolution video footage. Browning, please take care of this!
Note that as of this writing (2023-11-14) I do not have many hours of camera time to confirm that the problem is indeed solved. However, I was able to test this fix with my simple diagnostic program. Without the fix, the diagnostic program reliably encounters write errors. With the fix, it does not. So I’m confident that the fix will also prevent the much rarer write errors that have frustrated many of us when using the HP5.
You can download my firmware patches, which now includes this fix, from by GitHub site here.
Workarounds
If you’d rather not load a non-Browning firmware image onto your camera, there are some things you can do to reduce the chances that this bug gets you:
- When deploying the camera, after executing the “Delete All” menu item, take at least one photo/video. You can do this by pressing the “E” button while the camera is in the live-view mode. This creates the DCIM and xxxBTC subdirectories when the SD card is already stable in “menu mode”. It means the camera doesn’t have to create them on the fly on it’s very first trigger.
- Use a Slow SD card: This problem is related to cards with rated bandwidth’s in excess of 80 MB/s. Unfortunately, it’s difficult to find the newer, higher capacity cards in lower speed variants.
Sound Failure
The audio recorded on modern trail cameras should be very good. However, sometimes these trail cameras will lose sound completely, or develop a static or humming noise. Note that some brands of cameras, especially older cameras, may have design problems which limit sound fidelity. If a camera has poor sound “out of the box”, it may not be fixable. I added a new post covering replacement of the microphone in a Browning Elite HP5 camera.
Symptoms of Sound Failure
A camera that once had good sound, suddenly, or over time, does not. Sound may disappear completely, or it may become full of static, electronic humming, or popping.
Debugging Sound Failure
There are two likely causes of sound failure, both having to do with the small electret microphone typically mounted to the camera case. The microphone is connected to the printed circuit board with a pair of wires. Either the microphone itself has failed, or the wires have become disconnected from the circuit board. With the camera case open, a visual inspection will generally distinguish between these two cases. If the wires are connected to the circuit board, the problem is likely with the microphone.
Fixing Sound Failure
If the problem is disconnected wires, these can be tacked back on with are a small soldering iron and a delicate touch. The pads are very small, so high magnification of the work area is a must.
If the problem is with the microphone itself, then replacing the microphone with an equivalent is the solution. Here are some guidelines:
- Size: The microphone typically fits into a hole in the camera case. Prying away a little corner of the glue around the existing microphone to expose a thin plastic housing shell. Diameter of micrphone for recent Browning models is 6 mm.
- Microphone type: These are typically electret microphones (vs. MEMs microphones). These are inexpensive and have a simple, polarized, 2-wire interface.
- Dust/Waterproof: See https://en.wikipedia.org/wiki/IP_Code. A product rated IP57 is dust resistant (5) and is waterproof (7) to a depth of less than a meter. IP68 is completely dustproof (6) and waterproof (8) to a depth of more than a meter. IP57 should be enough (1 meter of water is a lot!), but you may want to look harder to find an IP67 (dust-proof, waterproof to 1 meter) or IP68 (dust proof, water proof to more than meter) device.
- Connection: Simplify your life by finding a microphone with red and black wires already attached. Leads should be at least 50 mm long.
For the Browning Elite BTC-8E-HP4 series (and likely other recent Browning models, at least back to the BTC-7 Advantage series), here are a couple of options. If you order any of these, make sure to find one with the small leads arlready attached to limit the amount of fine soldering you have to do.
| Microphone Part Number | Comments |
| CUI Devices CMC-6027-42L100 | Water Resistant (IP57) 6 mm electret microphone. Known to work on Browning Elite HP5 |
| Panasonic WM-61A | Known to work. The specs do not indicate how waterproof this unit is |
| Taidacent 4015 | Listed as IP67 Dustproof and waterproof to 1 meter |
| PUI Audio POW-1644L-LWC50-B-R | Listed as IP57 Dust resistance and waterproof to one meter |
Make sure to connect the microphone with the right polarity. The red, positive, wire should attach to the pad marked “+”, and black, negative, wire to the pad marked “-“.
I am indepted to blog subscriber Erik, who shared his experience replacing the microphone on his Browning Elite BTC-8E-HP4 with Panasonic WM-61A microphone in the comments section of Browning Spec Ops Elite HP5 Teardown and Inside the Browning Recon Force Elite HP4 (BTC-7E-HP4). Check out his videos showing his HP4 before and after replacing the microphone.
LCD Failure
Many cameras use a small LCD screen to display menu items and to preview photos and videos in the field. These LCD modules are of varying sizes and resolution, and are not generally interchangeable between manufacturers or within different model families. Based on experience, these LCD modules can fail over time in the harsh conditions of outdoor deployment.
Symptoms of LCD Failure
LCD failure is often clearly visible. Unlike “Video Artifacts” if an image is visible on the screen, it contains all the right elements, but the color may be off, or part of the screen may be dark or overly bright. The image may lack contrast. These aberrations exist in all menu modes, and not just the preview function.
Debugging LCD Failure
Debugging can be done by eye in most cases. To eliminate all doubt, owners of certain Browning trail cameras can use the hidden test mode to run the “Verification” test, which includes tests of the LCD. See: Hidden Test Mode in Browning Trail Cameras.
Fixing LCD Failure
In some cases, the LCD failure can be due to moisture damage to the flex cable connector at the socket on the PCB. Thus, any repair should start off by dassembling the camera to expose the LCD panel, and then carefully releasing the flex cable from the connector. Inspect for any visible signs of damage and clean if necessary. Re-insert the flex cable and try the camera again. If you are lucky, cleaning the connector fixed the problem. Video below shows removing LCD modules in Browning trail camera.
If the LCD problem persists, the LCD module itself needs to be replaced. Unfortunately, these LCD modules are typically only available to volume manufacturers (like Browning), and are hard to find at the retail level. Still, with the help of subscribers, I am working on a list of tested LCD modules for different cameras. See table below. Note that I cannot endorse or guarantee the products from the suppliers listed below, but they “worked” at least once.
| Camera Make/Model | LCD Module Part Number | Suppliers |
| Browning ReconForce and Spec Ops (BTC-{7,8}{A, E, E-HP4,E-HP5} | T20P96 LCD (240 x 320 2″) | AliExpress |
| Browning BTC-6HDPX | BL-T15P00V1 (240 x 320 1.5″) | AliExpress |
I am indebted to blog subscribers @Paolo and @damnfool034 for their help verifying vendors in this list.
Summary
Have you seen these failure modes? Others? Have you tried fixing these problems? Please comment below.
Disassembly Notes
Videos
Browning BTC-7A and 8A
I used a hooked dental tool to remove the “rubber stoppers” which keep water out of the 6 screw holes that hold on the back cover. Once these were out, I used a #1 Phillips head screwdriver to remove the screws.
The main PCB is likewise held in place 6 small screws. There are several sets of wires which connect the main PCB to: the battery pack; the front keypad; the microphone; and the IR LED array. It’s a little tight, but I found that I could get at most of the main PCB without removing any of these by careful manipulation of the board. The ribbon cable to front keypad is connected via a “flip-clamp” connector to PCBs on either end. The flip bar can released with a small flat screwdriver to release the cable and give a little more working flexibility. The other wires are all soldered to the main PCB.
The two screws for the heat sink fit directly into tapped holes in the heat sink itself. I found when tightening these screws that it was easy to strip them — an undesired outcome. It may be that the screw in question was already stripped when I got to it, which could have been part of the problem. These screws are tiny — smaller than 2 mm. I was able to insert a slightly larger screw (not sure exactly which size, possibly M 1.7) into the stripped hole and it self-tapped in the soft aluminum of the heat sink.
On reassembly, I sometimes found myself forgetting to re-install the little rubber stoppers into the screw holes in the case. This would have been a mistake, since these stoppers are part of the gasket system which keeps moisture out of the camera.
Lens Assembly and IR Filter
To access the lens assembly (e.g. for “Loss of Focus” fix), the IR filter must be removed. The IR filter is just held on with double sticky tape (!) to the face of the lens assembly. Prying it back and forth gently will loose the adhesive and allow removal. For reassembly, I scraped off the adhesive, applied another piece of double sided tape (making sure not to block the lens!) and stuck it back on.
References
- WildLabs camera trouble-shooting database: this conservation tech organization keeps a community spreadsheet where users can report camera failure modes. You may need to register to view this GoogleDoc.
- Seiko MS920T-FL27E Rechargeable coin Cell Battery with SMT pads: Available at multiple sources, including mouser.com.
- Browning Replacement Parts: PIR Lens
Very useful. Thanks.
Thanks, Peter. Hopefully you never need this information 🙂
Pingback:Trail Camera Noise: Part 1 - Clicks - Winterberry Wildlife
Thanks for such a informative article on how trail cameras fail, why they fail, and better yet, how to test for or fix some of these problems. Although I know nothing about those parts inside the camera, your article is so informative I might venture in and try open camera surgery the next time one is dead and out of warranty. Especially since I have several of the Browning cameras mentioned, and yes, they have had the failures you described. Your article really helped me understand how these cameras work. I have found all your articles/blogs related to trail cameras/camera trapping to be well written and includes beginner to expert level. Keep ’em coming!
I’m glad you found this post useful. If you decide venture into any of your out-of-warranty cameras, let us know how you made out. I have been (and will continue) to update this post with new information (e.g. new “Disassembly Notes”), so be sure to check before the surgery date 🙂
I haven’t had a PIR lens in hand and I can’t be sure from looking at the pictures. The black plastic is both a “cover” and a Fresnel lens built into that piece of plastic?
Therefore cutting out a scrap piece of plastic to the right shape would not work, as it has no Fresnel lens.
And while you can’t speak for all cameras, of the ones you have noticed other than Browning’s, would this be generally true as well? The plastic is the lens?
I guess I thought they were just pieces of plastic covering something underneath them – in the camera.
Yeap — the cover for the PIR sensor on all the cameras I’m aware of is also the Fresnel lens array — a critical element of the PIR sensor system. These lenses can sometime become brittle and break with age and UV damage, and sometimes they can be damaged by animal interactions. I know that Browning makes replacement lenses available on their website (though sometimes lenses are out of stock). I am working on a follow-on post on PIR sensors focusing on the structure of these lenses and the resulting “detection” zones. Stay tuned 🙂
Excellent-looking forward to learning about PIR sensors next, thanks!
Updated to include “Loss of Date/Time”
Pingback:Hidden Test Mode in Browning Trail Cameras - Winterberry Wildlife
Regarding the “Loss of Date/Time” in trail cameras. I in the past have also replaced the button battery. And like you have found only 3 volt rechargeable batteries in all the cameras I’ve repaired. Recently I had this failure on a Exodus Lift camera and I took a different approach to the repair.
This repair is always difficult especially if you are not well versed in micro soldering. The button battery on the Lift is located on the front side of the motherboard required complete removal of the motherboard along with the IR array, AA battery connections, ambient Light sensor and input switch assembly boards just to gain access to the battery.
To avoid all this disassembly work in the future I ordered a set of 10 BS-1220 coin battery holders online, total cost was $5.29 and two ML-1220 rechargeable batteries which cost $5.50 each. (Don’t be fooled and purchase CR-1220 batteries even if they are listed as rechargeable, they are not.) My total investment for repair was $6.03. While I can find surface mount button batteries for $2.50 each through specialty suppliers they do not include free shipping which can be as much as $10 per order.
Before I removed the button battery I confirmed the polarity of the connections. Also before removal the button battery showed 1.99vdc, after removal 2.3vdc. The fresh coin battery was 3.2vdc. Another upside to this repair is the ML-1220 is a 40mah battery while the button battery used on the OEM build is only 11mah. This nearly 4X increase in storage should improve the battery life.
I wired the the coin battery holder to the motherboard using #30 wire and glued the holder to the back side of the motherboard making it accessible by simply removing the back of the camera housing. I used a polyurethane adhesive, silicone RTV adhesives have an affinity for moisture which overtime might damage electrical circuits on the board.
I’ve just fielded the camera so I’ll post an update later to confirm or not the repair but as of the date it was fielded it appeared to be working correctly.
Thanks for the super-detailed comment! This sounds like a great solution to simplify the replacement of the real time clock battery in the future. These “hardwired” batteries often don’t seem to last as long as we’d expect. I look forward to hearing how your fix works!
Pingback:Avoiding False Triggers in Trail Cameras - Winterberry Wildlife
Updated to include two different failure modes for Date/Time. One in which date/time are reset to some factory default; and a separate, still mysterious failure, where camera “loses” time, on the order of ~hours per month.
Updated to include failure and replacement of PIR sensor lens
Great reading. Question I had my strike force out for a good four days. It took video up till the day before I retrieved it. When I opened it to shut down it wasn’t lit up. Upon checking the SD card their was no video of me taking camera down like usual. Popped on and off nothing checked battery try by popping in n out. It turned on fine and I got a video of me looking at camera. Is this something I need to worry about if I leave out for a longer period of time as I intend to ? The batteries were brand new energizer lithium ones. Just getting into trail cams and its fun but find myself flustered a lot! Thank you.
I think you discovered a corner case in the StrikeForce firmware!
I did an experiment with one of our StrikeForces where I replicated the sequence you describe. I set the camera up in (1-minute) video mode, let it count down to it’s sleep state; and then triggered it by waving my hand in front of PIR sensor. I then waited a varying amount of time before pushing the “mode” button.
I found that if I waited for more than about 5 seconds to hit the mode button, the camera did what I expected. It lit up the backlight, displayed the Browning splash screen, and showed the menu. I could review the abbreviated video of me “picking it up”.
However, if I went quickly for the mode button — I’m not sure what the number is exactly — but maybe a second or two, I saw exactly the behavior you describe when I hit the “mode” button — no backlight, no splash screen, no menu, even though I waited for a good long while. Interestingly, after waiting some time, the camera did respond to the mode key, but when it did, it was back in “trail camera” (still mode), having exited the “video” mode I had configured.
This leads me to suspect that when handling the “mode” button very early on in a video sequence, the firmware becomes confused (it may even “crash”). This causes some “backup” firmware to be executed, which resets the camera, hoping to avoid the situation again 🙂
At least that’s my theory.
I notice that as of October 7, 2021 , Browning has a firmware update for the BTC-5HD-26-CBP, which addresses a “power problem”. This is not quite the version of the Strikeforce I tested (which was a “plain” BTC-5HD). If it matches your camera, you should definitely do the firmware upgrade.
https://browningtrailcameras.zendesk.com/hc/en-us/articles/4408027055899-BTC-5HD-26-CBP-Power-Correction
But even if it’s not your model, I think you should be okay to use the camera, even with this “feature”. Everything about my experiments suggests the camera was working fine right up until time of retrieval. Now that you know about it, you can work around this firmware corner case.
For example, Janet and I have taken to turning the camera “off” with switch when we retrieve it, and waiting the full video length before turning it back on (vs. just hitting the “mode” button). This may not be necessary, but it seems to work for us.
We also run through all the settings to make sure they are set correctly before re-arming the camera. This is good practice, and necessary in the case you discovered.
Hope this helps. Good luck with your camera trapping. And thanks for commenting!
No pictures taken and after all tips applied. Can you recommend a pro to look at my trail camera. Stealth ZX36NG.
thanks,
Frank
Sorry to hear that your Stealth camera won’t take pictures. I am not aware of any independent professionals who repair these things. I suspect this is because with the cost of shipping, and the time to debug and repair (if a repair is even possible), it’s almost always less expensive just to get a new camera. Your best bet is likely to contact Stealth customer service (especially if its under warranty). Some e-tailers offer an extended warranty. E.g. if you bought it through TrailCamPro.com, you have a 2-year warranty with them.
If it’s out of warranty, I have a general curiosity about what goes into the different brands and models of trail cameras, and I’ve never opened up a Stealth model before. If you will cover shipping to and from, I will open it up, debug it, and do my best to fix. Best case, I’ll mail it back to you fixed in a week or so. But no guarantees. As I said, certain failures may not be (practically) fixable, and I may not be able to figure out what ails it. If either of these happens, I could either mail it back still broken, or dispose of it.
Let me know.
Hi Bob,
I have a couple of questions in regards to changing the coin cell battery in the Browning Recon Force/Spec Ops Advantage cameras. Are these batteries best attached to PCB board with a glue/adhesive or should they be soldered onto the board?
If not soldered, can you recommend a product?
Also I like the idea from Dan Potter on a battery holder that allows for easier battery changes and possible preferred easy accessibility as well as larger battery size. Please follow-up on this when you or Dan Potter have data to share on this for the above Browning cameras please.
Thank you
They are soldered to the board. See photo from “Stuck IR Filter” section in How (some) Trail Cameras Fail. The battery is up in the right hand corner of this board on the BTC-7A and 8A. They are definitely soldered down, but can still be replaced. I’ve never done it on the BTC-7A, so I haven’t looked at the battery type or form factor in detail. I’ll message DP and see if he has any update on the “remote battery” solution (which also requires removing the battery that’s soldered down to the board).
I’ve field that camera for about a month and it work perfectly. Pulled it and it sat in my office for a few weeks and was just put back into the field last week. Date and time seem to be holding well.
Excellent. Thanks for the update!
Thank you Bob (and Dan) but still have a question. If using the Seiko battery replacement that has the two prongs, are the prongs where you solder it to the board?
Should I also solder the round battery underside as well?
And you mention glue is used to hold the battery (and show it in the picture in the blog – as the “goo”) Is glue used just in the manufacturing of camera, but not necessary when replacing the battery? I’m asking because I’m not sure if I’m either going to short something out by soldering to many places, or invite moisture by using – or not using glue to surround battery as shown in the picture.
Thank you for clarification as I’m new to soldering.
Yes — the two tabs off the surface mount cell are the + and – pins. They need to be soldered to the PCB at the pads on the PCB. You’ll want to get some “solder braid” to help with the desoldering. See youtube demos for Super Wick (e.g. https://www.youtube.com/watch?v=_hrJ-rwxNRs) . I like the 0.050″ width for most SMT jobs.
You don’t need to worry about anything else (I don’t think). The goo/glue I found on an earlier Browning model was likely there to protect the battery during volume manufacturing. I don’t believe it’s necessary for hand replacement.
Looking at the BTC-7A, I see the markings:
ELNA 3.3V 0.2F jp
This is a 3.3Volt, 0.2 Farad Surface Mount ultracapacitor. An ultracapacitor provides energy storage in a slightly different way than batteries. I’m not sure that the charging circuit will support a battery-based replacement.
See: DSK-3R3E224U-E at https://www.digikey.com/en/products/detail/elna-america/DSK-3R3E224U-E/13693691
Unfortunately, my quick search of the internet shows that this particular style of SMT device (with the tabs very close to each other on one side) is now considered obsolete, replaced, apparently, by similar parts with leads on opposite sides of the coin cell. So my favorite electronics houses don’t have them in stock.
The newer style looks like this: DSK-3R3E204T614-E at https://www.digikey.com/en/products/detail/elna-america/DSK-3R3E204T614-E/13693693
Unfortunately, using the newer parts with older boards is problematical because the SMT pads aren’t in the right place.
But there’s always eBay:
https://www.ebay.com/itm/164811329362
10 of the older style, with the exact markings as on the BTC-7A, for $11.88. And you’ll have enough left to help your friends 🙂
-bob
Pingback:Inside the Browning Recon Force Elite HP4 (BTC-7E) - Winterberry Wildlife
Hi Bob,
I didn’t refresh my memory by watching your video first before I openned my BTC-8A.
I desoldered two wires that weren’t necessary AND lifted off a small conducting square.
Can this be fixed? I don’t know how to reattach square to board.
Also, this camera has “run on” but the heat sink is firm to board. Does heat sink come out easily to file in cutout around PIR?
PIR is flush mounted. Should I try lifting this up before I try cutout method?
I have pictures of small conducting square if needed.
Thank you
Will contact you via email shortly.
Per “run-on” in the 8A, I would try pushing the PIR sensor out first. The heat sink is attached by a thermal adhesive of some sort, and does not readily come off (I have never taken one off of a trail camera).
In any case, I would only try to tighten the heat sink onto the board, not modify it in any way. The issue, IMO, is not that it’s too close to the PIR sensor, it’s that it’s not working well enough getting the heat out of the CPU. Removing material from the sink could make this worse.
Pushing the PIR sensor out a mm or so is a little tricky. There are four leads that you have to free up. I used some solder braid (“superwick” 0.050″ from MG Chemicals). There are youtube videos on how this works. Basically, you press the copper braid onto the pad you want to remove the solder from with the hot tip of the soldering iron and wait for the solder to melt. Surface tension “wicks” the molten solder off of the circuit board and into the solder braid. In principle. In practice, it takes some patience.
Once all 4 pads are solder free, use the tip of a small screw driver to push them out about 1mm — not too far, since there has to be enough of the lead still in the hole to resolder it. Resolder it.
If this doesn’t work, best option is to increase the “photo delay” to 5 seconds (or more). Honestly, I would do this before removing the heat sink, but if you decide to remove heat sink:
I would remove the two screws holding it on, then try to “twist” (vs. “pull”) it off. Once off, I would use a soft tool (softer than aluminum — e.g. plastic) to remove the adhesive from the metal top of the processor and the bottom of the heat sink without putting any scratches in either surface. Maybe a dry cloth, as well. Your aim is to create two smooth, flat surfaces. Then, apply a thin layer of new-thermal adhesive (available on amazon), and tighten the heat sink down with the screws. One of the reasons I’m wary of these steps is that the manufacturer may use a special fixture to push the heat sink onto the top of the processor. Too much pressure and you could break the processor (fatal to the project); too little and you may be worse off than when you started.
Pingback:Browning Spec Ops Elite HP5 Teardown - Winterberry Wildlife
Hi, I am having apparently unique problems with my trail cam. I have a GardePro A3 trail cam that worked pretty well when I first started using it but gradually developed sound issues and triggering problems. But the weirdness is that the sound problems are only during night vision recording. Daylight recording has audio that sounds fine.
The triggering issue was that I was noticing that animals I saw with my own eyes were not being recorded. The camera just didn’t trigger to record at all. I started noticing that it was always when my dog was barking out the back door at the animal in the yard. It was like the sound of her barking furiously would interfere with or disable the motion sensor somehow. This morning I realized that after 3 months of using this camera every night, there should have been dozens of videos where you can hear my dog barking in the background. But there is not a single one! How is this possible? (The screen door is about 8 or so feet from where I have the camera set up on the patio.) How could a loud noise cause the camera to fail to trigger?
Sorry to hear that your’re having trouble with your camera. I have some ideas, but best to inform them with a little more information. A few quick questions for you:
1. Has there been any evidence of moisture in the camera? Possibly condensation on the inside of the lens cover, on the SD card, or on the batteries after a heavy rain?
2. What’s the nature of the sound failure at night? No sound at all? Or sound with electronic noise in the background? Or something else?
3. How is the camera mounted relative to the motion of animals? Do the animals typically move horizontally across the frame, or more towards the camera? (I know this is a tricky question, given that the camera isn’t taking pictiures 🙁 ) How far off the ground is the camera?
Any thoughts on a camera ( BTC-6HDPX Dark Ops HD Pro X ) that underexposes pic’s right out of the box? Pictures are color-correct but a bit blurred compared to my BTC-5HD’s, but they seem dark and detail in shaded areas is gone.
I assume the dynamic balance is internal to the camera, but if not does the photocell have any input to the camera settings other than IR on/off?
By the way thanks so much for posting your cam fix findings, I searched for years for such detailed info for the Bushnell Trophy Cams, and finally gave up on fixing them and moved to Browning.
No problem. I figure since I’m running across these problems anyway, might as well post them for the rest of the world.
Re underexposure on the BTC-6HDPX right out of the box. I’ve not used any of this type of camera. Do you have other instances of the same camera that don’t have this problem? Maybe “they all do that”? :/ Does it do it all the time? In photos and videos? Daylight and night images?
The blurriness could be a problem with the lens (see “Loss of focus” in this post), but let’s assume its part of an under exposure problem. To the best of my knowledge, the auto-exposure uses data from the image sensor to dynamically adjust exposure. As you suspect, the photo cell is only used to inform whether image is daylight or night time.
That being said, it’s hard to see how this mechanism would stop working. It’s all done in some combination of hardware and firmware in the main processor. These are usually quite reliable. Firmware can be fixed in principle, but would have to be done by Browning (I couldn’t find any firmware images for this camera on Browning’s site). Problem with the main processor is not repairable.
Sorry — I realize I’m not being much help on this one 🙁 Perhaps still under warranty?
Hi! Incredible post ! The only one i found with such a usefull information. thank you very much.
I have a problem with my BTC-8A that haven’t been commented here: Camera is stuck on USB-mode. USB conector is broken -fully out of the camera- and i’m afraid that the previous owner forced that conector so much that a Resitor is missing -or more!-. I have dissasembled the unit to look for a solution, but i’m stuck too. What would i do? I’m in Spain, i can’t send it to technical support, and i like electronics 😀 If you don’t have any idea, i’m sure nobody will!
Thank you in advance!!
Oh no! You are right — in removing the USB connector (!), there is some dangling or (more likely) shorted connection which is making the camera *think* that there is a USB device plugged in. The camera firmware prioritizes USB-mode, so it’s stuck there 🙁
My guess is that one or both of the D+ or D- (signal pins) is shorted to ground or +3.3V. This is interpretted by the firmware as the “presence” of a USB device.
How damaged is the PCB where the broken connector was removed? It’s possible that, by inspection, you will be able to find a trace on the circuit board that has become damaged, possibly by being physically torn off the top of the PCB. Depending on how good your eyes are (mine are not), you will need more or less magnification to carefully inspect the area around the USB connector. You will want to pull the main PCB out. See my teardown video for the BTC-7A (identical, for these purposes, to the 8A) at https://youtu.be/w4oodswC9Ho Flip the LCD display out of the way (it’s only held on by 4 plastic tabs on the PCB) to expose the area around the USB connector. I’ll send you a picture of what a BTC-7A looks like down there — it should be very similar to the BTC-8A.
Use the pinout diagram of the USB MicroB socket (e.g. https://www.hobbytronics.co.uk/usb-connector-pinout ) to find the D+ and D- pins, which is where I would start looking for shorts.
Good news!!! My cam is FIXED. B-)
After a simple cleaning, as Bob recommended, I proceeded to check tracks with the multimeter, trying to figure something out. Almost casually, I discovered that the problem seemed to lie with a broken ground track.
I proceeded to bridge the ground, et VOILÁ!
Then I covered the area well with thermal glue, and the camera is now working.
Thank you Bob for your help.
An affectionate greeting from Spain.
Javi
!Que Fantastico!
I would not have thought the suggest looking for a broken ground. I’m glad that you did, and that your camera is working. Good luck camera trapping with it!
Pingback:DIY: Trail Camera Lens Hacking - Winterberry Wildlife
Hi Bob! Another fantastic post/discussion to help us with our trailcam issues–many thanks.
So I have maybe 10 BTC-7Es (generation before the HP4s and HP5s) in the field, and 3 now have developed the runaway/run-on triggering problem you’ve described. Fortunately the incidents have been isolated enough not to overrun the SD card or deplete my battery. Two of these cameras are powered with external 12v Li batteries; the other one with rechargeable NiMH AAs.
Interestingly, all of my “runaway” incidents have been at night, most recently during some significant cold snaps. I have these running in video mode, with the video length usually at 30 seconds but sometimes 60 seconds. My photo delay time is that minimum 1 sec, and I’m reluctant to extend that for the reason you mentioned (I’ve lost some good footage in the past when I had that time set longer).
Is the heat sink situation/layout on these BTC-7Es the same/similar to these other models for which you’ve described the fixes? I figured I would at least pull these out of the field and open them up to tighten those heat sink screws as you’ve described. And maybe soldering/resoldering that PIR sensor to create that space/buffer too if the work isn’t too precise for my big/clumsy hands 😉
Colin
Thanks, Colin.
Regarding run-on triggering on the BTC-7E “Edge” series cameras… I happen to have one open in front of me right now (working on firmware port).
Internally, the Edge is more like the HP4’s and HP5’s than the Advantage series I covered in my original post. In particular, Browning moved the PIR detector off of the main circuit board and onto a small “daughter” card. On the plus side, this makes it further away, thermally, from the hot processor. However, they also removed the heat sink from the processor (possibly because the processer is a newer variant which consumes less power; or possibly because they moved the PIR sensor, allowing CPU to run hotter). The net, apparently, is that the Edge is still somewhat susceptible to run-on triggering.
Interesting that you say this happens at night. It could be that the heat from the IR LEDS is making it’s way to the PIR sensor, and is part of the problem.
Which is all a very long-winded way of saying there is no heat sink to come loose (or to “tighten up”) in this camera. It’s possible that the other fix — to unsolder the PIR sensor, lift it about a mm off the board, and resolder it — would help, but this is more involved. They key to this operation is to use clean solder wick and *patience* to avoid damaging the PCB by trying to push PIR sensor out before the solder has been completely removed. Browning makes this harder by not putting “thermal isolation pads” around connections to grounds on the PCB. The result is that one pin (the one connected to ground) is very hard to get hot enough to melt the solder onto the solder wick. But it can be done.
It’s much easier to increase the photo delay to 5 seconds 🙂
In any case, let us know how you make out!
Hey thanks Bob. As you say the better solution here it seems is just to see if I can live with that 5-second photo delay. I think in most instances that’s an acceptable tradeoff. I’m going to give that a try and I’ll report back some results later 🙂
Great. Thanks. More data is always better.
BTW — I expect that the night time video with these (unmodified) cameras is limited to 20 seconds (even though you have video length set to 30 or 60 seconds). Is this what you’re seeing?
Hello Bob,
You supplied me with excellent instructions on how to loosen my PIR sensor for better heat distribution and attach a pulled off wire to the microphone in my Spec Ops Advantage, but I wasn’t able to complete the task with my limited skills. At this point I’m just abusing the PCB board. Are you still offering repairs if I were to get unit to you? Also I have several other cameras that need repairs, various manufactures, also in need of repairs just sitting in a box collecting dust.
Let me know if you have any time or interest and any terms and I’d be happy to work something out with you.
Thank you
Sorry to hear that the microphone repair didn’t go as hoped. They really really don’t make these devices with much support for rework/repair.
Alas, I can’t really do repairs on a volume basis. I wish electronic device manufacturers were more into a “cradle-to-grave” product lifecycle model, so that failed items could be systematically repaired or recycled.
Firstly, massive thanks for all the great info you are putting out there, it is much appreciated!
After reading through some of your guides/info a few times I have just taken the next step of ordering a Panasonic WM-61A mic to replace the failed mic in my HP4, I really was not happy with the sound that was being recorded but only REALLY took notice when I recently added a HP5 to my kit, I intend to remove the PIR baffles whilst replacing the mic too so again, thanks for that tip/info.
Is there anything you can suggest I check/modify regarding keeping the new mic dry and hopefully free from failing anytime soon after it has been changed?
Glad you found us, and best of luck with your microphone replacement. Be sure to use a small, low power soldering iron on the microphone PCB pads. They’re tiny, and too much heat will cause the to delaminate off the board. Also, don’t be surprised if you don’t find the “baffles” on the PIR sensor. Browning apparently removed them in newer HP4 models.
I can’t think of anything to further protect the microphone from water. The water proofing of the microphone itself should be enough. Do make sure that you seal the area around the microphone with a dab of silicone adhesive to keep moisture out of the camera case. I think the failure of some HP4 microphones is a manufacturing defect with these units. Or perhaps Browning inadvertently sourced a non-water resistant microphone during Covid supply chain crunch? In any case, we have not experienced microphone failures in the Browning line outside of the HP4s.
Hello,
I have sometimes errors appearing in the files. The camera displays “BAD FILE” and the files are 0 Kb. I have changed the SD cards, formatted the cards. I still have these “BAD FILE”. I don’t know what to do anymore. Does anyone have an idea how to solve this problem? Thanks for your help.
What model camera? Is there any pattern to the error occurring? Are you sure batteries are good? I know that in the Browning cameras we use, if the batteries run out, or become weak especially while taking night video with flash, the camera will shut down mid-video, resulting in corrupted or zero-length files.
This is with the BTC-8A cameras. There is no recurrent pattern of “Bad File” appearance. The “Bad File” appears day and night, even in the middle of a series of videos in a daytime sequence. I use Eneloop batteries mainly. After a week I have a 50% charge by setting the battery type to alkaline. Would using lithium batteries be a solution?
Aha! That is the critical piece of information! The short answer is that switching to another batter chemistry should fix this problem. Li-Metal (e.g. Energizer Ultimate Lithium), or Alkaline for non-rechargeable; or Li-Ion rechargeable AA if you want to stick with rechargeable. Set the battery type to “Lithium” if you are using Li-Metal; or “Alkaline” for any of the others.
The long answer is that the (Panasonic) Eneloop batteries you are using are are a brand of NiMH (Nickel Metal Hydride) battery. These operate at a lower voltage (1.2) vs. the 1.5V standard. All Browning cameras that I’ve looked at have a “low voltage” detection circuit which will turn the camera off in a controlled, but abrupt way, when it thinks the batteries are dead, or near dead. I believe this is to keep the firmware from doing something truly terrible — like completely corrupting the SD card — when low voltage to the components could leave them in a confused state. The camera sets this threshold (as well as the calibration for the battery meter) based on the battery type menu setting.
Note that idle batteries will often recover a little voltage, so the camera may come on again, and even take more photos/videos operating just above the cutoff threshold.
Unfortunately the Advantage series cameras don’t have a setting for NiMH batteries, which is why I suspect your camera is behaving strangely with these batteries when are they are partially discharged. Newer models (like the Elite HP5) (finally) support NiMH cells directly.
I have several posts on batteries which contain more detail. E.g.:
https://winterberrywildlife.ouroneacrefarm.com/2021/11/10/trail-camera-batteries-internal-aa-cell-options/
https://winterberrywildlife.ouroneacrefarm.com/2022/04/21/deep-tech-rechargeable-li-ion-aa-batteries-for-trail-cameras/
Hope switching batteries helps.
Thank you very much. Three cameras went to the field to be tested with lithium batteries (VARTA ULTRA LITHIUM) for 10 days. I will give you the results of my tests.
I haven’t tested the Varta’s myself, but the chemistry is right, and hopefully they will work as well as the Energizer Ultimate Lithium. If they do, you should get a lot of video from a new set of batteries. Do keep us posted.
Hello, all the tests I did with new Varta batteries or Enelopp batteries gave nothing positive. The cameras still make random bad files, with some normal files. I also tried with an external 12v power supply (10 Enelopp batteries), and it didn’t change anything.
Thanks for your help.
Thanks for reporting back. Sorry to hear that the Varta Lithium batteries didn’t fix the “random corrupted file” problem. I had such high hopes. If you notice any new correlations associated with the problem, feel free to report them here.
Hi Bob,
What a Great resource of info, I stumbled upon this blog after discovering a issue with a Dark ops pro XD model BTC 6PXD which I had just purchased as a new boxed item from a charity shop in the UK.
When opened I found it was actually in a used condition and has the exact eeprom fault described on this blog (always resetting back to defaults.) I emailed Browning regarding this issue requesting the original firmware as It may help fix the issue but they insisted the fault was due to the internal battery and that I should send back to the USA for repair at cost.
I decided to dissasemble the camera and removed the battery and carefully connected lab PSU simulating the battery voltage at 3V (the original battery was measuring 2.6V before removal)
I powered up and the resetting fault was apparent! So does indeed look like the eeprom issue.
Since there are no available software updates from Browning for this model I’m completely stuck.
Are there any possible solutions someone could please recommend? I’m fully conversant with removing SMT devices, it’s the software side that scares me. The eprom is a Winbond 25Q32JVS10 it was quite difficult to read due to being faded.
Thanks
Nick
Hi, Nick. Glad you found us. I have “good” news, bad news, and worse news. Apologies in advance, but this response it long on explanation, and short on actual help 🙁
The “good” news is that simply having a firmware update is unlikely to fix your problem, which I’m quite sure is caused by a faulty EEPROM device. The EEPROM is broken in a “read only” mode — so it has the right bits on it now. But since writes don’t work any more, it won’t store parameter updates (or a new firmware image).
The bad news is that to fix, in addition to removing the EEPROM chip, you need to replace it with one with the right bits on it. The worse news is that this a not a model for which I have the EEPROM image.
I know of two ways to get a working EEPROM image, and two ways that *don’t* work.
First, the ways that don’t work. It does not seem possible to read the EEPROM image in situ, with a external EEPROM reader/write. Also, the heat required to remove the EEPROM from the board causes some or all of the EEPROM cells to be erased, so it can’t be read post-removal.
I have had some luck “sniffing” the EEPROM image off of the EEPROM as it is read every time the camera powers on using a USB logic analyzer. Unfortunately, the clock speed is just a little too high to get a reliable read of the entire ~5 MBytes. As bad, only part of the image is loaded on power-on, while other parts are only loaded dynamically, as needed by the application. I have never been able to “sniff” off a complete, working EEPROM image this way.
The way that I’ve found works is to use the logic analyzer to sniff off the first couple of pages of the EEPROM image, and then to use a set of utilities I’ve developed to turn a working firmware image into the remaining bits of the EEPROM (the first few pages of the EEPROM are apparently not included in the firmware image). I’ve then been able to load this image into a new EEPROM device, and (quickly) resolder it back to the board.
Unfortunately, I’ve never used these tools on this model camera. And we don’t have a firmware image, in any case.
I’m in the process of working with some sponsors on porting a series of feature upgrades across the Recon Force and SpecOps product lines (BTC-7xx, and BTC-8xx) which include EEPROM images for these cameras. I’ve considered extending support for other Browning models, but don’t currently have any plans to do so. If that changes, I will let you know.
In the meantime, I think the best that you can do is use the camera with it’s default settings 🙁
Many thanks for the honest detailed reply Bob,
That seems quite a task to try retrieve the original software and then only to get part of it. I admire your dedication to the cause.
I suspected there was not going to be an easy way out of this situation, and as the manufacturer support does not seem particuarly helpful this situation really puts me off of a future purchase.
I will stick with the default settings for now as it does record video quite well, the most annoying thing is the internal timer function which also re-sets so I have to remember to set a false time if I intend to use overnight outside of the pre-set 7am-7pm
Keep up the good work in hope there might be a solution for this version in the future.
When the camera defaults start to really annoy me and I have more time on my hands I will have a go at trying to resolve this.
Kind Regards,
Nick
Sounds like a plan. If/when I add any new camera support, I’ll post it here.
I ran into problems with a Browning HP4. Somehow, a lot of moisture or condensation got into the camera. And the camera started doing all kinds of strange things…
I unscrewed the thing and it turned out the tiny internal battery was completely corroded. I got a fine supplier. He immediately sent me a new camera. Now I would like to protect my new and other cameras from this kind of battery corrosion. What would be the best thing to use for that? I myself was thinking of using a small brush to put some acid-free petroleum jelly on the small battery.
What do you think of this Bob?
Bummer that the moisture got in. Were you able to figure out where the “leak” was? Two thoughts on moisture in the camera: you can by a flat desicant “card” that will fit (in the small, thin) space available. The only issue with this is that I’ve only been able to find them in bulk — like 900 at a time 🙁 https://www.uline.com/Product/Detail/S-19581/Desiccants/Dri-Card-Desiccants-Gram-Size-050?pricode=WB1261&gadtype=pla&id=S-19581&gclid=Cj0KCQjwlPWgBhDHARIsAH2xdNfmOP5ea-GnLnYfWIR_w8mGZunGx4ZROOurWk2fmcEXOcGesGCCuN4aAr0nEALw_wcB ; second, with regard to “encapsulating” the coin battery. I don’t have any experience with this, but I would make sure that whatever you get is specifcally made for encapsulating electronics, and has the right electrical properties. Just a little bit of conductivity would drain this small battery quickly. Searching the web for “electronic potting and encapsulation” seems to yield a number of promising products. Let us know how you make out!
I already replied twice. But my answer doesn’t show up here.
Sorry — I don’t understand the website failure to register comments and am temporarily unable to debug it.
I had the Reset Date/Time problem with a BTC-7E. The backup battery voltage was 0.7V so it was obviously shot. However instead of replacing it with another battery which would fail again in the future, I fitted a 1F 5V supercapacitor. 1F is probably overkill but was what I could easily obtain. Although it is far too big to fit on the PCB, I connected it with flying leads, encased it in heatshrink sleeving to insulate it and positioned it where there is plenty of space in the case.
That works! After the 7/8E, Browning (and most of the embedded industry) seems to have switched over to ultra-caps for backup power. Unfortunately, these ultra caps also seem to have a non-zero failure rate, likely accelerated by high temperature. I have also seen trail camera models that feature a replaceable ultra cap. See: https://winterberrywildlife.ouroneacrefarm.com/2022/10/10/inside-the-stealth-cam-ds4k-trail-camera/
Unfortunately, IMO, the rest of the camera doesn’t measure up to the Browning SpecOps/ReconForce models.
Hi Bob,
Your site is wonderfully comprehensive & fascinating.
I’m a newbie to the trail cam world as a hedgehog recently came to nest in my garden. I bought an Apeman H70 & have been frustrated by the retriggering issue you describe & thinking of replacing it.
Which model comes out top on all aspects – in your experience – for reliability?
Would really appreciate some pointers.
With many thanks, Maxine
Thanks!
I haven’t evaluated all the cameras out there, and we have not yet found the “perfect camera.” We have had good luck with the Browning Recon Force (low glow), and Spec Ops (no glow) series — currently at {Recon Force, Spec Ops} Elite HP5 (model numbers BTC-7E-HP5 and BTC-8E-HP5). These have been reliable for us under a variety of conditions, have fast trigger times, easy to use interface, and take very good photos and videos. Their build quality is good, IMO, and they hold up well. It’s also easy to find camera-specific security boxes for them. They are not cellular/wifi models, which we don’t generally use.
Hope this helps.
-bob
PS: Just to be clear, this is “our site” — I take credit for the camera tech; but my wife Janet Pesaturo does all the great animal behavior posts, which I definitely recommend!
Thanks for all of the info! I ran across this while troubleshooting a Browning BTC-5PXD. It appears to have “Digital Image Artifact”. Mine just looks like a static filled pic @0 degrees F. (Real temp. 50-60) I haven’t been able to access any test screens and at this point, don’t really think I need to. It took great images… when it did work. Failed after about 18 months and is now worthless to me. Do you have a need for parts? Not even sure it’s worth shipping, but thought I would ask, as you’ve been very helpful. Thanks.
Sorry to hear about about “snow filled” BTC-5PXD display. Thanks for offering parts, but even my current “parts cam” collection is growing past my ability to keep it organized.
(Especially) Since it’s only 18 months old, you should definitely talk to your supplier about warranty service. Trailcampro.com, for example, provides a standard 1-year extension of the factory 1-year warranty (2 years total). Even if your supplier is not TCP, it may be worth a call. In place of a policy of “repair”, Browning’s business model allows for a certain (non-zero) return rate to address failures the know will happen. Worth a shot.
Pingback:Fixing Browning Edge, Elite HP4 and HP5 SD Card Corruption - Winterberry Wildlife
Hi Bob, less than 2 years old and with little usage, my Browning BTC 5HD MAXX won’t even start and it drains new batteries. New batteries do nothing, and no start up either. I sent in to Browning (out of warranty) and they said it was the “circuit board “ and not worth fixing. Offered to keep my camera and basically give me what amounts to the sale price on a list of cameras. Not any kind of deal at all as far as I am concerned. Anyway, I am going to try a new SD card and new batteries after reading your articles. Any other advice? If that doesn’t fix it, I will just get another camera but I am not giving my old one for them to fix or canabalize for parts!
If you haven’t done it yet, trying a new SD card is definitely worth it. A corrupted or failed SD card could cause all the symptoms you describe. Maybe you’ll be lucky 🙂
I’m not sure it works on the BTC 5HD MAXX, but some Browning cameras have a built-in test mode which may (or may not) give you more insight into what’s going wrong. See my post: https://winterberrywildlife.ouroneacrefarm.com/2021/08/31/hidden-test-mode-in-browning-trail-cameras/
Of course you can keep your broken camera, but I wouldn’t worry about Browning fixing or canabalizing parts. I’m pretty sure it would go into their corporate disposal bin.
Hi Bob Zak !
I think you save my BTC-8A from trash bin ! I have had the same problem as few fellows described here, all settings revert to default when power ON-OFF-ON or after a stand-by (after the first video was taken). After checking inside camera, no special issue was found and the SuperCap voltage was 2.96V.
After further checking, I decided to give a try (last chanche) reflashing the camera with firmware found in your Github page and … voila !! It seem working just fine now !
I would perform some more tests here at home before returning to the forest !
Btw, I have a old BTC-5PXD as well (first version, no multilanguage menu) that perform more or less the same problem, but seem impossible to find a good firmware to reflash. It’s a pity that Browning doesn’t propose to download firmware form theyr site … but I can understand this is a very risky job !
So, many many thanks for now and I will let you know how my BTC-8A perform !
Best regards and HNY 2024
Pietro Bossi, electronic engineer from Switzerland !
That’s great news! My theory here is that the file that stores the camera settings gets corrupted somehow. Reflashing the firmware resets this file, and fixes the problem.
A problem with the same symptoms can be caused by the EERPOM failing, usually by becoming a “read only” device. The firmware tries to update the parameter file, but the writes don’t go through, so it keeps getting the same settings. The only fix for this bug is replacing the EEPROM. And for this you need a valid EEPROM image (in addition to some SMT rework skills). Hopefully, your 8A EEPROM has a lot of life left in it. I’m working on a post for this repair which includes EERPOM images suitable for downloading into new EEPROM devices. Unfortunate, I don’t have an EEPROM or Firmware image for the BTC-5PXD 🙁
It is frustrating that Browning doesn’t post the current version of firmware for all of its cameras. (As you likely know) They do post firmware images with bug fixes at https://browningtrailcameras.zendesk.com/hc/en-us/sections/200943558-SOFTWARE-UPGRADES. You may have some luck going to your trail camera supplier for a copy of the current firmware image. Browning seems to make firmware images available to some of their bigger resllers.
Hi, Very informative. I have a problem with sound on my trial cam, sound is ok daytime but night is electronic noise, suspect IR interference? what do you think?
That makes sense. The IR flash requires a lot of power, which is usually supplied by a switching current regulator. “Switching” here means that some power transistor is turning off and on at a rate of several kHz. Without proper electrical isolation, electrical noise could easily leak into the sensitive microphone circuit. If so, it’s likely a design issue, and therefore not easily fixable 🙁 What is the camera make and model?
Hi Bob,
Even with your words of encouragement, I have not had success unsoldering a PIR sensor completely to lift it up one 1MM from the board. I’m going to try one more time but thought it might be wise to have a new sensor on hand as I certainly overheat the part and board in the process. Might be a good part to have a spare of anyway. Do you have any info on a PIR sensor source?
Also, I have to double check the camera but in the field this camera seemed to have run on triggering even though the PIR sensor trigger option was NOT even turned on.
Is this possible or any thoughts on what to do here?
As always, thanks for you all your work and knowledge.
Sounds like you’re being patient — which is good 🙂 If you aren’t using a (no clean) flux pen on the solder-wick, do that.
I think this was the Advantage Spec Ops, right? The Browning Advantage series camera use an XLitos PYD1690 integrated PIR sensor. See https://www.digikey.com/en/products/detail/excelitas-technologies/PYD-1698-3534/6615454 Note that the newer cameras (Edge, Elite HP4, and Elite HP5) use a different, completely incompatible, PIR sensor. I don’t have that part number off hand.
When you say the camera had run-on triggering even though PIR sensor trigger was not turned on — you mean in timelapse mode? If this is the case (unfortunately!) you’re probably barking up the wrong tree with the PIR sensor 🙁
Hi Bob,
My question above was in reference to one of my several Recon Force Advantage cameras and may not be one we have discussed before. The run on triggering in the prior email happened when “Smart IR Video” wasn’t not selected as an option, as I rarely have use the Time Lapse option. This would be an uncommon error, indeed a first I have seen this. Is this even possible to have run on triggering – with it not selected as an option?
Which leads to me my next question, do you think PIR sensors slowly degrade in their specs over time? I’ve never kept error and time logs on my cameras, but it seems that run on triggering failures more often start after 1 year or longer of camera service. But my memory is fallible.
THANK YOU for the link to a PIR sensor! That particular model only comes in a pack of 50 for several hundreds of dollars. I see at the bottom of the page several similar models are suggested that can be ordered for smaller quantities. Any chance any of those have the same specs (or higher?) that you would give the OK to? And would this replacement sensor work in both the Recon Force and Spec Ops Advantage models?
I’ve just spent some time searching no clean flux pens. There are several types with different bases, all with their own pros and cons. Could you share the exact name one you have had found to work best for you in regards to PIR sensor removal?
Thank you!
Ahh — I understand now. The “SmartPIR Settiing” that you were using still uses the PIR sensor. It just checks the PIR sensor toward the end of the recording time, allowing the recording to continue if the PIR sensor is active. This instead of ending the recording, waiting for the “photo delay”, and starting a new recording if the PIR sensor is still active.
I’m not 100% sure what causes this problem to develop over time in some instances of the Advantage line. My best guess is that it’s caused by a gradual degradation in the performance of the heat sink mounted atop the main processor rather than a long term failure of the PIR sensor. This because the main processor has a lot of current flowing through it when active, and none when idle. I suspect the resulting thermal swings introduced small cracks in the bond between the processor and heat sink, which reduces its thermal conductivity. Like water flowing through a blocked passage in a river, the heat will find somewhere else to go — I suspect into the PCB where it reaches the sensitive PIR sensor. (The PIR sensor itself is a very low power device under all operating conditions, and seems to me less likely to suffer the kind of internal stress which could lead to failure in time).
Pushing the PIR sensor up off the PCB reduces the heat flow into the PIR sensor, which can fix the problem. I do not think that replacing an otherwise working PIR sensor will help.
Oops! I should have looked closer at the link I sent you. Obviously, you don’t need 50 of these 🙁 There is no substitute part, unfortunately, as these PIR sensors have an internal controller which communicates with the firmware in the camera. I think I can help. I’ll drop you an email.
Hi Rob, first of all, thank you so much for all the effort and time you have devoted to helping others with their camera issues. We all appreciate it very much!
I have a Browning Recon Force Elite HP4 that was eating through batteries (Energizer Lithium). I stumbled across your help when I was Googling the issue. I ended up taking mine apart and found the PIR Sensor PCB quite corroded/calcified and looked to be burned into the opposing plastic panel a bit. The camera still worked, but the board looked terrible. My batteries showed 50% when I took it apart, after I cleaned the board up with Electronics alcohol and plastic scraper, the batteries went back to 100%. Don’t know if a cleaning fixed it though. Not very confident.
I was using a SanDisk Ultra 128GB MicroSD via a SanDisk adapter.
I’m curious if you know if I can get a replacement Sensor PCB, or if you have any recommendations for repair besides sending it back to Browning. I do have proper soldering/de-soldering equipment and some light experience with pcb’s. It has seen very little use, but has now passed the warranty period. I could send photos if you’d like to supply your email.
Again, thank you very much for your time and sharing your knowledge.
Glen.
Water! The bane of outdoor electronics. I think you are on the right track. Here are some thoughts:
First, you need to prevent moisture from condensing inside your camera. If you don’t fix this problem, your corrosion problems will be back. See “Water Incursion” section in How (some) trail cameras fail if you haven’t already.
Corrosion of the PIR detector PCB could certainly cause premature battery draining. The PIR detector and associated circuitry this PCB are always powered on. The normal power consumption of the PIR detector and associated amplifier and threshold detector is very low (in the micro Watt range). However, water and the chemicals that form as the result of corrosion are often conducting, and will act as a parasitic resistance between power and ground. Conceivably this could draw 1000 times as much power. Cleaning the board, as you have done, with isopropyl alcohol should fix this this problem, as long as the corrosion isn’t hiding under one of the SMT parts.
The changes in the batter meter you report could be useful information. If the EULs are loaded, possibly by an electro-chemical “short” due to corrosion, their voltage will drop. This is interpreted by the battery meter as a lower capacity. Hopefully your cleaning has fixed this issue. When the EULs are not loaded (or under very, very low load, as with a correctly functioning PIR sensor), the battery voltage will creep over time, which is interpreted as a higher battery capacity by the camera. See Estimating Energizer Ultimate Lithium (LiFeS2) Battery Capacity
A more reliable method to verify the problem and the fix is to put an ammeter in series with power supply to measure the current consumed by an “idle” (un-triggered) camera. In this state, these cameras should consume about 60 microAmps. If the camera is consuming significantly more than this, there is a problem. Putting the meter in series with a power supply is a bit tricky. I use modified barrel connector through the external power supply connector, and a 12 VDC power supply.
Unfortunately, replacing the board is doubly difficult. First, they are Browning-specific, and Browning doesn’t sell them. Second, they are a devil to remove. I’ve made several attempts, but have never been able to get the pads on the through-hole connector to the main PCB hot enough to melt the solder. This especially on the power and ground traces, which act like very effective heat sinks. It’s possible I was being “too gentle”, and I could have dialed up the power on my soldering iron to get them to melt — solder will melt if hot enough 🙂 But I was worried that this much heat could damage either the PIR PCB, or (worse) the main PCB.
Hi Bob, thanks for your informative and quick reply! That’s unfortunate that the seal is sub-par on this one and let the water in. Oh well, I should’ve used it more during the warranty period.
I’ve got the camera back together now, batteries still showing 100% and I set it up in my basement for the time being, just to see if, and how fast the batteries drop. I’ll give it a shot, and if it works, great. If not, it not of much use anymore and I’ll let you know what temp I had to get up to to melt that solder! Ha.
Thanks again!
🙂 Keep us posted.
Hello, love your really informative website. Wondering if you have any suggestions – my BTC-7E has stopped responding to the Mode button – turns on ok and functions to take photos with the last used settings, but can’t get to change any settings or date. Have tried taking batteries out for a while and putting back, and tried a different SD card. Trying to pluck up courage to look at the circuit board to see if anything wrong with it but any suggestions would gratefully received!
Hmmm. Haven’t seen this problem before, but I can well imagine that it could happen in an older camera like the 7E. The keyboard, including the mode button, is on the backside of the main PCB in this camera, and covered by the flexible key assembly. If you haven’t already, check out my teardown video for the 8E-HP5 at https://youtu.be/cvJWzh9BGkA . The 7E has a different camera module, and a different LED PCB, but the rest of the packaging identical. You will need to remove the camera module, the main PCB, and the LED module in order to expose the keypad, which is on the backside of the main PCB. I would look for any physical damage or corrosion around the “mode” button. If you find any, remove it with a Q-tip and some isopropyl alcohol before letting it dry thoroughly. It’s also possible that the “dimpled” metal membrane they use for the key array has become damaged (lost its’ “click”). If this is the case, you may have replace it. Unfortunately, the only source of a replacement I know of would be a “parts” camera in the {7,8}E{HP4, HP5} family. You should be able to test the camera while you have it apart (though you’ll have to plug in the flex cable from the camera module). Good luck, and let us know how you made out.
Hi Bob, finally plucked up courage to take it apart, there was a small lump of something corroded near the mode switch which fell out when I moved the board, the dimpled metal switch still felt like it moved when pressed, but even after cleaning up, the mode switch still did not work. Pleasantly surprised the camera didn’t function any worse than before once i’d put it back together again! Replacing switched is beyond my abilities so will try seeing if anyone wants it on ebay as spares / repairs to try to reduce electronic waste….. Thanks for trying to help…
Glad to hear that you made it into and out of the camera withouth making things worse. Always a victory. But sorry to hear that the mode switch is damaged beyond repair. Hopefully, you find a “home” for it as a parts cam.
Thanks for detailed, informative article.
I have several Moultrie A-series trail cams that continually took pictures with no motion. The Fresnel lens over the PIR sensor had deteriorated and partially disintegrated. Moultrie does not sell this replacement part, but DigiKey (electronics components supplier in MN) sells one that worked: 3929-PIRFRESNELLENS_PF16-12012-WHITE-ND
It is the same height as those installed; center the bad one over it and cut it to width.
This is great information, thanks! The Fresnel lens is probably the weakest mechanical link of most trail cameras. We just had one fail after a year in the desert due to UV damage. The set required us to point it at the sun — not our usual practice. Others have reported failures due to woodpecker damage. They’re relatively easy to replace, if you can find a part. Some manufacturers, like Browning, sell the Fresnel lens separately. The Digikey option may work if the manufacturer does not offer a replacement. As I’m sure you noticed, but for others going down this path — if you do any trimming, make sure to remove material from both sides, to maintain the central lens pattern in the center!
Thanks for the informative post.
I don’t suppose you know the model of the RTC battery for a Strike Force Pro HD (BTC-5HDP). The camera forgets the time even with the battery pack connected. Inside I found that the RTC battery was a little corroded and one terminal was no longer connected to the PCB. It’s reading 0.3V and there appears to be no power coming into the pads where it was soldered so I suspect that it’s non-rechargeable.
Browning have been unable to provide the information
Bummer. The battery in my BTC-5HDP is unmarked. I just verified on my BTC-H5DP that this is a rechargeable “battery”. It’s possible that the built-in charger won’t drive a voltage without a load, which would explain why you don’t see any “open circuit” voltage on your meter. If you have a 1K resistor, you could jumper it across your meter leads, on measure the voltage at the pads again (with battery or external power). If you still don’t get a voltage (working it’s way up to 3.3V) when you have a load installed, there’s something wrong with the charging circuit 🙁
I’m not sure I understand how on of the pins had become “disconnected” — due to corrosion? If so, you may have trouble getting new solder to “stick” to damaged pad 🙁
I believe there are several functionally equivalent replacement parts. Lately, manufacturers have been replacing small electro-chemical batteries for these applications, with small “super-capacitors” in the same form factor, so the super-cap variants are much easier to come by. In general, you are looking for a 3.3V(Volt), 0.2F(Farad) super-cap in a SMT (Surface Mount) package that is 6.8mm diameter * ~1.6 mm (high) with 2mm pad pitch. Specifically, the variant from “DMS3R3224” seems to have pretty good specs and appears readily available in small quantities online e.g. at eBay. Note there are several SMT variants with different style pinouts. To fit on your PCB, you’ll need to get something that looks like the DMS3R3224.
Good luck! If you decide to replace, let us know how you made out.
Many thanks for providing all this information. I observed what seems like a different flash failure than what you describe. I have a Bushnell Trophy Cam Aggressor. The flash unit has partly failed. The flash unit consists of 10 groups of 5 (or 3) LEDs in series with a 1 (or 23.7) ohm resistor. 3 of these groups illuminate well, 2 are weak and flicker and 5 do not illuminate, leading to overall weak illumination in photos. Checking each LED with a multimeter shows most read about 1V, some read nothing and some read 1.2 or 1.5 V. Groups with bad LEDs do not illuminate properly or at all. I considered replacing the bad LEDs but could not find enough information about their current requirements and wavelength output to find replacements. I also considered removing the bad ones and shuffling the working ones to maximize the number of functional groups. But for now it functions well enough at close range that I will leave it.
How many AA batteries does this camera use? And/or what’s the voltage across the parallel groups? (I’m assuming it’s the full battery voltage)
Hi Bob,
Need some help and advice again having just bought a faulty 7E-HP5
When I first powered up the camera the display was messed up, displaying horizontal colour bar lines. I borrowed another HP5 display and now seems to be booting up with the camera showing a image on the display. The only issue is the keypad is not functioning.
The PCB has some corrosion damage, a couple of resistors R112 & R108 have corroded/dissolved near IC U7 labelled ST 866. I cannot seem to find any component existing when searching for ST-866 on the web. Also what component the keypad connects to? I am having trouble following the PCB tracks.
Could the non functional keypad be caused by a corrupt eeprom? (MX25L12835FM21)
There was also some corrosion around the supercap/battery which I have now removed and cleaned the PCB.
Thanks in advance,
Nick.
Sorry to hear about your 7E-HP5. Sounds like it was exposed to some signifiant moisture in its life before you bought it. That’s consistent with a broken display, and the corroded parts. I can’t give you any insight on U7 — I’ve also tried searching for “ST-866” online and had no luck. It’s possible this part is is related to the keyboard. Even so, the most likely cause of the keyboard not working is corrosion within the contacts for the board-integrated metal membrane switches (rather than the controlling IC, whatever that is). Failure of the keyboard is very unlikely related to the EEPROM — if the camera is booting, then the EEPROM is probably ok.
Unfortunately, as you know, on this camera, the buttons are mounted right on the main PCB, and cannot be replaced without replacing the whole PCB (which is most of the camera). You may be able to flush the contacts with some iso-propyl alcohol, applied liberally with a cotton-swap, and then allowed to try thoroughly, to remove corrosion between the contacts. Not sure what to suggest after that.
In the section….
Overview of Failures
The table below gives a summary of failures and fixes discussed in detail in the rest of this post. Follow hyperlinks in the “Name” column to get to each
under
No Photos Taken Despite new batteries, working SD card, correct settings, correct arming, camera takes no photos/videos Unknown Unknown
The actual answer (I would estimate 99.% of the time it) is
someone is using a camera jammer on your camera, and you get “No Photos” literally
1% – 9% is human error (like you hand slid on the button and moved it slightly), forgot to set camera, battery died or too low, field of vision is blocked.
What’s a “camera jammer”?
Hi Bob!
So strangely…in the last few weeks two of my older/well-loved Recon Force Edge/BTC-7Es have stopped recording in color. It’s as if I switched to a “black and white” or grayscale mode. All of the other functions seem normal. One of them exhibited a few “pink day photos,” so I took it apart and did your recommended fix of reflowing the solder on the IR leads. No more pink photos, but still no color. Fortunately, the night photos seem not affected, and in the worst case, I can continue to use the cams as scouting cams and/or areas with a higher risk of theft. But if there’s a possible fix I’d like to try it. Thanks!
I’m glad the “fix” to the IR filter motor worked for you.
The symptoms you’re describing — camera only taking black-and-white images — are consistent with the failure of the light sensor used by the camera to choose either daylight or night-time modes.
This sensor is right next to the “aim test” LED on the case. It’s the one with the blue plastic cover. If you remove the back case, you can see where this two-pin part is soldered onto the small “daughter card” which also holds the PIR sensor.
It’s possible that the light sensor itself has failed. I believe it’s a small cadmium sulphide (CdS) or photo-diode sensor. But it is more likely that this is another cold solder joint. I would start by reflowing the solder around both pads.
If that doesn’t fix the problem, I’d look at replacing the sensor itself. I’ve never done this, and I’m not sure what part it is exactly. Let me know if you get there.
Well, I gave it (resoldering), and unfortunately, that didn’t fix the persistent B&W images. I can’t feel *too* bad though, as this camera has seen heavy use for 4 years, including being buried under a 3′ snow drift for 4 months, eventually melting out (not the best camera placement on my part!). After that I assumed it was a goner, and was thrilled to get another year out of it before this most recent issue. It will still work fine for scouting, risky placements, etc. 🙂
Well, it was worth a shot. Sounds like this camera has been through a lot. I like the idea of using marginal cameras for scouting and in high risk areas. We have a lot of the latter, and it would be liberating to put a camera up with relaxed attitude on theft.
Thanks for checking back in.
There can be a stack-up of issues with filter switchers. The filter switcher’s solenoid requires a higher voltage than anything else in the camera. If the designers didn’t sufficiently boost the 3.6v battery rail to at least 5v then that can contribute to failures. Being too stingy with the duration of the pulse to the switcher to conserve battery capacity can also contribute to failures. The voltage required to activate the solenoid is also heavily dependent on the orientation of the filter. It requires higher voltage when lifting the filter against gravity, much less when the filter is horizontal or down. And when it comes to delivering voltage to the solenoid, bad solder can add resistance and drag the whole process down.
All true! Unfortunately, without documentation, it’s hard to figure out what the specs for the IR Filter switches are *supposed to be*. I also notice that in newer Browning models, the (error prone) hard wired connection from the IR filter motor to the PCB has been replaced with a small PCB-mounted connector, which should all but eliminate the problem of cold solder joints.
Hi Bob!
So I have an issue with one of my Spec Ops HP5s. Daytime videos are overexposed/no color (e.g. https://imgur.com/a/SHTudwI), while night photos are overly dark (e.g. https://imgur.com/a/sI9P1Zx). The day video quality is my main concern; the night videos might just be the Specs Ops; most of my cams are the “Recon Force” 7Es that are much better at night with their low glow rather than no glow IRs…
In any case, do you think this is a stuck IR filter issue or something else? No pink videos, and about 10% of the day videos appear normal…no obvious pattern to when they are normal…just a string of a few normal videos and then back to overexposed/washed out ones.
Colin
I see two things going on in the photos you sent.
Starting with the second, under-exposed flashlit photo of the bobcat. In this case, I believe the exposure algorithm (which operates frame by frame of the video) is confused by the highly reflective tree in the right foreground. That is, in attempting not to saturate this feature, it has to dial down the brightness of the rest of the scene – including the star of the show. Adjusting the set so that there aren’t any reflective features in the foreground will probably fix this problem. I know, easier said than done in many cases 🙂 (I’m not advocating cutting down the tree!)
The first photo – black and white when it should be in color, and generally over-exposed is something different. These cameras take a reading from a small light sensor just to the right of the PIR sensor before starting any video or photo. It’s the blue tinged circle just to the right of the red “aim test LED”. If the light sensor reading is below a threshold value, the camera assumes it’s night time, and takes a b&w image/video, with the flash. If the light sensor reading is above the threshold, it takes a color photo/video. Once the measurement is taken, the mode persists for the duration of a video.
The fact that your camera is sometimes taking b&w images when it should be taking color images indicates an intermittent failure of the light sensor or the path from the light sensor to the processor, or possibly a pathologic lighting condition.
If you are lucky, maybe you’ll find a piece of shmutz, or something else, blocking this sensor. Removing the obstruction should fix the problem.
If that’s not the problem, I would test the light sensor. See my post on the hidden test mode in these cameras
https://winterberrywildlife.ouroneacrefarm.com/2021/08/31/hidden-test-mode-in-browning-trail-cameras/
With the SD card removed, execute the magic 4-finger sequence and navigate your way to the Exposure Test, or CDS sensor test. The reading should reliably range from 0 (dark, with your finger covering the sensor) to 600-800 (bright light). If this reading is flaky, or intermittent, it points to a failure of the sensor, or possibly a bad solder joint one of the two sensor pins.
I’m betting that the sensor tests fine, in which case it could be that occasional pathologic conditions at this set are just confusing the sensor. For example, it looks like the camera itself is in relatively deep shade, even as the distant foreground is in sunlight. This could cause the simple light sensor to misjudge the lighting conditions. If this is the case, you may want load my custom firmware onto our camera. See:
https://winterberrywildlife.ouroneacrefarm.com/2023/07/04/new-features-for-browning-recon-force-and-specops-cameras/
https://github.com/robertzak133/unified-btc-reverse
Navigate to the new “NIGHT THRESHOLD” menu and select “LOW LIGHT” (instead of “STANDARD”). This will change the threshold value between night and day captures, causing the camera to take color images under lower light conditions.
Hope this helps.
Hi Bob,
Well, I think you’re two for two on diagnosing my issues. I repaint most of my Brownings since the original paint tends to quickly fade, and I can also conceal them a bit better in public land settings. I was not careful enough to remove some of that paint from the area of the light sensor; thoroughly doing that solved the problem immediately.
And while testing this, it also seems clear that you’re right on the money with that small tree reflecting light back to the camera and causing my issues. I wondered about that a bit as I reviewed some of the recent videos, but I didn’t stop to think that it would impact the camera in that way (beyond just physically blocking some IR).
Thank you so much for fast and thorough diagnosis…you’re a true asset to trail camera enthusiasts like myself!
Woo, hoo! Glad you were able to fix these issues so (relatively) easily!
Hello!
I have a Spypoint force pro that started to drain fresh batteries in a matter of a few days. Are there a few things I could look at and try with the camera? I know you mostly work with brownings but maybe the internals are somewhat similar. I cleaned the internal battery a bit and that seemed to extend the life of the batteries by a week or so but it still drains them really fast.
You’re right – I’ve never even seen a SpyPoint camera in person. But that won’t stop me 🙂
I’ve found there are three general classes of “fast battery drain”:
1. Camera is consuming too much power when “asleep” (between triggers)
2. Camera is consuming too much power while taking videos or photos (during triggers)
3. Camera is turning on, without a trigger, consuming power, and not recording videos
You can test for the first two cases with an ammeter by measuring the current consumed while the camera is idle and active/video states. For Browing cameras, the idle current is about 60 microAmps. While taking a daylight video, about 120 milliAmps, and while taking night video (with flash) about 470 mA.
The Spypoint camera should be similar. You should definitely make these measurements if you have a digital multimeter. See youtube videos on measuring current if you need to. The meter needs to be in series with the batteries. Also, start with the highest current option to make sure you don’t blow any fuses in the meter if the current is higher than expected.
If these tests pass, and I bet they will, you’re in the realm of case (3): the camera coming on when it shouldn’t. The biggest trick for this type of failure is getting the camera to fail reproducibly while you’re watching it. You may be able to catch the camera in the act by monitoring it with an ammeter while trying different triggering or setting scenarios.
If you have a recording multimeter, you may be able to catch the camera in the act by recording measurements made every 5 seconds or so over the course of a day.
But these failures can be quite subtle, as I discovered in a recent debug and repair of a Browning HP5 model. In this case, I only succeeded in finding and fixing the problem only because I could use tools and knowledge I developed over many months while reverse engineering the firmware in these cameras. I would not have been able to make a similar repair on a camera from a different vendor where I lacked this background.
Sadly, even the folks at SpyPoint probably don’t have this expertise, having outsourced the platform design, firmware, and production to a contract house which tends to keep the technical details to themselves.
I fear i’m not being very helpful :/ Please let us know if you take any current measurements and maybe we can make some progress from there.
Hi Bob, my browning patriot from 2020 worked perfectly, but now it does only make totally black videos at night, it seems to react to movement, daytime video is still fine, I see on the inside that the little battery is a bite corroded, the rest seams fine. Can you help? Great info on your site!
Greetings Ad Kliphuis, Netherlands
This camera has a “dual sensor” – i.e. one for daylight, and one for night time captures. This doubles the possible failure modes.
It could be *either* a faulty night-time image sensor, or a faulty IR Flash LED panel. You should be able to tell which.
First, try triggering the camera in the daylight, while holding your finger over the light sensor, which is between the camera lenses and the PIR lens on this camera. This will trick the camera into thinking that it’s dark, and will cause it to use the night time sensor. During daylight, there should be plenty of light for this sensor. If you get a black and white video or photo, then the sensor is working fine. If it’s still black, then the sensor is somehow not working.
As well, take this camera into dark room with your phone camera, and take a video with your phone of the IR Flash array during a video trigger. You should see a purplish glow on the camera preview when the LEDs come on. You may be able to see these with your eyes, as well, but the camera on the phone will show the IR light more clearly. If you get a purple glow during a video trigger, then the LEDs are working. If not, then there’s something wrong with the LED driver.
Let us know what you find, can we can proceed from there.
My Browning Recon Force camera has been gaining time over the course of a day or more. Usually it is over an hour. The camera is connected to an external battery that has been charged. I doesn’t appear that any other settings are changed.
That’s annoying. The real time clock in these cameras resides in an ultra-low power microcontroller that gets power all the time. The clock rate is determined by a (fixed) internal frequency reference. It sounds like the internal frequency reference in your camera is running too fast. Which leads to some follow-on questions: has this camera always had this problem? Is the gain in time continuous and linear? (i.e. suppose it gains 5 minutes per hour; does it gain 10 minutes in 2-hours; 60 minutes per day?) Having asked these questions, I’m not sure I can offer a solution. If the camera is still under warranty, I’d try that. Otherwise, I think you’re stuck with a too-fast clock 🙁