DIY: Trail Camera Lens Hacking
Most commercial trail cameras have a fixed lens, often with a relatively narrow field of view. Factory lenses sometimes fail, and sometimes it would be nice to have a different field of view (narrower, or wider). In this post, I reverse engineer the lens mount for several Browning trail camera models. These include the Advantage (BTC-7/8A), Edge, Elite HP4 (BTC-{7,8}E-HP4, and the newly released Elite HP5 (BTC-{7/8}E-HP5). Based on this information, I provide references for a compatible lenses, along with photos contrasting fields of view for each. I also provide a detailed guide to the lens replacement itself.
Due to some very tight space constraints, I was only able to find one compatible lens for the Advantage, Edge, and Elite-HP4 cameras. The focal length of this lens is very close to the original lens and can be used to fix “loss of focus” issues described in How (some) Trail Cameras Fail. There are more options for the newer Elite HP5 cameras.
These modifications are not difficult, but as with most camera hacks, may void the warranty on your trail camera.
Typical Trail Camera Lens System
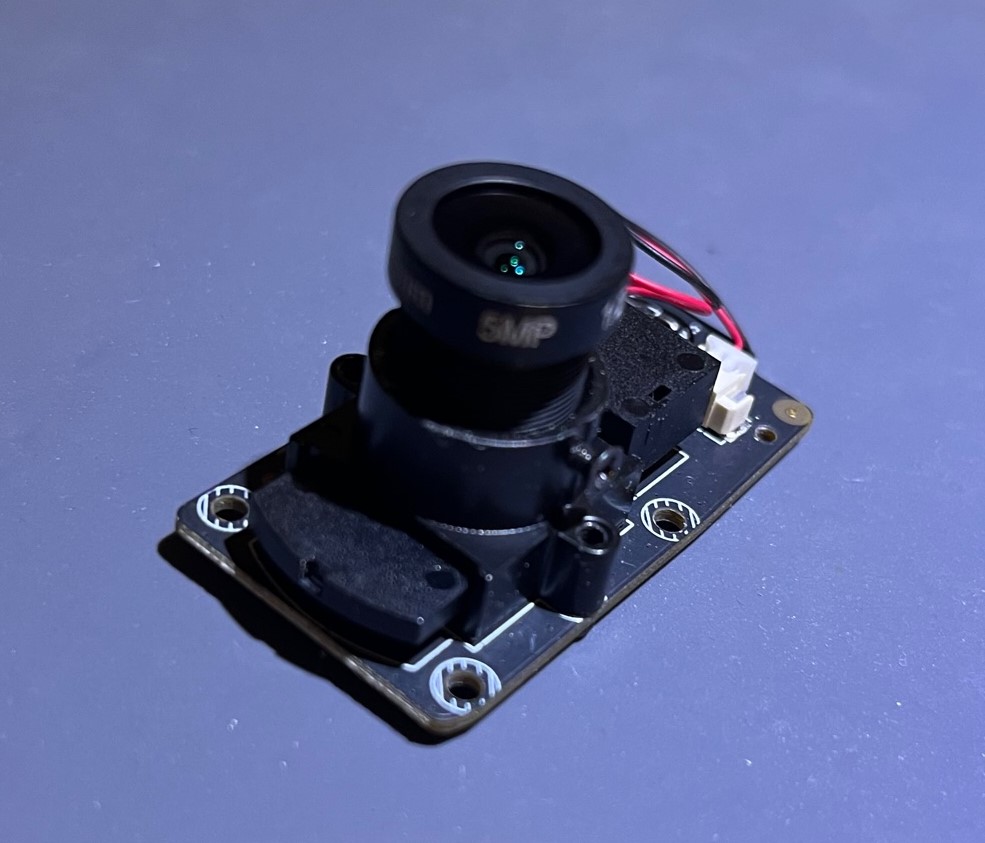
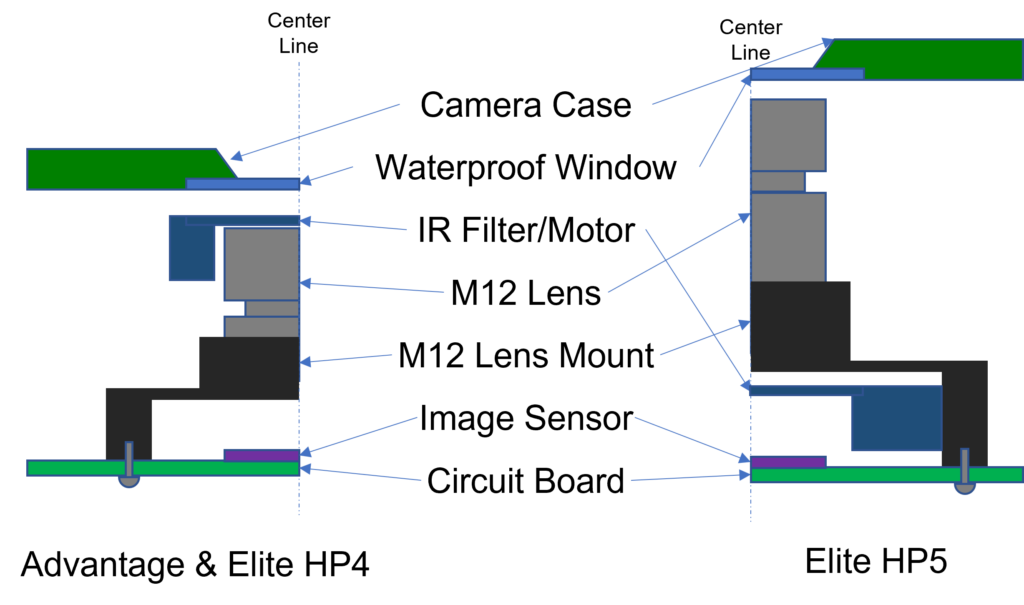
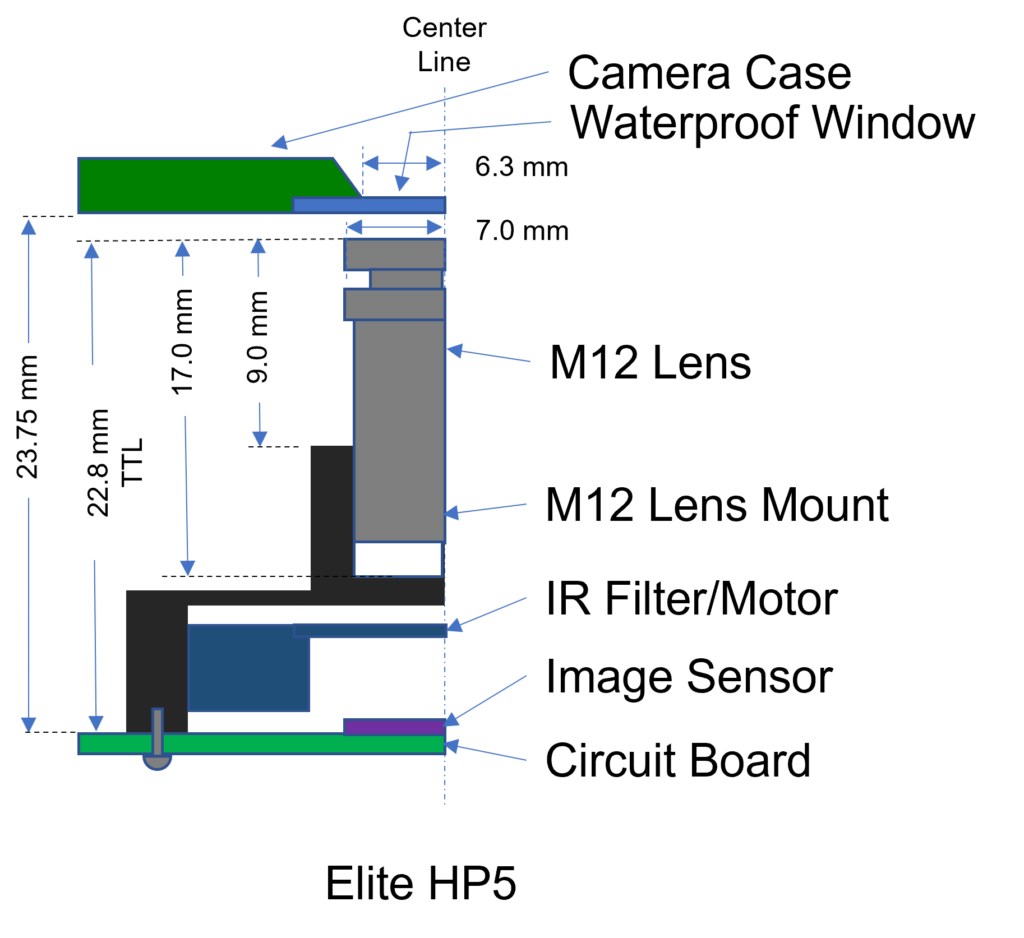
In most trail cameras, the image sensor is soldered directly to a Printed Circuit Board (PCB). A board lens mount attaches over the sensor and is held to the circuit board by two screws. The lens mount on most cameras is Type S with M12 threads. In principle it will hold any S-type, M12 thread lens. The optical path for most trail cameras includes an IR filter and motor assembly. In the Advantage, Edge, and HP4, the IR filter motor sits on the end of the lens. In the Elite HP5, the IR filter is part of the lens mount, and sits between the sensor and the lens.
The diagram below shows a cross section of the lens assembly for Advantage, Edge, and Elite HP4 and the Elite HP5 (BTC-{7,8}{A,E}-HP5).
Camera-Specific Critical Dimensions
There are critical physical specs for Browning several Browning Cameras. If you don’t get these right, the lens will not fit mechanically in the camera. Other cameras have similar structure, but will likely vary in exact dimensions.
Lenses have a a property called Total Track Length (TTL). This is not to be confused with “Through The Lens” — another photography TTL acronym. Cameras like the Browning Advantage series use a “compact” lens with a smaller TTL. The newer Elite-HP5 allows for longer lenses, and longer TTL, which are more readily available.
Browning Advantage, Edge, and Elite HP4 Critical Dimensions
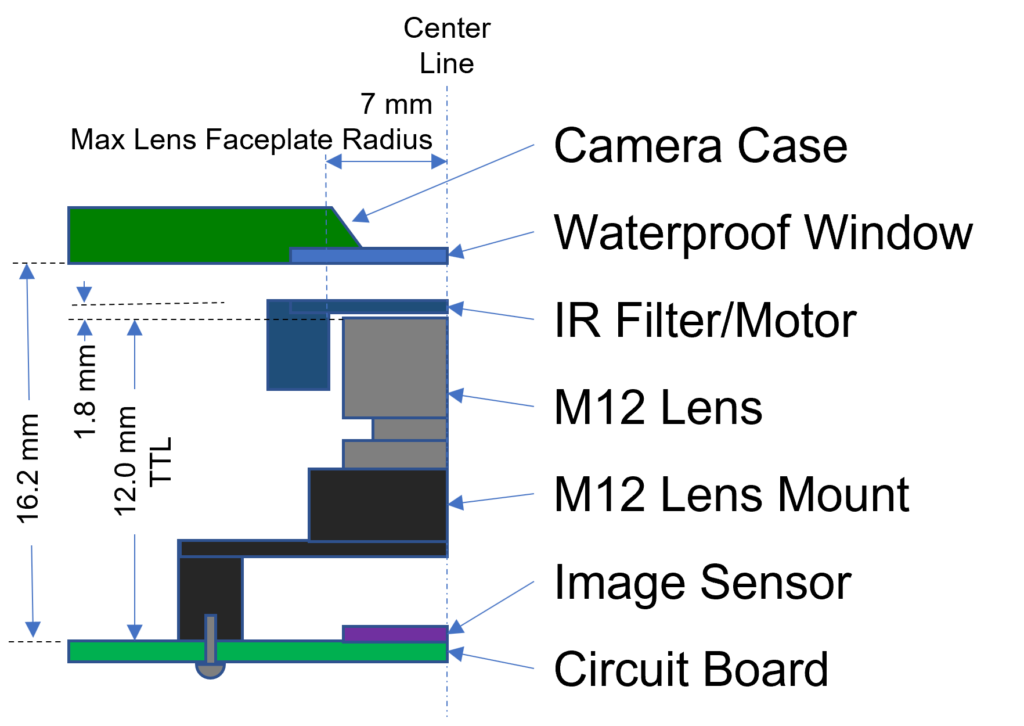
The diagram below shows the critical dimensions for the Advantage, Edge, and Elite-HP4 cameras.
Browning Elite HP5 Critical Dimensions
The Elite HP5 series cameras use a much longer lens. Critical dimensions below. Note that if you use a much shorter lens, the radius of the transparent waterproof window will limit the maximum field of view, by blocking light around the edges (vignetting).
S-Type M12 Mount
In principle, the S-Type M12 lens mounts are standard, and can be used with any standard M12 lens. I found that the replacement M12 lenses I ordered would not fit on the factory lens mount. The diameter and thread density are the same, but the way the threads are cut is apparently different. Forcing a new lens into this fixture is a bad idea. It requires too much torque, and is likely to shed tiny plastic shards onto the image sensor. Instead, I recommend installing a new board mount with each new lens. This also allows you to keep the old (glued-together) factory board mount and lens assembly.
Lens Faceplate Diameter
In Advantage and Edge-series cameras, the IR filter and motor assembly must fit over the end of the lens. Thus, the lens faceplate diameter must be less than the inner diameter of the IR filter and motor assembly (14.0 mm).
Other Trail Camera Lens Specifications
Sensor Format
The Advantage series (BTC-{7,8}A), and Elite series BTC-{7,8}E{HP4,HP5} all use a Sony IMX291 1/2.8″ sensor. This is an uncommon size, but is very similar to the more common 1/2.7″ format sensor. Lenses designed to support sensor formats in the range of 1/2.5 to 1/3 will work.
Sensor Resolution
Usually measured in “megapixels”. The quality of the lens doesn’t have to be any better than the resolution of the sensor, but it should not be any worse. These cameras all use a 2.1 MPixel sensor, so should have a lens spec’ed for at least 2 MPixels. The Elite HP5 cameras (BTC-{7,8}-E-HP5 also uses a 2.1 MPixel camera, but most newer lenses fit this camera are spec’ed for at least 5 MPixels.
The whole optical path needs to support the sensor resolution, thus higher resolution sensors require higher resolution IR filters. If you are replacing the IR filter/motor assembly, make sure the resolution spec is at least as high as the camera image sensor.
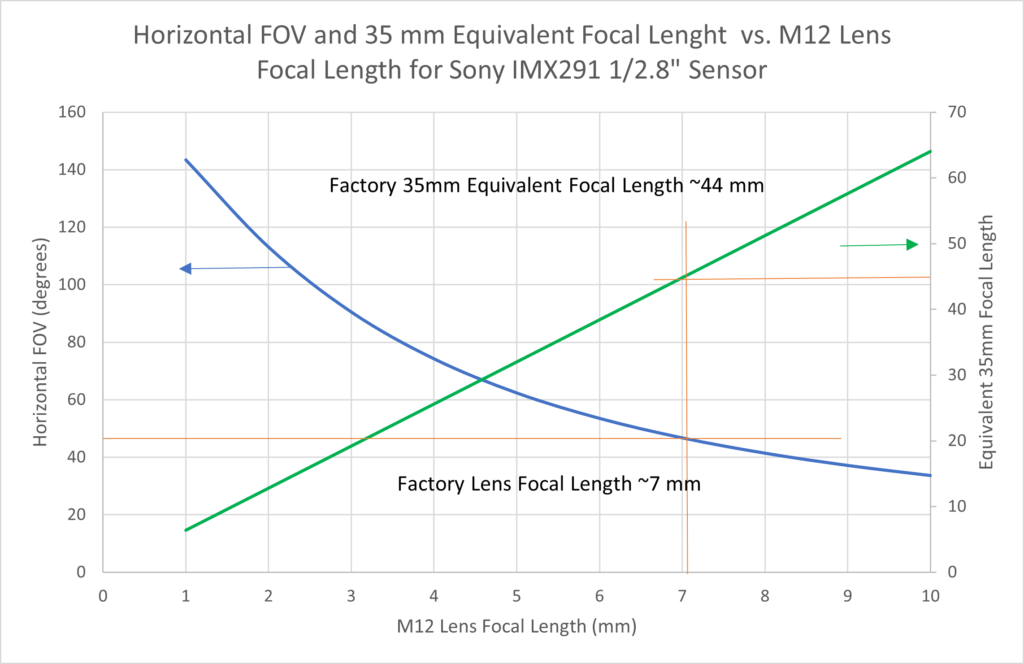
Effective Focal Length
The focal length determines the field of view the lens “sees,” or, equivalently, the amount of “zoom”. As with other cameras, smaller focal length means larger field of view and versa. The graph below shows the horizontal field of view and equivalent focal length for a 35 mm (DSLR camera) vs. M12 lens focal length. According to TrailCamPro, the BTC-7A has a relatively narrow horizontal field of view (43 degrees), corresponding to an focal length of ~7mm. This, in turn, is comparable to 44 mm lens for a typical 35mm/DSLR camera.
Many consumer-available M12 lenses are targeted at wide angle applications, with many lens options in the range of ~2 mm. The external lens shroud may limit the view for a wide angle lens. I found, for example, that a 2.1 mm focal length lens results in severely vignetted photos on the Advantage (BTC-7A).
Aperture Size (measured in F/stop)
Larger apertures (lower f-stop value) allow more light in. This allows the camera to get higher quality images in low light conditions. I have found that most lenses in this class have an aperture near F 2.0
Distortion
A number, in percent, which reflects how much the image is warped when it is projected onto the sensor image plane. Wider angle lenses often have more “barrel” distortion as the lens maps a spherical view onto a rectangular image. By convention, this is listed as a negative percent, vs. “pin-cushion” distortion, which as a positive sign. In general, for trail camera applications we seek low distortion lenses ( < 2%). Lens distortion can be corrected using some video and photo editing software packages.
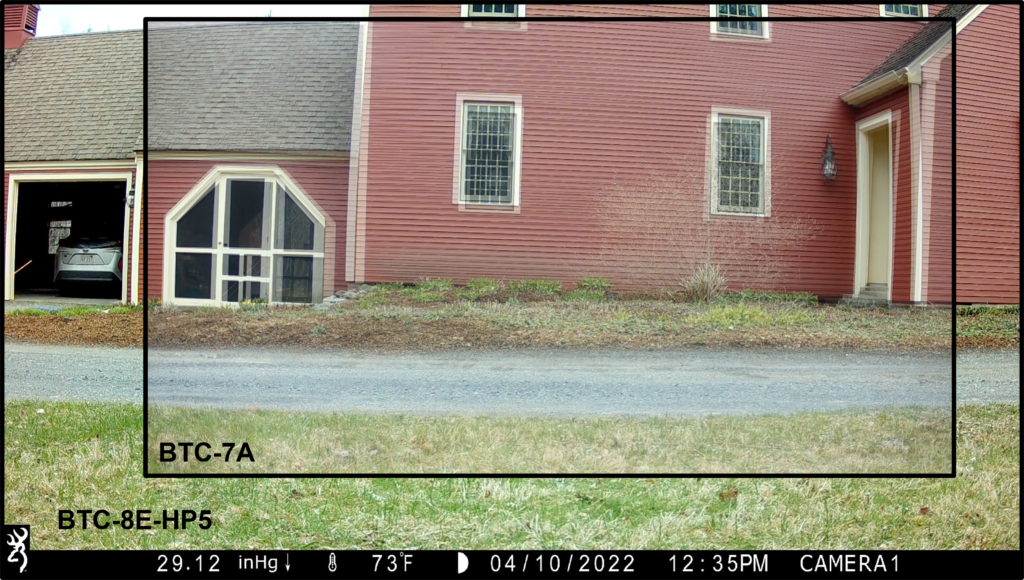
The factory lens on the Advantage series cameras have fairly low distortion (and a narrower field of view). The Elite-HP5 cameras, in contrast, show a wider field of view with noticeable “barrel” distortion. See comparison of photos from these two camera types, below
IR Filter
Many lenses available online come with a built-in IR filter. This is undesired for trail cameras which a separate motor-operated IR filter. assembly. If the trail camera lens as an IR filter motor, a replacement lens should not have an IR filter.
Trail Camera Lens Replacements
Taking all of the items above into account, here are examples of readily available lens replacements for recent Browning trail camera models.
Caveats
Opening up a trail camera, and especially fiddling around with the optical path, as I describe in this post, will almost certainly void the warranty on your camera. If you get stuck, please let me know in the comments below, and I will do my best to help. But I cannot offer any guarantees that these lens replacements will work for you.
I have tested each of the lenses listed in the tables below for fit and focus. They are each apparently of high quality (perhaps higher than the OEM lens), with glass optics and metal housing. If you are tempted to extend these lists, consider that a lens with focal length less than 4.0 mm (wider angle) will result in vignetting around the (narrower field) window in the camera. Also note the importance of the lens length (independent of TTL). I found several lenses which were too long for the IR filter mount. A lens that is too long cannot be focused.
Finally, I found that when substituting a wider angle lens (e.g. 4 mm vs. factory 6 mm on HP5), night time shots are dark around the edges. This is because lenses on the LED flashes are tailored for the narrower field of view of the factory image sensor lens. Unfortunatley, I have not found narrower lenses for the HP5 IR LEDs. Note that new LEDs (and lenses) are not required for the Advantage, Edge, and HP4 cameras, because the only replacement lens I could find has the same focal length and field of view as the factory original.
Browning Advantage, Edge, and Elite HP4 Series Replacement Lens
These cameras include model numbers BTC-7A, BTC-8A, BTC-7E, BTC-8E, BTC-7E-HP4 and BTC-8E-HP4.
Despite my extensive online search, I was only able to find one generally available lens which satisfies the mechanical constraints of the Browning Advantage, Edge, and Elite-HP4 series camera, which I reference in the table below. I have also included a link for the lens mount, which I recommend replacing with any new lenses. The threads of the new lens did not work with the factory lens mount. If you find more, please let me know in comments sections.
| Part Number | EFL (mm) | Aperture |
| Commonlands CLA017 Low Profile 18mm M12 Mount | — | — |
| CIL872 | 7.2 | F/2.8 |
Note that lens has about the same field of view as the factory lens for this camera, which I estimate to have a focal length about 7 mm. It seems to by high quality, with glass optics and a metal housing. I am hoping that it doesn’t suffer loss of focus over time that we’ve seen with the stock lenses in some of our Browning Advantage and Edge series cameras.
Browning Elite-HP5 Series (BTC-7E-HP5 and BTC-8E-HP5) Replacement Lens
As I noted in Browning Spec Ops Elite HP5 Teardown post, the HP5 series cameras allow for a longer lens. As a result, I was able to find several lenses which work with this camera. I also give a compatible, 5 MP IR filter motor assembly. I suggest removing the whole factory IR filter motor assembly and lens, and replacing them with paired IR filter motor assemblies and new lenses. This allows you to keep the factory lens in its mount, set to the proper focal distance, in case you want to reuse it later.
Update 2024-12094: I’d like to thank Jeff for pointing out that the previous link tot he IR Cut filter for the HP5 was broken. I have updated the table below to point to include a part available on Amazon. It looks like a metal part, but is a little pricy. There are other versions of this part available. Use name below as search item. Note some are plastic, and some are metal. In either case, make sure to get one with a “hole spacing” of 20 mm.
| Part Number | LED Lens | Focal Length (mm) | Aperture |
| 5.0 Megapixel M12 IR Cut Filter w/ 20mm hole spacing | — | — | — |
| PT-0418-MP | 4.0 | f/1.8 | |
| CIL060 (without IR Filter option) | — (same as factory) | 6.0 | f/2.8 |
| #58-204 | 10.0 | f/2.5 |
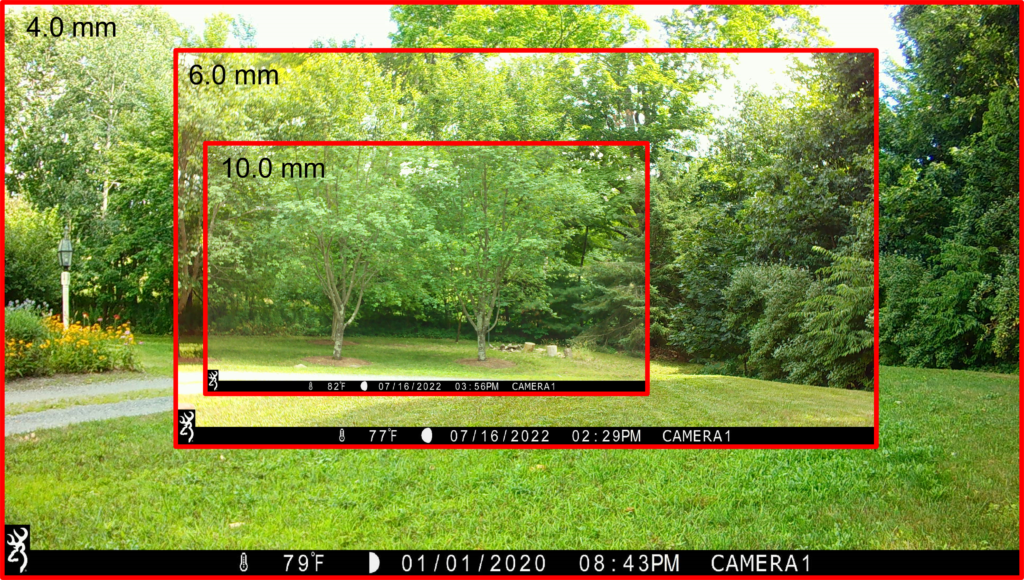
The lens options above give an interesting range. The 6.0 mm lens is very similar to the factory lens, but with much lower distortion. The 4.0 mm lens gives a wider angle view at low distortion (similar to a 25 mm lens on a DSLR). The 10.0 mm lens (~65 mm DSLR equivalent) is the “telephoto” in the group, allowing close up views of animals if the camera must be mounted a distance away.
Because case for the IR filter motor and lens mount specified above is metal, it uses an M2 6mm machine screw to attach to PCB (vs. coarse thread M2 screws used for the factory-supplied plastic IR filter motor and lens mount). It also has holes for an M2 4mm set screw to hold the lens in place. I found both of these screw sizes (and more) in an assortment box, such as the MEIYYJ 500pcs M2 M2.5 M3 Laptop Notebook Computer Replacement Screws Kit.
Replacing Trail Camera Lens
This section features step-by-step video showing lens replacement and focus adjustment for Browning Advantage, Edge, Elite HP4, and Elite HP5 cameras.
Replacing Lens on Advantage, and Edge Cameras
I’ve created a video showing lens replacement on a Browning Recon Force Extreme (BTC-7FHD-PX). The steps will be almost identical for the Browning Advantage series. See some of my other teardown videos for other models.
Setting Focus for Advantage, Edge, and Elite HP4 Cameras
When installing the lens, seat it deeply in the PCB lens mount by turning it several times. The front of the lens should be about 17 mm from the top of the PCB.
Before putting the camera back together, hold it such that you can point the image sensor at a target greater than 30 cm distant. Temporarily reinstall batteries and an SD card and turn the camera “on”. With the camera in “preview” mode, adjust the focus by turning the lens in the board mount back and forth. Find the point of maximum focus by going between “blurry” because target is too close; and “blurry” because target is too far.
This should produce a crisp image on the preview screen. Now you can turn the camera off, remove the batteries and SD card, and place a small dollop of glue on the threads to hold the lens in place.
I found the focus adjustment to be rather forgiving, and did not find it necessary to test focus with an external (higher resolution) monitor.
Replacing the Image and LED Lenses in the Elite HP4 and HP5 Series
Below is a video showing lens replacement in the Elite-HP5 series camera. The Elite-HP4 is similarly constructed, but uses a different camera module that uses the same lens mount and short-form lenses as the earlier models. Because the camera module is not on the main circuit board (with its connection the IR Flash, microphone, batteries, and display), it’s a lot easier to replace the lens on these cameras.
For night shots, it is desirable to have the angle of the light cone from the LEDs match the field of view of the image lens. This maximizes the amount of light on the visible scene, while preventing dark (unilluminated) areas around the peripheral of the image. Thus, in the tables below, I give a set of matching board-mount lenses for the LEDs, as well as instruction on replacing.
Note that the IR cut filter listed above that I purchased has a few improvements vs. the factory part. The housing is made of metal (vs. plastic), and has a hole for an M2 4mm set screw to hold the lens in place (vs. dab of glue). I recommend using a set screw. In doing so, make sure to put it in the hole on the side of the lens mount facing the top of the camera, as shown in photo below.
Replacing LED Lenses
There are 5 LEDs on the HP5, and 4 on the HP4. Each LED has a small plastic lens that fits over the LED and clips into the back of the circuit board. The first step is to remove the LED board. This, in turn, requires removing both the camera module (done during image lens replacement), as well as removing the main PCB. See video above for example.
Once the board is out, the factory lenses pop right out, and the new lenses pop back in over each LED. With new lenses installed, the LED PCB goes back in, followed by the main PCB and camera module.
Setting Focus for Elite HP5 Cameras
When installing the lens, seat it deeply in the IR motor assembly by turning it several times. The front of the lense should be about 23 mm from the top of PCB. Don’t tighten the set screw, yet.
Before putting the camera back together, hold it such that you can point the image sensor at a target greater than 30 cm distant. Temporarily reinstall the batteries and an SD card an turn the camera “on.” With the camera in “preview” mode, adjust the focus by turning the lens in the housing. Find the point of maximum focus by going between “blurry” because target is too close; and “blurry” because target is too far.
This should produced a crisp image on the LCD screen. Now you can turn the camera off, remove the batteries and SD card, and tighten the set screw that holds the lens in place
Conclusion
This post describes options for trail camera lens replacement in recent Browning models. Because of the tight space constraints, I was only able to find one lens for the Advantage, Edge, and Elite-HP4 series. This lens very similar to the original factory lens, and can be used to repair the “loss of focus” problem which sometimes develops with these cameras. There are more lens options available for the newer Elite-HP5 camera models. Here I was able to find a range of lenses with wider and narrower fields of view, as well as one with same field of view but much less distortion than factory lens.
If you use this post as a guide to replace the lens on one of your trail cameras, please let me know how you made out in comments below.
References
Edmund Optics Application Note on Distortion: A great description of lens distortion and measurement.
Dang. You are amazing!
Well, I don’t know about that. But I do have a number of curious interests. Hope this investigation is helpful for the trail camera hard core.
Thank You for the article. I’m interested in getting a lens with a larger aperture. I have cameras set in the forest of SE Alaska and the Elete HP 5 is switching to infrared during the day due to low light. How much help do you think the CIL 061 with a 1.9 would help.
Thank You Gary Holt
That’s frustrating!
According to the EXIF information on photos from my HP5, the factory lens is f/2.4 — so f/1.9 would be an improvement in terms of light gathering for the image sensor. Unfortunately, the lens and image sensor are not used in this camera to determine whether it takes a day or night photo 🙁 Instead, the camera decides night vs. day based on an independent reading of a Cadmium Sulfide (CDS) light sensor mounted to the right of the “aim LED” on the faceplate. Certainly you will want to make sure that the window in front of this sensor is clean and unobstructed.
If the CDS sensor value is above some threshold, it takes a daytime photo; else it fires up the IR flash for a night time photo. I’m pretty sure the threshold is 25 — below 25, it takes a night photo/video; above 25 a day photo/video. Why am I telling you this?
It turns out that the camera stores the value of the CDS sensor in the “EXIF” data associated with jpg files. I used Microsoft Photos to open an HP5 JPG file; then I right clicked on the photo to get a menu, and selected “File Info”. In addition to date and time, size, and device info, this also gives a somewhat cryptic string of the form:
P00[334:339]TT[87311]E[107:0681]G[076:0x17]BV[55:0]IR[L:F:80]MOE[0:3]AL:[0:0]
The CDS value is right up in to front, e.g. P00[{CDS_VALUE}:…. E.g. From the string above, the CDS value is 334. Take a look at some of your photos you want to be color/daylight to see what the CDS value was. Is it close to 25?
You can also access the CDS sensor reading directly by putting the camera into “test mode” (See: Hidden Test Mode in Browning Trail Cameras and choose the “Exposure Test”. This will display on the screen the CDS sensor value. This might help you understand how the camera sees the lighting level for potential sites.
Thank you so much for explaining this, it has had me baffled as to why the camera was switching to IR Mode. I’m using this camera for strictly video and can’t find any data on the video file with the CDS value. I don’t suppose there is a way to lower the value of the CDS sensor. A under exposed video is much preferred to the IR video. The camera is switching to IR mode 3 hours before sunset on some days probably due to cloud cover. That is the preferred time the bears like to fish. So I guess there isn’t much value in a larger aperture with out being able to adjust the CDS sensor settings.
Well, now that you mention it, having done the hacks described in Adding Features to Browning Elite HP5 Firmware and New Optional Features for Browning HP5 Trail Cameras, dialing down the threshold for IR cutover wouldn’t be too hard. I was hoping that your data might give me an idea of how far to knock it down, but I can guess. I think the way to do this would be to add a new menu page for “Lens Aperture” which defaults to the factory “F/2.4” (and corresponds to the current CDS threshold); but which has an “F/1.9” option with a lower threshold. I will add this to my list. It may take me a while, as I need to fix my tools to allow me to add more stuff (I’ve run out of room with my current techniques in the HP5). I also have a few other features in the queue. In any case, when it’s done, you can test it out with the factory lens and see if you want to go through the trouble of actually replacing the lens. It would definitely be very cool to get fishing bears in color! When do you need to set your cameras out for this event?
I put the camera out about mid July. The highest activity is about the 1st of August. The card from last summer had 564 videos and about half were from bears in 6 weeks. That would make a good combination with a larger aperture and being dial back the CDS threshold. Thank you for taking an interest in this project
Great. It’s on my list. I will post an update when I have it working
If you follow the blog, you may have noted an updated firmware drop that allows you to control the “Day Threshold” — that is the CDS value at which the camera switches from daytime (no flash) to nighttime (flash). In the new menu, “Standard” (the default) is the factory setting; “Low Light” will take color images at lower light, but still take black-and-white images (with flash) if there is even less light. The “No Light” option will always take color images (no matter how little light). This could lead to some dark images, but could be the right setting for your project. Apologies that this took so long — we decided to move in the middle of this project and I was a little distracted. Let me know if you try these new settings out. For pointer to firmware, see: New Features for Browning Recon Force and SpecOps Cameras
Interesting blog. I’ve have one HP-5 and think I’ll change it over to a glass lens.
Cool. Let us know how it works out.
What do you believe the issue is with the Type S mount? Odd that if it were built to a standard it would not attach directly. And because of costs I would not think Browning would spend the money to deviate from a standard just to try to prevent someone from easily changing hardware.
I was surprised by this was well. From all appearances, the S-mount in the cameras *is* “standard.” Standard lens diameter, standard thread pitch, and standard placement of mounting screws. What I found though, was that the new, also “standard” S-mount lens I bought wouldn’t actually screw in 🙁 It was not the thread pitch, but there was something different in the way the threads were cut that meant it just wouldn’t go. I suspect that Browning’s supplier made the lens and the lens mount, and only sells the combination. So they didn’t do any testing with other lenses (why would they?). “Standards” are only as good as the degree of actual interoperability required, I guess.
Just completed one of each of these modifications. Replaced the HP-5 with the 6mm. Easy modification in both cases. Home tests appear to be successful, now to get them into the field for a long term test.
I was hoping this article was how to mount on the exterior of the camera, HP4 and/or HP5 and which mount/lenses to buy. Darn.
Sorry to disappoint you :/ Maybe in a future post. In the meantime, if you are interested in closeup shots, it’s relatively easy to double sticky tape a lens from a pair of reading glasses to the case in front of the lens. We’ve used this method to get some nice garden critter closeups.
Hi Bob,
Just the kind of Trailcam blog I was hoping to find. Thank You!
I’ve been experimenting with a 30.5-37mm stepup ring on my trusty 7A along with a set of 37mm close up lenses
and I am very pleased with the results. The four close-up lenses include a +1, +2, +4 and a +10. I use the +2 for most close-ups of small rodents or birds. I’ve glued the glass-less step up ring over the lens of the 7A. The closeup lenses screw into the step up ring. If I want to use this camera without this modification I just unscrew the closeup lenses.
I will list the items I purchased (under $20) from Amazon. if you are interested. Also I have video samples and a photo of the camera with the rings attached. Let me know where I can send these to you. The video images are stunning. I wondered being only about 22″ from my subjects if the ir flash would just blowout the image, but to my surprise, the exposures are perfect.
Glad you found us!
Yours sounds like a great system, and similar to the replaceable lens system on the “Bushnell Natureview HD Liveview”, that, alas, has been discontinued. Fortunately, the Advantage (and cameras since) have a dynamic auto-exposure system which allows them to modulate the flash intensity and “shutter speed” to allow for great closeups.
There are a ton of interesting camera trapping opportunities at small scale. If you haven’t seen it yet, don’t miss Janet’s howling mouse:Grasshopper Mouse Howling: Trail Cam Audio/Video
Please do post your parts list!
I thought I made a post reply but I don’t see it. I think I might have screwed up the links-sorry!
Anyway, two items from Amazon are a 30.5 to 37mm step up ring and a set of 4 close up magnifying
lenses>
Here are links to the aforementioned:
https://www.amazon.com/ProOptic-Step-Up-Adapter-30-5mm-Filter/dp/B0002E3WJA
https://www.amazon.com/Vivitar-Close-Up-Macro-Filter-Pouch/dp/B004E5A4RQ
I glued the step up ring to my Browning 7A careful to center it as best as i could.
The closeup lenses screw into the step up ring. I use the #2 close up lends for small animals like mice and rats.
Links are great —thank you! Sorry, just hadn’t gotten to approving you comment.
I’m just wondering, how much of a difference in image quality is it between the stock HP5 lens and the 6mm replacement? I’m just trying to figure out if it is worth replacing the lens on an HP5 that I’m primarily going to be using as a modified macro camera. Is there a video of sample footage with a custom lens?
Your blog is a huge resource for trail camera modifications, thanks for putting all of this together.
Beyond eliminating the distortion present in the original HP5 lens, is there any increase in quality of the image gained by replacing the lens with the aftermarket 6mm one? Just trying to get an idea of what to expect before purchasing the parts and doing the replacement. Thanks for putting these articles together, they are really helpful.
If you’re ok with the distortion in the factory lens (as we we have become over time), and you don’t intend on changing the focal length, I wouldn’t recommend swapping the lens in the HP5. I can’t tell any difference in image quality between the factory lens and the replacement I reference in this post. Of course, if your factory lens starts getting blurry (which we haven’t noticed on the HP5’s yet), then changing the lens would fix that.
Perfect, thank you. That will definitely save me some time.
Some months ago I realised the quality of the images from my Browning BTC-7E had been gradually deteriorating, looking decidely fuzzy at all distances. Looking inside at the lens I could see there was a focus adjustment but couldn’t see how it could have changed with two large blobs of glue holding it in place. However your article enlightened me and gave me confidence to change the lens itself. As I am in the UK I found one on ebay uk (https://www.ebay.co.uk/itm/234740080686?var=534498150804). When I ordered it I asked for mounting screws at 18mm spacing which I got but the mount was not large enough to fit over the sensor. You may be able to request a different size. Luckily the lens thread was compatible with the old mount. Thanks for all the research and detailed information.
Glad to hear this worked out for you! I too was stymied for a while by the apparent impossibility of a fixed optics lens spontaneously developing an astigmatism — but that’s definitely what happens! Thanks for the pointer to UK lens source. Buying little plastic pieces online is always risky, so I am also relieved that the factory lens mount worked for you.
Hello Andrew, I have the no-glow Spec-Ops Elite HP5 and IR videos have been oddly fuzzy from new (compared to the Patriots which are also no-glow). Daytime videos are very sharp, and I suspect that they fuzzy IR videos are a consequence of the lens – sensor distance being optimised for daylight. Since I need sharp IR videos more than sharp daytime ones I was thinking of re-focussing the lens, do you thnk that the two blobs of glue would come loose ? Thanks.
Thanks Bob for all your effort. Of all the blog posts and videos, this is the one I’m most interested in. Do you have any sample videos with these new lenses with the HP5 camera? I would love to see the raw video straight from the camera.
One of my favorite posts, too!
I guess I should have posted some raw video at the time. Unfortunately, subsequent to the post, I’ve reconfigured some of the test cameras.
Of the three lenses I tested for the HP5’s in this post, I still have one with the 4mm lens. This offers a somewhat wider angle view than the factory ~6mm lens. I’ll post a video from this camera, but it may be a week or so. Of the two other lens options I cover in this post — the 6mm lens, and the narrower field of view 10 mm lens — is there one you’d like to see first?
A sample video of the 4mm would be of most interest personally. I believe that I would appreciate a wider field of view with the HP5. With many people retrofitting an eyeglass lens to the the from of the camera for macro video shots, could a similar effect be achieved if using a “wide angle lens” attachment to the front of the camera? There are commercially available wide-angle lenses designed for a cell phone camera lens.
I’ll see what I can do about some 4mm video. I haven’t heard of anyone using a wider angle lens place in front of the factory lens, but it should work if you can get the alignment right. Let us know if you decide to give it a try.
Thanks for commenting.
Alas, the “link” to Dan Potter’s metal (not plastic) IR cut filter featured in the video (5.0 Megapixel M12 IR Cut Filter) is no longer active/working. As mentioned in the blog, there are options for plastic IR cut filters (I have not tried any of these). The link to the 4mm f/1.8 lens (without IR) does still work.
Oops. I fixed the link and updated the text. I found the metal version (it looks like metal in the photo 🙂 ) available on Amazon. That’s the good news. The bad news is that it’s listed at $25. There are less expensive version available using the search term “5.0 Megapixel M12 IR Cut Filter 20mm hole spacing”.
Thanks for finding the broken link, and for commenting. Let us know if you decide to give this mod a try.
Bob,
I don’t have a question about the new lens you mounted in the HP5, because in itself I am not dissatisfied with the image quality the factory lens provides. What I would like to know is whether the metal IR filter motor you used is quieter than the original plastic version mounted by Browning. Because wolves are spooked far too often by this camera.
Greetings from Holland
Unfortunately, no. I’ve found that the IR filter motors in the post-Advantage Browning RF and SpecOps — metal or plastic — are somewhat louder. I’m guessing because these are rigidly held in place by screws which mount them to a “resonating” PCB. The IR filter motor in the Advantage is stuck on the the end of the lens with (somewhat compliant) double sticky tape.
Our local wolves are also very wary of cameras — an adaptive behavior we can encourage, even while lamenting the difficulty of getting them on our cameras.
You could try one of the “dual sensor” camera models, which don’t require an IR filter motor. E.g. Browning Dark Ops DCL Nano (BTC-6DCLN) Review and Teardown. We don’t like the image quality on this camera quite as much as the RF/SO, but it’s quiet!
I had suspected that. Unfortunately, the Patriot, the double-lens model, is out of production and sold out. The Nano is a big step down in terms of image quality. Hopefully, there will be a full-fledged successor to the Patriot soon….
Maybe I will experiment if I can disassemble an old lens unit and then connect it using double-sided tape or a thin bed of silicone sealant, instead of tightly screwed together. Although I doubt such a thin soft break will make much difference in the harsh sound of the IR filter
Bummer. BTW — the whole architecture of the IR filter on the post Advantage cams is different. It now goes between the sensor and the lens, which means it *needs to be* held tightly in place to preserve the optics.
I just double checked the packaging of the HP5, and there’s not a lot of room inside the camera to do much.
3M makes a tape coated with viscoelastic material which is made specifically for sound damping. There seem to be several variants, but the 2552 “model” looks like it might work, and is available in small amounts. I would cover the non-optical case of the camera with strips of this tape to see if it helps. I haven’t done this myself, but if you do, let us know how it works. See: 3M Damping Tape
Thanks, Bob,
I have been looking at the 3M Damping tape. Unfortunately, it is only available in long lengths and very expensive (in Holland). There is very little space indeed between the back of the lens unit and the camera housing. In addition, I think a decent effect would only be expected if the damping is directly between the lens unit and the PCB. I believe that only there would you be able to reduce noise generation somewhat effectively. I expect that the whole “operation” will yield little, and I therefore refrain for the time being from modifying a camera
All reasonable concerns. Good luck with whatever you end up trying.
So interesting Bob, Thanks!!!!!!
I think I will try on one my hp5If I understand well I just have to buy:
5.0 Megapixel M12 IR Cut Filter w/ 20mm hole spacing
PT-0418-MP
& to follow your tutorial to have larger fov, great!
Even if hp5 is already large fov, I’m exciting to try it!!!
Nicolas
Yeap, that should work. Let us know how you make out.
I will order all that this week but on different internet sites as I’m in France.
I will let you know the results!
Do you have idea or lenses proposal to increase hp4 fov?
Best,
Nicolas
Unfortunately, I was not able to find any other lenses that fit inside the tighter space in the HP4 and earlier variants. One of the reasons I included dimensioned drawings in the post was to allow others to look. I found the task to be tedious, as the lens vendors I found often had poorly designed web sites, making it tricky to find the necessary mechanical and optical specifications. This was over a year ago, so maybe things are better now?
Nicholas, If you are successful with lens mod to the HP5 and have the time to post a video with a comparison (before and after the modification), I would be most interested. A wider field of view would be great for wildlife videography of smaller subjects and allow for a more intimate observation of animal behavior. I have fox pups in the spring. A wider field of view would allow for recording the interaction of siblings and improve the audio.
Hi Bob,
I know you’ve taken the lenses out of Browning Trail Cams as shown above.
Is there a protective glass lens in front of the lens itself?
I scratched one of my BTC 7E HP5’s on the outside of the glass protector
(if there is one). I don’t think Browning has this part so I was thinking of
using some glass polish and buffing out the scratches.
Daylight clips seem unaffected, but the IR clips are terrible. Out of
focus and unusable.
Yes, there is a glass cover over the lens itself. I think it’s primary job is to keep water out. Because of this, it’s glued to the case, and cannot be (easily) removed without damaging something. I’ve never used glass polish, but since it sounds like night images are basically ruined, I suppose it can’t make things worse. If you can “buff it out”, let us know, as I’m sure someone else will run into this problem eventually.
Thank you Bob, I’ll give it a try and let you know.